
-

-

-

- Austria (27)
- General (16)
- HowTo (122)
- IT Security (129)
- Linux (128)
- Networking (65)
- Other (4)
-

- CDemu - a free, gpl cd/dvd-rom device emulator for linux
- heatpumpMonitor - Monitoring a Stiebel Eltron LWZ
- ignis backup tool - the heat-strengthened backup tool
-

- May 2026 (1)
- December 2021 (2)
- September 2019 (1)
- May 2019 (1)
- April 2019 (1)
- January 2019 (1)
- October 2018 (1)
- August 2018 (1)
- February 2018 (1)
- September 2017 (1)
- August 2017 (2)
- May 2017 (1)
- April 2017 (1)
- February 2017 (1)
- January 2017 (2)
- December 2016 (1)
- November 2016 (2)
- October 2016 (1)
- September 2016 (1)
- August 2016 (1)
- July 2016 (2)
- April 2016 (1)
- March 2016 (3)
- February 2016 (4)
- January 2016 (2)
- December 2015 (2)
- November 2015 (2)
- September 2015 (2)
- July 2015 (5)
- June 2015 (4)
- May 2015 (2)
- February 2015 (1)
- January 2015 (4)
- December 2014 (1)
- November 2014 (5)
- October 2014 (4)
- September 2014 (1)
- August 2014 (4)
- July 2014 (3)
- June 2014 (5)
- May 2014 (5)
- April 2014 (1)
- March 2014 (2)
- February 2014 (3)
- January 2014 (5)
- December 2013 (2)
- November 2013 (3)
- September 2013 (3)
- August 2013 (2)
- May 2013 (4)
- April 2013 (1)
- March 2013 (1)
- February 2013 (3)
- December 2012 (3)
- November 2012 (3)
- October 2012 (1)
- September 2012 (2)
- June 2012 (1)
- May 2012 (1)
- April 2012 (1)
- March 2012 (1)
- February 2012 (1)
- January 2012 (1)
- December 2011 (4)
- November 2011 (1)
- August 2011 (1)
- March 2011 (1)
- October 2010 (1)
- May 2010 (3)
- January 2010 (1)
- September 2009 (1)
- August 2009 (5)
- July 2009 (5)
- June 2009 (4)
- May 2009 (1)
- April 2009 (1)
- January 2009 (1)
- December 2008 (6)
- November 2008 (6)
- October 2008 (2)
- September 2008 (11)
- August 2008 (4)
- July 2008 (7)
- June 2008 (2)
- May 2008 (7)
- April 2008 (5)
- March 2008 (9)
- February 2008 (15)
- January 2008 (11)
- December 2007 (3)
Check if your mailserver is encrypting SMTP to/from other mail servers
August 10, 2014
For readers with their own mail server (or if you want to check what your provider is doing) – verify that your mail server accepts encrypted communication and that PFS is enabled. Just click on this link and enter the domain name to test. Some big players goof there …. It should at least look like in the screen shot. DANE would be cool, but that’s not that easy at this point as you need a working DNSsec DNS server, which not all registrars provide. Sure you can host your own authoritative DNS servers but that is work …
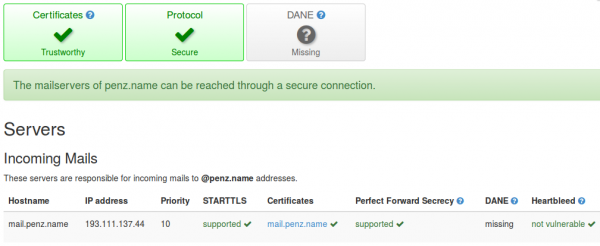
ps: send also a mail to [email protected] to check if sending mails is also encrypted. It should look like this:

Slow DNS resolving with Linux systems against Windows DNS server
August 1, 2014
In the last days I encountered a problem with the DNS resolution by our Linux systems – must be there for a long time but it took a deep look into a different performance problem to get this one figured out. I did a simple wget to a HTTP site in the same data center and it took sometimes 5 seconds to get DNS name resolved to an IP address. As a network guy I launched tcpdump at once and did see following packets:
10:59:19.264987 IP LinuxClient.51463 > WindowsDnsServer.domain: 57223+ A? xxxx.penz.name. (35)

10:59:19.265056 IP LinuxClient.51463 > WindowsDnsServer.domain: 26702+ AAAA? xxxx.penz.name. (35)

10:59:19.265700 IP WindowsDnsServer.domain > LinuxClient.51463: 26702* 0/1/0 (103)
10:59:24.269981 IP LinuxClient.51463 > WindowsDnsServer.domain: 57223+ A? xxxx.penz.name. (35)

10:59:24.270303 IP WindowsDnsServer.domain > LinuxClient.51463: 57223* 1/0/0 A 10.10.xxx.xxx (51)

10:59:24.270370 IP LinuxClient.51463 > WindowsDnsServer.domain: 26702+ AAAA? xxxx.penz.name. (35)

10:59:24.270557 IP WindowsDnsServer.domain > LinuxClient.51463: 26702* 0/1/0 (103)
As you see the first A query gets not answered but the AAAA does. I changed to an other DNS server (first Windows 2008 R2 and the second Windows 2012 R2) but with the same results. I did tests with RHEL6/Centos6 and Ubuntu 14.04 .. no difference. As a next step I talked with the Windows guys to look at the Windows 2012 R2 DNS server. They did a packet capture and saw that the Windows server did not send that packet, but a DNS Debug log showed that the DNS server it self did answer it. I than called wget with the “–inet4-only” option, which made sure that only a A query was sent and I was not able to reproduce the problem. So it must be something with the second packet.
Getting a tip from a fellow network admin who said I should look at the source port of the packets I did so. The UDP source ports of the A and AAAA were the same and it looked like that the Linux system gets an answer if the A query is answered before the AAAA arrives on the Windows Server. The next step was to look for a way to change that behavior on the Linux side, which looked to me easier than to change something on the Windows site. 😉
Following resolv.conf option looked promising:
single-request-reopen (since glibc 2.9)
The resolver uses the same socket for the A and AAAA requests. Some hardware mistakenly sends back only one reply. When that happens the client system will sit and wait for the second reply. Turning this option on changes this behavior so
that if two requests from the same port are not handled correctly it will close the socket and open a new one before sending the second request.
And yes – that was the solution. On every system I added
options single-request-reopen
to the /etc/resolv.conf the problem went away. For systems which generate the resolv.conf automatically (like Ubuntu 14.04), which you can check by
ll /etc/resolv.conf

lrwxrwxrwx 1 root root 29 Mai 26 12:35 /etc/resolv.conf -> ../run/resolvconf/resolv.conf
you should add the line to /etc/resolvconf/resolv.conf.d/base instead and call sudo resolvconf -u afterwards.
All together this problem took me many hours to find and I didn’t find anything on the net .. so I thought a post may help other poor admins. 😉
Access Mikrotik Router OS via SSH Public Key authentication
July 12, 2014
Sometimes you need to execute various commands on a Mikrotik automatically from a Server. Surely it is possible to store the password in the script, but there is a better way – it is called Public Key authentication for SSH. Basically a pair of files is generated and the public one is copied to the Mikrotik and the private key stays on the PC. If you encrypt this key on the PC (which is useful if not a script does use it but a person) you get a 2-factor authentication. An attacker needs that private file and the password to decrypt it to administer the router. There are two types supported by SSH RSA and DSA. RSA is more commonly used but Mikrotik does only support DSA so we need to create a DSA key pair.
The first step is to generate the key pair as the user on the Linux system which is than used to access it. If it is a script it maybe a separate user just for this purpose is a good idea.
$ ssh-keygen -t dsa

Generating public/private dsa key pair.

Enter file in which to save the key (/home/<user>/.ssh/id_dsa):

Enter passphrase (empty for no passphrase):

Enter same passphrase again:

Your identification has been saved in id_dsa.

Your public key has been saved in id_dsa.pub.

The key fingerprint is:

.....
If you just press enter on the file question, the default one will be used. If you want to use some separate directory that’s fine, you just need to provide the location later at the ssh call. If you press just enter for the passphrase the private key will not be encrypted. Now we copy the public key (.pub extension) to the Mikrotik:
scp /home/<user>/.ssh/id_dsa.pub [email protected]:
And after that we need to import the key. If we choose the user admin, which we use our self to login, no password login will be possible anymore for that user. So if you don’t like that you should create a special user for the script. As my script needs only to read stuff I’m okay with the group “read” and create a user like this:
/user add name=scriptUser group=read comment="user for our readonly scripts" disabled=no
Now we import that public key to the scriptUser with following command:
/user ssh-keys import public-key-file=id_dsa.pub user=scriptUser
We’re done .. just testing is open …. if you used not the default directory to store the key files you need to provide them via the -i parameter, if its the default location you don’t need to provide it. This command logs into the router and gets you some basic data without entering a password.
$ ssh -i <pathTo/id_dsa> scriptUser@xxx.xxx.xxx.xxx “/system resource print”
You should also try to login as this user without the key file (e.g. from an other computer) and it should not be possible.
Howto convert Outlook .msg files to normal MIME mails
June 29, 2014
Just got a Microsoft Outlook .msg file and I needed to convert it to something I could read on the console. Its quite simple to convert it to a normal MIME mail .. here for Ubuntu 14.04 but it should be as simple on other distributions:
sudo apt-get install libemail-outlook-message-perl libemail-localdelivery-perl

wget http://www.matijs.net/software/msgconv/msgconvert.pl

perl msgconvert.pl filename.msg
the result file name is filename.msg.mime.
Howto install and use the Burp Suite as HTTPS Proxy on Ubuntu 14.04
June 26, 2014
This article shows you how to intercept and analyze HTTPS traffic. This of course only works if you can add your CA to the client system or the client system does not check the key chain. But you would not believe how many clients, specially embedded devices and mobiles apps don’t check it. The software I use in this post is the Free version of the Burp Suite – from the homepage of the Burp Suite:
Burp Suite is an integrated platform for performing security testing of web applications. Its various tools work seamlessly together to support the entire testing process, from initial mapping and analysis of an application’s attack surface, through to finding and exploiting security vulnerabilities.
Installation
As it is written in Java it is really easy to install and run. Just these 3 commands
sudo apt-get install openjdk-7-jre

wget http://portswigger.net/burp/burpsuite_free_v1.6.jar

sudo java -jar -Xmx2g burpsuite_free_v1.6.jar
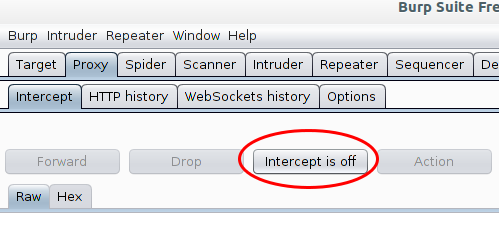
I use sudo for the Java process as it needs in my cases to listen on ports lower than 1024 and this requires root permissions. After entering the last command and accepting the EULA you get following window:

Now go to the Proxy | Intercept tab and click onto “Intercept is on” button to disabled it. Otherwise you’ll need to acknowledge every request.
The proxy is already running but only on localhost, we need it to listen on all to look at traffic from other devices.
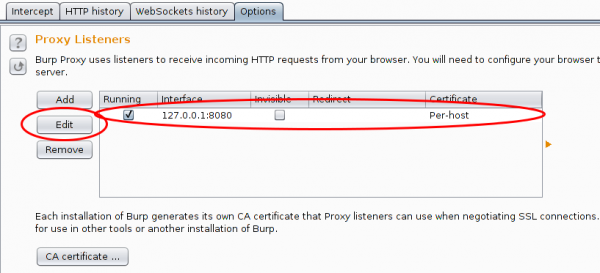
And in this case I want to see the traffic to a specific host from my mobile, so I set Burp to port 443 and to invisible mode and define a redirect IP address (the original host IP address).

After this, you only need to set on my local DNS Server the wished host name to my desktop IP address and the traffic runs over it and if the client accepts the faked certificate you can look at the traffic. Which looks e.g. like this:
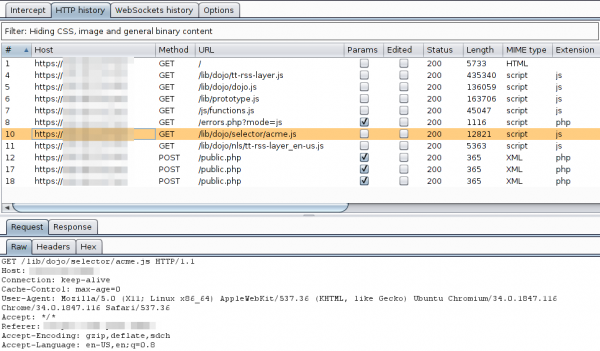
For other devices or requirements it is also possible to use Burp as a HTTP Proxy, just configured it on the client. ARP spoofing is also an idea…..
Howto fix -bash: ./trafr: No such file or directory?
June 1, 2014
Trafr is a program from Mikrotik which receives mirrored traffic from Mikrotik RouterOS systems. The linked blog article shows how to use it with Wireshark. This blog article shows how to get it working if you have following problem:
root@nids:/usr/local/bin# ll

total 12

drwxr-xr-x 2 root root 4096 Jun 1 13:59 ./

drwxr-xr-x 10 root root 4096 Jun 1 12:09 ../

-rw-r--r-- 1 root root 2629 Jun 1 13:53 trafr.tgz

root@nids:/usr/local/bin# tar xzf trafr.tgz

root@nids:/usr/local/bin# ll

total 20

drwxr-xr-x 2 root root 4096 Jun 1 13:59 ./

drwxr-xr-x 10 root root 4096 Jun 1 12:09 ../

-rwxr-xr-x 1 1003 root 4764 Mär 17 2004 trafr*

-rw-r--r-- 1 root root 2629 Jun 1 13:53 trafr.tgz

root@nids:/usr/local/bin# ./trafr

-bash: ./trafr: No such file or directory
The problem is that the trafr program is a 32 bit application and you’re trying this on a 64bit OS without 32bit compatibility libraries. To verify that you can use following command:
file ./trafr

./trafr: ELF 32-bit LSB executable, Intel 80386, version 1 (SYSV), dynamically linked (uses shared libs), for GNU/Linux 2.2.0, stripped
On Ubuntu 14.04 you can that simple by doing following:
sudo dpkg --add-architecture i386

sudo apt-get update

sudo apt-get install libc6:i386
and you get
sudo ./trafr

usage: trafr <file | -s> [ip_addr]

 -s write output to stdout. pipe it into tcpdump for example:

 ./trafr -s | /usr/sbin/tcpdump -r -

 ip_addr use to filter one source router by ip address
For older Ubuntu Version following helps (didn’t check at which version it changed):
apt-get install ia32-libs
For other distribution its similar. e.g. for CentOS6 or RHEL6 its
sudo yum install glibc.i686
How to configure SNMPv3 securely in CentOS/RHEL/SL
May 4, 2014
Looking through the Internet I found more often than not insecure SNMP setups explained in Howtos, maybe the authors where happy to got running in the first place – don’t know. The Simple Network Management Protocol (SNMP) is used to monitor (and configure in the case of network equipment) systems via the network in a standardized way. There are 3 versions of it in the wild:
Version 1
The first version, it is really old and only uses community strings to “protect” access. If you look with Wireshark what the packet for the request contains you’ll see following:
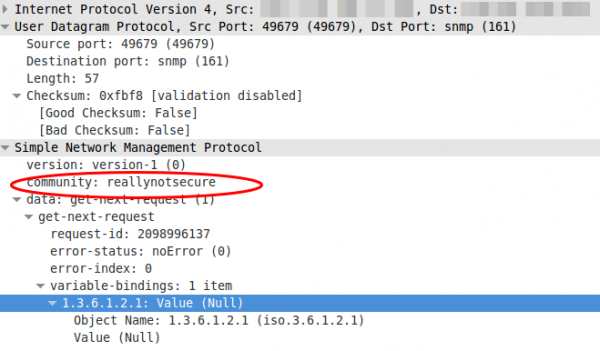
Yes, thats the community in clear text …. so don’t use it, if you must not. If you must (old devices which supports only this) use it on a secure network and make sure that the device only accepts quests from a given source IP address.
Version 2c
Not better in any security related way. The e.g. traffic counters are just bigger, as on fast interfaces it was possible with v1 that the counter rotated more than ones within the interval you queried so you didn’t know how many bytes really got transfered over the link.
Version 3
Now we’re talking. This versions supports authentication passwords, that get not transfered in the clear and it also supports encryption passwords so a attacker does not see what is transfered. I’ll show you now how you configure your CentOS/RHEL/SL to let it be queried via SNMPv3 in a secure way.
- We need to install the package we need:
yum install net-snmp - We create our user. SHA1 is used for the authentication and AES for the encryption of the traffic. And for security it is important to use two separated passwords.
service snmpd stop

net-snmp-create-v3-user -ro -A snmpv3authPass -a SHA -X snmpv3encPass -x AES snmpv3user

service snmpd start
This will print something like this
adding the following line to /var/lib/net-snmp/snmpd.conf:

createUser snmpv3user SHA "snmpv3authPass" AES snmpv3encPass

adding the following line to /etc/snmp/snmpd.conf:

rouser snmpv3user - Secure the SNMP daemon with a host firewall and only allow requests from source IP addresses you know and which need to query the system.
- Verify that everything works with following command:
snmpwalk -u snmpv3user -A snmpv3authPass -a SHA -X snmpv3encPass -x AES -l authPriv 127.0.0.1 -v3
So as you see it is quite easy, so there is now reason to use anything less secure!
If you want to delete the user, just edit the two files mentioned above. In /etc/snmp/snmpd.conf delete the line rouser snmpv3user and in /var/lib/net-snmp/snmpd.conf look for a line like this and remove it:
usmUser 1 3 0x80001f88801e15113fbf17bf5100000000 0x736e6d7076337573657200 0x736e6d7076337573657200 NULL .1.3.6.1.6.3.10.1.1.3 0xaaa3bc2aa941d932a581bbb11956699a7d807238 .1.3.6.1.6.3.10.1.2.4 0xcd6eed84f9d1aa903e92162f0e3fcb26 ""
restart the daemon with service snmpd restart and the user is gone.
Ubuntu 14.04 apt-get update –> Reading package lists… Error!
May 3, 2014
Today I just wanted to make an apt-get update but I got following:
Reading package lists... Error!

W: Encountered status field in a non-version description

W: Encountered status field in a non-version description

W: Encountered status field in a non-version description

E: Encountered a section with no Package: header

E: Problem with MergeList /var/lib/dpkg/status

E: The package lists or status file could not be parsed or opened.
And Synaptic and update manager would not start .. I just checked to make sure as I don’t use them normally. Anyway the solution is really simple. If you take a look into the above mentioned directory you see 2 status files:
$ ll /var/lib/dpkg/status*

-rw-r--r-- 1 root root 2752482 Mai  1 09:27 /var/lib/dpkg/status

-rw-r--r-- 1 root root 2753380 Mai  1 09:27 /var/lib/dpkg/status-old
I just did following:
$ sudo mv /var/lib/dpkg/status /var/lib/dpkg/status-new

$ sudo mv /var/lib/dpkg/status-old /var/lib/dpkg/status
And it worked again. Hope this helps others.
I get only a A- on Qualys SSL Labs tests – Why? and what can I do?
April 19, 2014
In the last months more and more sysadmins started looking into their SSL configuration of their HTTPS websites. And one of the major sites that is used to rate/check the quality of the SSL configuration on a given HTTPS server is the Qualys SSL Labs SSL Server Test which can be reached via this link. If a sysadmin gets a not so good rating he search through the Internet and uses something like this settings (Apache 2.2 on Centos 6) to fix it:
SSLEngine on

SSLProtocol All -SSLv2 -SSLv3

Header add Strict-Transport-Security "max-age=15768000"

SSLCipherSuite ECDHE-RSA-AES256-GCM-SHA384:ECDHE-RSA-AES128-GCM-SHA256:DHE-RSA-AES256-GCM-SHA384:DHE-RSA-AES128-GCM-SHA256:ECDHE-RSA-AES256-SHA384:ECDHE-RSA-AES128-SHA256:ECDHE-RSA-AES256-SHA:ECDHE-RSA-AES128-SHA:DHE-RSA-AES256-SHA256:DHE-RSA-AES128-SHA256:DHE-RSA-AES256-SHA:DHE-RSA-AES128-SHA:ECDHE-RSA-DES-CBC3-SHA:EDH-RSA-DES-CBC3-SHA:AES256-GCM-SHA384:AES128-GCM-SHA256:AES256-SHA256:AES128-SHA256:AES256-SHA:AES128-SHA:DES-CBC3-SHA:HIGH:!aNULL:!eNULL:!EXPORT:!CAMELLIA:!DES:!MD5:!PSK:!RC4

SSLHonorCipherOrder On
This leads at the time of writing (Quality SSL Labs changes the rating from time to time to following) to:
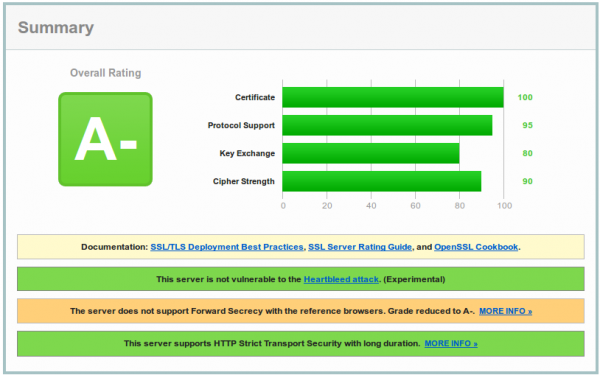
And now you are wondering why you get only a A- and what the problem with your configuration is. To make your journey shorter, the problem is most likely not the SSL configuration, it is the software you’re running. As you see on the screenshot the test reports that Forward Secrecy is not supported by all browsers and if you take a look at the details,

you’ll see that the problem is the Internet Explorer and that Forward Secrecy works for all other browsers.
(Perfect) Forward Secrecy
But what is (Perfect) Forward Secrecy in the first plage and why should you care. PFS ensures the integrity of a session key in the event that the private key of the server gets compromised. This is done by generating a separate session key for every new HTTPS session/connection.
Why should you care?
An attacker could record the SSL traffic for some time and later he got the private key and now without PFS he would be able to extract all the SSL traffic he was not able to look into before. Basically without PFS if a private key gets compromised you not only need to look the now and the future but also a the past and consider everything that was encrypted/signed by this key as compromised. With PFS you’re sure that an attacker is not able to extract data from before he got the private key. With the Heartbleed Bug in OpenSSL such an attack was possible or by hacking the server.
The cipher suites (the ones you choose with SSLCipherSuite in the Apache configuration) that provide Perfect Forward Secrecy are those that use an ephemeral form of the Diffie-Hellman key exchange. The disadvantage of them is that they have a performance overhead, but the security is worth it and it is not that much overhead. With some elliptic curve variants the performance would be better.
A- and the workarounds
And how to the problem with the A- rating – I’ll quote Shadow Zhang who described it nicely in his post:
With Apache 2.2.x you have only DHE suites to work with, but they are not enough. Internet Explorer (in all versions) does not support the required DHE suites to achieve Forward Secrecy. (Unless youre using DSA keys, but no one does; that’s a long story.) Apache does not support configurable DH parameters in any version, but there are patches you could use if you can install from source. Even if openssl can provide ECDHE the apache 2.2 in debian stable does not support this mechanism. You need apache 2.4 to fully support forward secrecy.
Patching and compiling Apache is not the best idea, as you need to do it again for every security update. I see following options:
- Use a distribution version which supports Apache 2.4
- If you’re using RHEL 6.5 take a look at the Red Hat Software Collections 1.1 currently in beta, which provides Apache 2.4 – don’t know about CentOS at this point.
- Upgrade your Ubuntu to 14.04 which provides Apache 2.4
- Use Nginx as reverse proxy in front of the Apache because it fully supports ECDHE.
- Change to a web server that is shipped with your distribution and that does support ECDHE.
I hope this post helped and saved you some time looking through the internet for a solution.
Configure a Synology NAS as OpenVPN client with certificate authentication (and make it stable)
March 8, 2014
Normally I use standard Linux distributions as NAS systems, but in this case it had to be a real NAS (size and price was more important than performance) and it was not at my place –> so I chose a Synology DS214se. But I still needed to setup a certificate based OpenVPN where the NAS was the client and it needed to stay connected all the time. First I though that must be easily done in the GUI as OpenVPN is easy for stuff like this … but I was wrong. First it is not possible to configure a certificate based authentication for OpenVPN in the Synology GUI and secondly if the connection got disconnected it stayed that way. But with some magic it was easily fixed:
Configure Certificate based authentication
First go to the VPN window in Control Panel and configure what is possible via the GUI. e.g. the CA certificate or the server IP address or DNS name. Use anything as username/password:
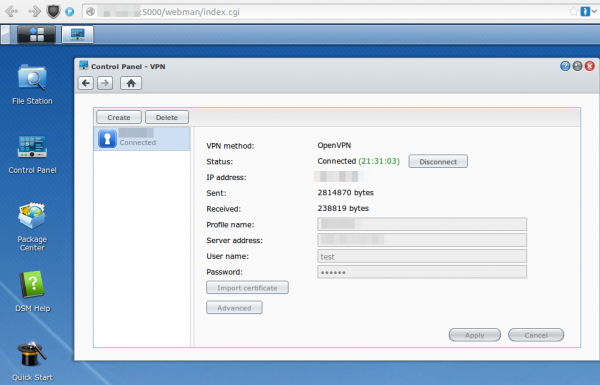
After that save it .. but don’t connect as it won’t work. You need to log in via ssh (use username root and the admin user password) and change some files and upload some new.
cd /usr/syno/etc/synovpnclient/openvpn

ll
will give you something like this
drwxr-xr-x    3 root     root          4096 Feb 23 20:21 .

drwxr-xr-x    7 root     root          4096 Mar  7 21:15 ..

-rwxr-xr-x    1 root     root          1147 Feb 22 18:10 ca_234324321146.crt

-rw-r--r--    1 root     root           524 Mar  2 09:24 client_234324321146

-rw-------    1 root     root           425 Feb 22 18:10 ovpn_234324321146.conf
the file without extension is the configuration for OpenVPN, which gets created from the GUI. The GUI config is stored in the .conf file. So if we change the OpenVPN configuration file it gets overwritten if we change the GUI config, but we won’t do that anymore ;-). Now we create a sub directory and upload our client (=NAS) certificate files. The long and hopefully good documentation on creating the certificates and how to configure OpenVPN on a standard distribution can be found here.
mkdir keys

cat > keys/my_ds.crt    (paste the certificate content and press CRTL-D in an empty line)

cat > keys/my_ds.key  (paste the private key content and press CRTL-D in an empty line)

chmod 600 keys/my_ds.key
Now we change the file without extension so that it contains at leased following lines (other stuff is also required but depends on your setup)
ca ca_234324321146.crt

cert keys/my_ds.crt

key keys/my_ds.key

keepalive 10 120

tls-client
I recommend to make a copy of the file after very change so if someone changes something in the GUI you don’t need to start from the beginning.
cat client_234324321146 client_234324321146.backup
For simple testing start OpenVPN like this (stop it with CTRL-C):
/usr/sbin/openvpn --daemon --cd /usr/syno/etc/synovpnclient/openvpn --config client_234324321146 --writepid /var/run/ovpn_client.pid
And tune it until it works correctly. Now you can start it in the GUI and you’re finished with the first task.
Configure OpenVPN in a way that it keeps running
For this we write a script that gets called every five minutes to check if the OpenVPN is still working and if not restart its.
cat > /root/checkAndReconnectOpenVPN
if echo `ifconfig tun0` | grep -q "00-00-00-00-00-00-00-00-00-00-00-00-00-00-00-00"

then

echo "VPN up"

else

echo 1 > /usr/syno/etc/synovpnclient/vpnc_connecting

synovpnc reconnect --protocol=openvpn --name=XXXXXX

fi

exit 0
Replace XXXXXX with the name the VPN Connection has in the GUI (not sure if it is case sensitive or not, I kept the case anyway.) and make the script executable:
chmod +x /root/checkAndReconnectOpenVPN
Try it with (e.g. when the OpenVPN is running and not running)
/root/checkAndReconnectOpenVPN
Now we only need to add a line to the crontab file (Important it is >> and not >)
cat >> /etc/crontab
and paste and press CRTL-D in an empty line
*/5 * * * * root /root/checkAndReconnectOpenVPN
Now we only need to restart the cron daemon with following commands:
/usr/syno/etc/rc.d/S04crond.sh stop

/usr/syno/etc/rc.d/S04crond.sh start
and we’re finished … a certificate based OpenVPN which reconnects also if the process fails/stops.
Powered by WordPress
Entries and comments feeds.
Valid XHTML and CSS.
52 queries. 0.069 seconds.