
-

-

-

- Austria (27)
- General (16)
- HowTo (122)
- IT Security (129)
- Linux (128)
- Networking (65)
- Other (4)
-

- CDemu - a free, gpl cd/dvd-rom device emulator for linux
- heatpumpMonitor - Monitoring a Stiebel Eltron LWZ
- ignis backup tool - the heat-strengthened backup tool
-

- May 2026 (1)
- December 2021 (2)
- September 2019 (1)
- May 2019 (1)
- April 2019 (1)
- January 2019 (1)
- October 2018 (1)
- August 2018 (1)
- February 2018 (1)
- September 2017 (1)
- August 2017 (2)
- May 2017 (1)
- April 2017 (1)
- February 2017 (1)
- January 2017 (2)
- December 2016 (1)
- November 2016 (2)
- October 2016 (1)
- September 2016 (1)
- August 2016 (1)
- July 2016 (2)
- April 2016 (1)
- March 2016 (3)
- February 2016 (4)
- January 2016 (2)
- December 2015 (2)
- November 2015 (2)
- September 2015 (2)
- July 2015 (5)
- June 2015 (4)
- May 2015 (2)
- February 2015 (1)
- January 2015 (4)
- December 2014 (1)
- November 2014 (5)
- October 2014 (4)
- September 2014 (1)
- August 2014 (4)
- July 2014 (3)
- June 2014 (5)
- May 2014 (5)
- April 2014 (1)
- March 2014 (2)
- February 2014 (3)
- January 2014 (5)
- December 2013 (2)
- November 2013 (3)
- September 2013 (3)
- August 2013 (2)
- May 2013 (4)
- April 2013 (1)
- March 2013 (1)
- February 2013 (3)
- December 2012 (3)
- November 2012 (3)
- October 2012 (1)
- September 2012 (2)
- June 2012 (1)
- May 2012 (1)
- April 2012 (1)
- March 2012 (1)
- February 2012 (1)
- January 2012 (1)
- December 2011 (4)
- November 2011 (1)
- August 2011 (1)
- March 2011 (1)
- October 2010 (1)
- May 2010 (3)
- January 2010 (1)
- September 2009 (1)
- August 2009 (5)
- July 2009 (5)
- June 2009 (4)
- May 2009 (1)
- April 2009 (1)
- January 2009 (1)
- December 2008 (6)
- November 2008 (6)
- October 2008 (2)
- September 2008 (11)
- August 2008 (4)
- July 2008 (7)
- June 2008 (2)
- May 2008 (7)
- April 2008 (5)
- March 2008 (9)
- February 2008 (15)
- January 2008 (11)
- December 2007 (3)
How to configure SNMPv3 securely in CentOS/RHEL/SL
May 4, 2014
Looking through the Internet I found more often than not insecure SNMP setups explained in Howtos, maybe the authors where happy to got running in the first place – don’t know. The Simple Network Management Protocol (SNMP) is used to monitor (and configure in the case of network equipment) systems via the network in a standardized way. There are 3 versions of it in the wild:
Version 1
The first version, it is really old and only uses community strings to “protect” access. If you look with Wireshark what the packet for the request contains you’ll see following:
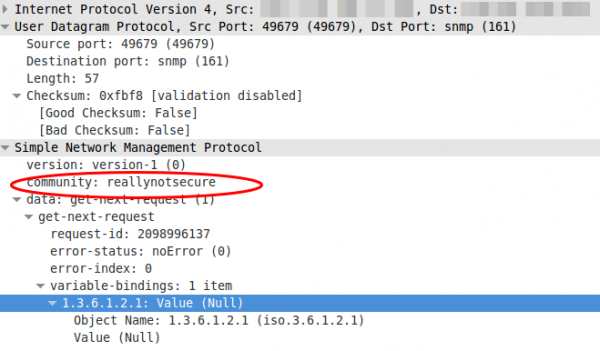
Yes, thats the community in clear text …. so don’t use it, if you must not. If you must (old devices which supports only this) use it on a secure network and make sure that the device only accepts quests from a given source IP address.
Version 2c
Not better in any security related way. The e.g. traffic counters are just bigger, as on fast interfaces it was possible with v1 that the counter rotated more than ones within the interval you queried so you didn’t know how many bytes really got transfered over the link.
Version 3
Now we’re talking. This versions supports authentication passwords, that get not transfered in the clear and it also supports encryption passwords so a attacker does not see what is transfered. I’ll show you now how you configure your CentOS/RHEL/SL to let it be queried via SNMPv3 in a secure way.
- We need to install the package we need:
yum install net-snmp - We create our user. SHA1 is used for the authentication and AES for the encryption of the traffic. And for security it is important to use two separated passwords.
service snmpd stop

net-snmp-create-v3-user -ro -A snmpv3authPass -a SHA -X snmpv3encPass -x AES snmpv3user

service snmpd start
This will print something like this
adding the following line to /var/lib/net-snmp/snmpd.conf:

createUser snmpv3user SHA "snmpv3authPass" AES snmpv3encPass

adding the following line to /etc/snmp/snmpd.conf:

rouser snmpv3user - Secure the SNMP daemon with a host firewall and only allow requests from source IP addresses you know and which need to query the system.
- Verify that everything works with following command:
snmpwalk -u snmpv3user -A snmpv3authPass -a SHA -X snmpv3encPass -x AES -l authPriv 127.0.0.1 -v3
So as you see it is quite easy, so there is now reason to use anything less secure!
If you want to delete the user, just edit the two files mentioned above. In /etc/snmp/snmpd.conf delete the line rouser snmpv3user and in /var/lib/net-snmp/snmpd.conf look for a line like this and remove it:
usmUser 1 3 0x80001f88801e15113fbf17bf5100000000 0x736e6d7076337573657200 0x736e6d7076337573657200 NULL .1.3.6.1.6.3.10.1.1.3 0xaaa3bc2aa941d932a581bbb11956699a7d807238 .1.3.6.1.6.3.10.1.2.4 0xcd6eed84f9d1aa903e92162f0e3fcb26 ""
restart the daemon with service snmpd restart and the user is gone.
14 Comments »
RSS feed for comments on this post. TrackBack URI
Leave a comment
Powered by WordPress
Entries and comments feeds.
Valid XHTML and CSS.
50 queries. 0.062 seconds.
I take it one is required to ignore the embedded text in /var/lib/net-snmp/snmpd.conf which says (right above the usmUser line:
STOP STOP STOP STOP etc
**** DO NOT EDIT THIS FILE ****
STOP STOP etc.
Comment by John Black — May 9, 2016 #
Hello,
I could use the above example to do a snmpwalk against local system,
what changes or addition should i make to run against a remote host
I am getting the following message when running snmpwalk against remote host:
No log handling enabled – turning on stderr logging
snmpwalk: Timeout
Comment by jenson — September 22, 2016 #
Centos/RHEL has a firewall active by default, you need to let udp 161 traffic in
Comment by robert — September 26, 2016 #
halu…
nice post you have here.
could you share also how to allowing only snmp v3 for all request? it would be great.
thanks.
Comment by adhitya christiawan nurprasetyo — January 10, 2017 #
If you don’t add an SNMPv1/2 community in the config, SNMPv1/2 will be disabled.
Comment by robert — January 11, 2017 #
Thank you! I have been on the fence on having a blog, but your site and the reason why you made this blog is making me think it may be worth it. I could provide linux howtos and tutorials to enhance my own memory and knowledge by teaching things to others like you. 🙂
Comment by Kyle Hamilton — April 19, 2017 #
Hi
please could you help me with configuration snmpv3 on CentOS7-Linux
i can not do snmpwalk v3 ,,may i get the standard format commands
thank you for your time
halaaedi
Comment by halaaedi — July 12, 2017 #
Love your post IT WORKS….
can you show how to get this to work in Asterisk thanks
Comment by Dylan Ramirez — August 2, 2018 #
I am using mrtg on a rhel6 server, to monitor router traffic. The routers are set to snmp v2c, I run a simple command on the mrtg server, and it updates the graphs. If I change the routers to snmp v3, aside from the command change, do I actually have to change anything on the server?
Comment by Jon — August 7, 2018 #
Normally you can enable SNMPv2 and v3 parallel on the router so you can switch to v3 and if you’ve a problem go back on you mrtg server.
Comment by robert — August 8, 2018 #
A very usefull post.
Thank you.
Comment by Ottmar — September 21, 2018 #
Thanks this info was very helpfull
Comment by FERQOS — October 10, 2018 #
I am trying to do SNMP polling on a firewall device. I followed the steps you provided and was able to install and create a v3 user, thank you! I am able to successfully run v2c snmpwalk. However, I am getting “No log handling enabled – turning on stderr logging” when I try to run a v3 snmpwalk. Can you please help?
Comment by mmenna — July 17, 2019 #
With net-snmp 5.8 there is now support for longer keys, up to SHA 512 and AES 256
Using AES and SHA is no longer considered ‘secure’
Comment by M MacFaden — August 28, 2020 #