Howto flush the DNS cache in Ubuntu 12.04?
November 18, 2012
I guess most of you know how to flush the DNS cache on Windows
ipconfig /flushdns
but how to you do it with Ubuntu? Just open with CTR-ALT-T the terminal and type following
sudo /etc/init.d/dns-clean
Howto force scheduled DSL reconnects on Mikrotik routers
November 10, 2012
In my last blog post I have shown how to connect to a PPPoA provider with a Mikrotik router and get the public IP address on the router. I also mentioned that my provider has the bad habit of disconnecting every 8h. As thats not exactly 8h, it tends to wander, but I want at least always the same times. This blog post shows you how to do that if you want the same.
What the script basically does is to force a reconnect at a given time once a day. First we need to make sure that we’ve the correct time on the router. The simplest way to do that is following line:
/system ntp client set enabled=yes mode=unicast primary-ntp=91.189.94.4
But you can only use an IP address there, if you want DNS names take a look hat this script. Also verify that you’ve configured the correct time zone with this command:
/system clock set time-zone-name=Europe/Vienna
Verify the current time with
[admin@MikroTik] > /system clock print

time: 20:56:44

date: nov/04/2012

time-zone-name: Europe/Vienna

gmt-offset: +01:00

dst-active: no
Now we need to write the script, which we to in 2 steps. First we create the script ….
/system script add name=scriptForcedDslReconnect source=""
… than we open it in the editor and add the actual code
[admin@MikroTik] > /system script edit 0

value-name: source
After this you get an editor and just copy and paste following lines:
/interface pptp-client set [find name="pptpDslInternet"] disabled=yes

/interface pptp-client set [find name="pptpDslInternet"] disabled=no

/log info message="pptpDslInternet forced reconnect. Done!"
and press CRTL-O. You can now check if all is correct with (everything should be colored in the script)
/system script print
Now we only need to add it to the scheduler
/system scheduler add name=schedularForcedDslReconnect start-time=00:40:00 interval=24h on-event=scriptForcedDslReconnect
And we’re done, it will disconnect always at 00:40, 8:40, 16:40 … as we wanted.
Howto use a Mikrotik as router for a PPPoA DSL Internet connection
November 4, 2012
I live in Austria and the biggest Internet provider is A1 Telekom Austria and they use PPPoA and not PPPoE. I’ve searched through out the Internet to find some documentation on how to configure a Mikrotik router for this. I wanted to have the public IP address on the Mikrotik and not on the provider router/modem. I did not find any documentation. But as I got it working I’ll provide such a documentation now. 😉
1. The Basics
PPPoA is the abbreviation for PPP over ATM or some say PPP over AAL5 and it is used to encapsulate PPP into ATM cells to get into the Internet via ADSL connections. The more commonly used standard in this space is PPPoE (PPP over Ethernet), but which has somewhat more overhead as you need also to encapsulate the Ethernet header too.
There are now two possibilities:
The first is that the provider modem/router handles everything and you get only a private IP address behind the router, and the router masquerade the private IP addresses. This is normally the default as it works for 95% of the customers but your PC or own router does not get a public IP address. You need to use port forwarding if you want to provide services which are reachable from the Internet. And something which I specially need. You don’t get a event when you get disconnected and assigned a new IP address. A1 Telekom Austria has the bad habit to disconnect you every 8 hours … 3 times a day. As I want to have the disconnects always at the same time I need my own router to time it once a day, so it gets reseted to my desired reconnect times.
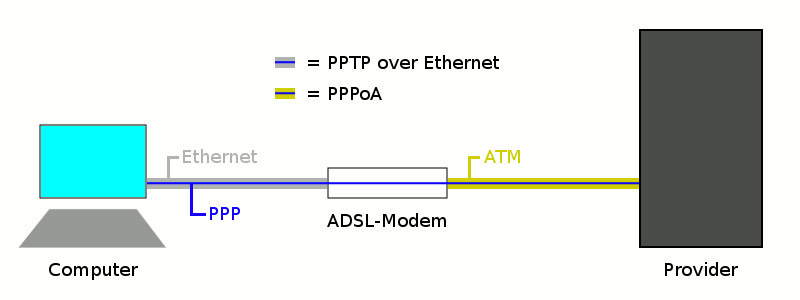
The second way it to get somehow the public IP address on the PC or router. In this case your need a provider modem/router with a PPPoA-to-PPTP-Relays. Take a look at the picture I took from the German Wikipedia(CC-BY-SA-3.0, Author Sonos):
The computer (or Mikrotik router) thinks it establishes a PPTP tunnel with the modem, but instead the modem encapsulates the packets and send them on via ATM to the provider backbone. So the computer or Miktrotik router does not need to be able to talk PPPoA it is enough if it is able to talk PPTP, the rest is handled by the modem.
2. Requirements
But of course there are some requirements:
- The provider modem needs to be able to make a PPPoA-to-PPTP-Relays and which is important you need to be able to configure it, as some provider firmwares restrict that.
- You need to know the username and password which is used for the ppp authentication
- And for the sake of completeness – you need a Mikrotik router 😉
3. Provider modem / router
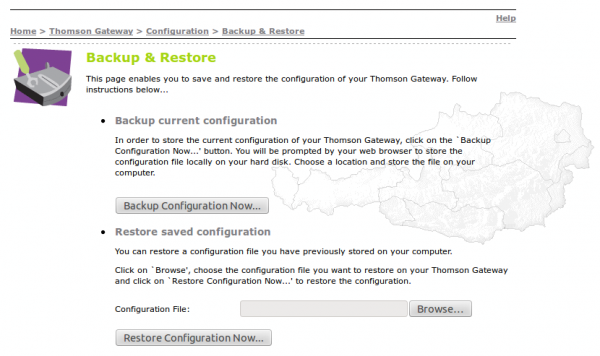
My provider gave me a Thomson Speedtouch TG585 v7 modem/router. The firmware is old (8.2.1.5) and branded but I was able to upload a new configuration via the web interface.
And as it works stable I did not see a reason to upgrade. I found in the Internet a INI file, which configured the router to PPPoA-to-PPTP-Relays mode. Three important notes:
- If you search the Internet for a configuration file … look for “single user” or “single user mode” (SU), the masquerade mode is called “multi user mode” (MU)
- It is also possible to configure the single user mode via telnet, there are some howto’s out there. The specific ones for Austria are of course in German.
- The version numbering is quite broken. The A1 Telekom Austria branded firmwares are often higher (e.g. 8.6.9.0) than the newer generic firmwares (e.g 8.2.6.5_AA).
After configuring the router as PPPoA-to-PPTP-Relays it has the IP address 10.0.0.138/24 for my setup.
4. Mikrotik PPP configuration
So now to the Mikrotik configuration … we start with resetting the configuration with no defaults.
/system reset-configuration no-defaults=yes
Then we rename the first interface and add a transit network IP address
/interface ethernet set 0 name=ether1vlanTransitModem

/ip address add address=10.0.0.1/24 interface=ether1vlanTransitModem
And now we only need to configure the PPTP
/ppp profile add change-tcp-mss=yes name=pppProfileDslInternet use-compression=no use-encryption=no use-vj-compression=no

/interface pptp-client add add-default-route=yes connect-to=10.0.0.138 disabled=no name=pptpDslInternet password=YourPassword profile=pppProfileDslInternet user=YourUsername
this configuration should lead after connecting the ether1 with the modem to following log entries:
[admin@MikroTik] > /log/print

00:29:03 pptp,ppp,info pptpDslInternet: initializing...

00:29:03 pptp,ppp,info pptpDslInternet: dialing...

00:29:05 pptp,ppp,info pptpDslInternet: authenticated

00:29:05 pptp,ppp,info pptpDslInternet: connected
you should see the IP address too:
[admin@MikroTik] > /ip route print

Flags: X - disabled, A - active, D - dynamic, C - connect, S - static, r - rip, b - bgp, o - ospf, m - mme, B - blackhole, U - unreachable, P - prohibit

#      DST-ADDRESS        PREF-SRC        GATEWAY            DISTANCE

0 ADS  0.0.0.0/0                         xxx.xxx.xxx.xxx            1

1 ADC  10.0.0.0/24        10.0.0.1        ether1vlanTrans...        0

2 ADC  xxx.xxx.xxx.xxx/32   yyy.yyy.yyy.yyy   pptpDslInternet           0
But if you try to ping something you’ll get
[admin@MikroTik] > ping 8.8.8.8

HOST                                     SIZE TTL TIME  STATUS

8.8.8.8                                                 timeout

8.8.8.8                                                 timeout

sent=2 received=0 packet-loss=100%
whats the problem? the router uses the wrong source IP address, try following (the xxx.xxx.xxx.xxx is the IP address from /ip route print (entry 2) )
[admin@MikroTik] > /ping src-address=xxx.xxx.xxx.xxx 8.8.8.8

HOST                                     SIZE TTL TIME  STATUS

8.8.8.8                                    56  46 37ms

8.8.8.8                                    56  46 36ms

8.8.8.8                                    56  46 37ms

8.8.8.8                                    56  46 37ms

8.8.8.8                                    56  46 37ms

8.8.8.8                                    56  46 37ms

sent=6 received=6 packet-loss=0% min-rtt=36ms avg-rtt=36ms max-rtt=37ms
Now the Internet connection is working, we just need to make it usable ….
5. Mikrotik on the way to be usable
The first thing we need is a masquerade rule that we use the correct IP address into the Internet, following does the trick.
/ip firewall nat add action=masquerade chain=srcnat out-interface=pptpDslInternet
But we want also a client to test it … so here is the configuration I use for the clients (without explanation as it is not the topic of this Howto)
/interface ethernet set 2 name=ether3vlanClients

/ip address add address=10.23.23.1/24 interface=ether3vlanClients
/ip dns set allow-remote-requests=yes servers=8.8.8.8,8.8.4.4

/ip dns static add address=10.23.23.1 name=router.int
/ip pool add name=poolClients ranges=10.23.23.20-10.23.23.250

/ip dhcp-server add address-pool=poolClients authoritative=yes disabled=no interface=ether3vlanClients name=dhcpClients

/ip dhcp-server network add address=10.23.23.0/24 dns-server=10.23.23.1 domain=int gateway=10.23.23.1
Connect a client behind it, set it to DHCP and everything should work. I hope this Howto demystifies PPPoA and Mirkotik.
Powered by WordPress
Entries and comments feeds.
Valid XHTML and CSS.
28 queries. 0.094 seconds.


