
-

-

-

- Austria (27)
- General (16)
- HowTo (122)
- IT Security (129)
- Linux (128)
- Networking (65)
- Other (4)
-

- CDemu - a free, gpl cd/dvd-rom device emulator for linux
- heatpumpMonitor - Monitoring a Stiebel Eltron LWZ
- ignis backup tool - the heat-strengthened backup tool
-

- May 2026 (1)
- December 2021 (2)
- September 2019 (1)
- May 2019 (1)
- April 2019 (1)
- January 2019 (1)
- October 2018 (1)
- August 2018 (1)
- February 2018 (1)
- September 2017 (1)
- August 2017 (2)
- May 2017 (1)
- April 2017 (1)
- February 2017 (1)
- January 2017 (2)
- December 2016 (1)
- November 2016 (2)
- October 2016 (1)
- September 2016 (1)
- August 2016 (1)
- July 2016 (2)
- April 2016 (1)
- March 2016 (3)
- February 2016 (4)
- January 2016 (2)
- December 2015 (2)
- November 2015 (2)
- September 2015 (2)
- July 2015 (5)
- June 2015 (4)
- May 2015 (2)
- February 2015 (1)
- January 2015 (4)
- December 2014 (1)
- November 2014 (5)
- October 2014 (4)
- September 2014 (1)
- August 2014 (4)
- July 2014 (3)
- June 2014 (5)
- May 2014 (5)
- April 2014 (1)
- March 2014 (2)
- February 2014 (3)
- January 2014 (5)
- December 2013 (2)
- November 2013 (3)
- September 2013 (3)
- August 2013 (2)
- May 2013 (4)
- April 2013 (1)
- March 2013 (1)
- February 2013 (3)
- December 2012 (3)
- November 2012 (3)
- October 2012 (1)
- September 2012 (2)
- June 2012 (1)
- May 2012 (1)
- April 2012 (1)
- March 2012 (1)
- February 2012 (1)
- January 2012 (1)
- December 2011 (4)
- November 2011 (1)
- August 2011 (1)
- March 2011 (1)
- October 2010 (1)
- May 2010 (3)
- January 2010 (1)
- September 2009 (1)
- August 2009 (5)
- July 2009 (5)
- June 2009 (4)
- May 2009 (1)
- April 2009 (1)
- January 2009 (1)
- December 2008 (6)
- November 2008 (6)
- October 2008 (2)
- September 2008 (11)
- August 2008 (4)
- July 2008 (7)
- June 2008 (2)
- May 2008 (7)
- April 2008 (5)
- March 2008 (9)
- February 2008 (15)
- January 2008 (11)
- December 2007 (3)
Start securing your debit cards and why you should do it
July 18, 2014
Many people got new debit cards (called “Bankomatkarte in Austria) from the various bankings institutes in the last months and years. Many cards are PayPass enabled for wireless money transactions. PayPass is based on NFC, which is also integrated in some of the modern smart phones. The default setting is that five 25 Euro transactions can be done without entering a PIN. So a possible damage can be up to 125 Euro. You’ll verify if your debit card supports that standard by checking it has PayPass printed on it.
Picture: Maestro PayPass
But I’ve seen some cards with only this symbol (at least on the front side):
![]()
Anyway in therapy the card needs to be within 10cm of the reader and therefore an attack is not that easy. But already at Defcon 20 in 2012 Eddie Lee presented the possible of a NFCProxy which allows to misuse a card. The attack setup looks like this:
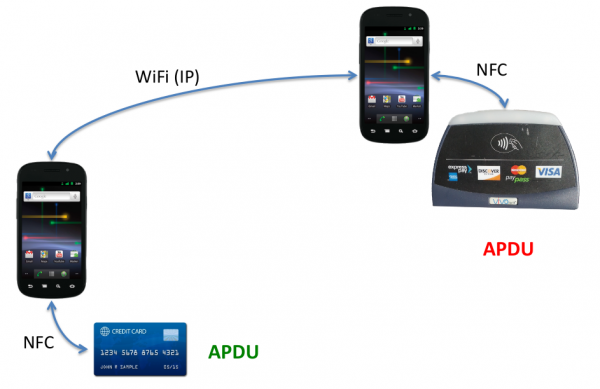
Picture: Eddie Lee @ Defcon 20
So this allows following attack vector. You’re standing in a crow or in a line and have your debit card in your back pocket. One of the attacker stands behind you …. and the other can be e.g. hundred meters away (only limited by the delay and reach of the network connection). They will be able to get your money with much less risk than with pocket picketing. And to make it even better – you can download the App for Android as an .apk file, ready to install and use, from Sourceforge.
So now you know of the problem, what can you to mitigate that problem?
- If you don’t need that feature at all, try to talk to your bank to disable that function. Some will do it for free, others will charge you. Some banks allow to you to choose if you want one with or without at renewal of your card.
- You basically like the feature, but you would like to have more control over it – thats also possible:
- Search for RFID/NFC blocking sleeves for credit card or payment cards
- You can get also wallets with RFID/NFC blocking feature … but currently they look not that great .. at least the ones I found
Access Mikrotik Router OS via SSH Public Key authentication
July 12, 2014
Sometimes you need to execute various commands on a Mikrotik automatically from a Server. Surely it is possible to store the password in the script, but there is a better way – it is called Public Key authentication for SSH. Basically a pair of files is generated and the public one is copied to the Mikrotik and the private key stays on the PC. If you encrypt this key on the PC (which is useful if not a script does use it but a person) you get a 2-factor authentication. An attacker needs that private file and the password to decrypt it to administer the router. There are two types supported by SSH RSA and DSA. RSA is more commonly used but Mikrotik does only support DSA so we need to create a DSA key pair.
The first step is to generate the key pair as the user on the Linux system which is than used to access it. If it is a script it maybe a separate user just for this purpose is a good idea.
$ ssh-keygen -t dsa

Generating public/private dsa key pair.

Enter file in which to save the key (/home/<user>/.ssh/id_dsa):

Enter passphrase (empty for no passphrase):

Enter same passphrase again:

Your identification has been saved in id_dsa.

Your public key has been saved in id_dsa.pub.

The key fingerprint is:

.....
If you just press enter on the file question, the default one will be used. If you want to use some separate directory that’s fine, you just need to provide the location later at the ssh call. If you press just enter for the passphrase the private key will not be encrypted. Now we copy the public key (.pub extension) to the Mikrotik:
scp /home/<user>/.ssh/id_dsa.pub [email protected]:
And after that we need to import the key. If we choose the user admin, which we use our self to login, no password login will be possible anymore for that user. So if you don’t like that you should create a special user for the script. As my script needs only to read stuff I’m okay with the group “read” and create a user like this:
/user add name=scriptUser group=read comment="user for our readonly scripts" disabled=no
Now we import that public key to the scriptUser with following command:
/user ssh-keys import public-key-file=id_dsa.pub user=scriptUser
We’re done .. just testing is open …. if you used not the default directory to store the key files you need to provide them via the -i parameter, if its the default location you don’t need to provide it. This command logs into the router and gets you some basic data without entering a password.
$ ssh -i <pathTo/id_dsa> scriptUser@xxx.xxx.xxx.xxx “/system resource print”
You should also try to login as this user without the key file (e.g. from an other computer) and it should not be possible.
How to configure SNMPv3 securely on Extreme Networks XOS
July 11, 2014
In two of the last posts I wrote about configuring SNMPv3 securely for Linux and Mikrotik RouterOS. This time I’ll show the configuration for Extreme Networks XOS. Its quite easy and supports more encryption algorithm and options than e.g. Mikrotiks RouterOS. To allow SNMPv3 access we only need these commands – as I use SNMP only for reading, I’ll create a readonly user:
config snmpv3 add user snmpv3ro authentication sha XXXXXXXXXX privacy aes XXXXXXXXXX

config snmpv3 add group snmpv3group user snmpv3ro sec-model usm

configure snmpv3 add access snmpv3group sec-model usm sec-level priv read-view defaultAdminView write-view None notify-view None
If we want to disable a previously configured SNMPv1 or v2c access type following:
disable snmp access snmp-v1v2c
If you want also SNMPv3 traps you need this command:
configure snmpv3 add target-addr snmpv3Target param snmpv3Params ipaddress transport-port 162 tag-list defaultNotify
Hint: You can/should also add from or vr entries depending on your switch config
Some addition ways so secure your SNMP:
- You can specify in which virtual router instance the SNMP is reachable with following commands:
disable snmp access vr all

enable snmp access vr vrMgmt - And you can also configure ACLs which defines from which IP addresses it is possible to access the SNMP service with following command:
configure snmp access-profile snmpACL readwriteYou need to create following file first with
vi snmpACL.pol:entry allow_subnet_1 {
if match all {
source-address 10.x.x.0/24;
}
then {
permit;
}
entry allow_subnet_2 {
if match all {
source-address 10.y.y.0/24;
}
then {
permit;
}
Powered by WordPress
Entries and comments feeds.
Valid XHTML and CSS.
38 queries. 0.079 seconds.