
-

-

-

- Austria (27)
- General (16)
- HowTo (125)
- IT Security (130)
- Linux (129)
- Networking (67)
- Other (4)
-

- CDemu - a free, gpl cd/dvd-rom device emulator for linux
- heatpumpMonitor - Monitoring a Stiebel Eltron LWZ
- ignis backup tool - the heat-strengthened backup tool
-

- July 2026 (3)
- May 2026 (1)
- December 2021 (2)
- September 2019 (1)
- May 2019 (1)
- April 2019 (1)
- January 2019 (1)
- October 2018 (1)
- August 2018 (1)
- February 2018 (1)
- September 2017 (1)
- August 2017 (2)
- May 2017 (1)
- April 2017 (1)
- February 2017 (1)
- January 2017 (2)
- December 2016 (1)
- November 2016 (2)
- October 2016 (1)
- September 2016 (1)
- August 2016 (1)
- July 2016 (2)
- April 2016 (1)
- March 2016 (3)
- February 2016 (4)
- January 2016 (2)
- December 2015 (2)
- November 2015 (2)
- September 2015 (2)
- July 2015 (5)
- June 2015 (4)
- May 2015 (2)
- February 2015 (1)
- January 2015 (4)
- December 2014 (1)
- November 2014 (5)
- October 2014 (4)
- September 2014 (1)
- August 2014 (4)
- July 2014 (3)
- June 2014 (5)
- May 2014 (5)
- April 2014 (1)
- March 2014 (2)
- February 2014 (3)
- January 2014 (5)
- December 2013 (2)
- November 2013 (3)
- September 2013 (3)
- August 2013 (2)
- May 2013 (4)
- April 2013 (1)
- March 2013 (1)
- February 2013 (3)
- December 2012 (3)
- November 2012 (3)
- October 2012 (1)
- September 2012 (2)
- June 2012 (1)
- May 2012 (1)
- April 2012 (1)
- March 2012 (1)
- February 2012 (1)
- January 2012 (1)
- December 2011 (4)
- November 2011 (1)
- August 2011 (1)
- March 2011 (1)
- October 2010 (1)
- May 2010 (3)
- January 2010 (1)
- September 2009 (1)
- August 2009 (5)
- July 2009 (5)
- June 2009 (4)
- May 2009 (1)
- April 2009 (1)
- January 2009 (1)
- December 2008 (6)
- November 2008 (6)
- October 2008 (2)
- September 2008 (11)
- August 2008 (4)
- July 2008 (7)
- June 2008 (2)
- May 2008 (7)
- April 2008 (5)
- March 2008 (9)
- February 2008 (15)
- January 2008 (11)
- December 2007 (3)
Howto visualize your water meter and get alerted if too much water is used
May 1, 2019
In the village I live the water meter is replaced every 5 years and it was the fifth’s year this year. I took the opportunity to talk to the municipal office, if it was possible to get a water meter with impulse module, which I can integrate in my network. And they said yes 🙂 – Thx again!
So last week they came by and put the new one in, I was not at home, and when I came home I found following:
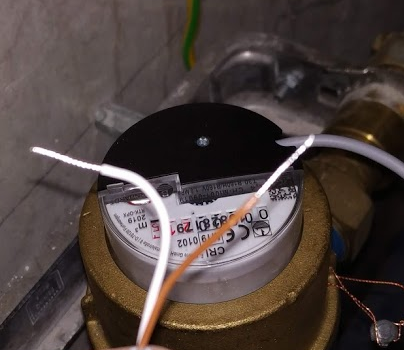
They also left the packaging, so I was able to guess the module. For me it looked like a “Ringkolben-Patronenzähler MODULARISRTK-OPX” from Wehrle as shown in this datasheet. I was not 100% sure if it was the S0 or M-Bus version, but a friend told me it must be the S0 Version as the M-Bus is much more expensive, so I went for it.
Getting the S0 connected
Basically the meter has an optocoupler (optoelectronic coupler) which is powered in my case by an internal battery. At every liter of water that runs through the meter, the two cables shown above get connected for a short period (e.g. 100ms). In the simplest case it would be possible to just use a pull-up resistor to 5V, but this may lead the problems. It is better to use 2 resistors and 2 capacitors stabilize the impulse and guard against unwanted effects such as electromagnetic interference. As my time when I learned that at school is too long ago, I asked a friend who does circuits all the time for help, which let to this drawing:
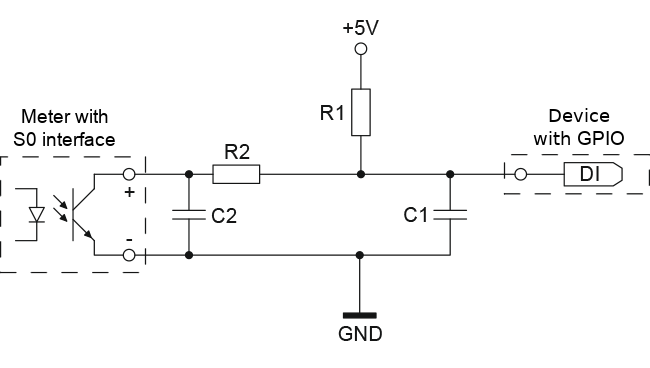
And he told me to use following resistors and capacitors:
- R1 – 4,7kOhm
- R2 – 470Ohm
- C1 – 100nF
- C2 – 10nF
At home, I build that circuit (no fully done on the picture):
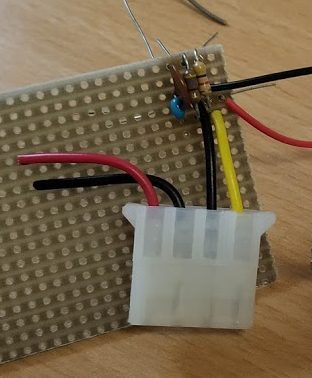
As you can see I used old PC power supply connectors to connect the water meter, so I can disconnect it easily. Hardware costs under 1 Euro so far – OK need some stuff at home already (e.g. soldering iron) 🙂
So, now back to areas I know better ….
Getting the signal onto my network
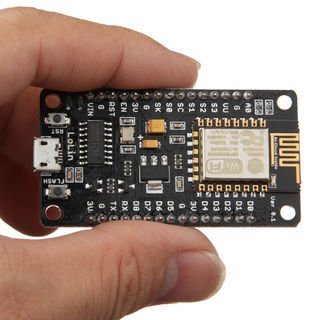
I’ve several Raspberry PIss at home and at first I thought about using one, but that would be overkill my case as I wanted to do visualization and alerting in a container on my home server anyway. I went with something Arduino like, but cheaper. 🙂
I went for a NodeMCU which has all I needed for that project:
- Digital Input with interrupt triggering –> no polling and missing an impulse
- WiFi support to connect to my IoT network
- Integration with the Arduino IDE
- It costs under 5 Euro
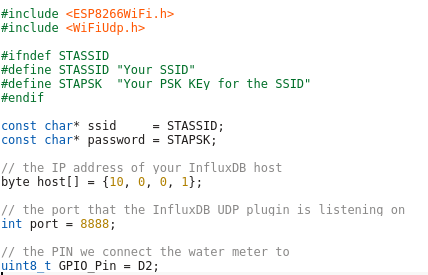
Lets take a look at my code – which you can download from here. In the first part of the code we import the needed libraries and define some variables:
- The WiFi SSID and password
- The host and port we will inform for every liter of water – We’ll use InfluxDB for that and you will see how easy that makes it.
- The PIN we connect the water meter to – make sure it supports interrupts.
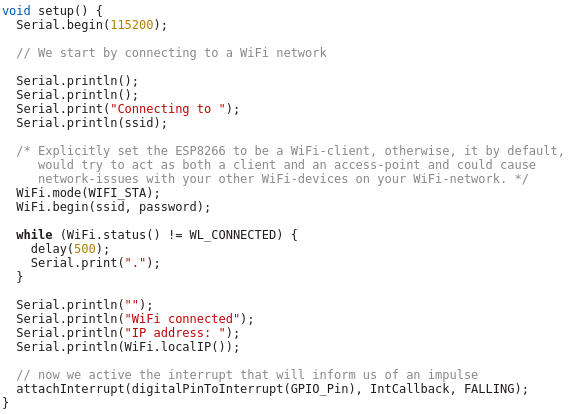
And now the code which is executed once at startup, where we connect to the Wifi and attach the interrupt.
And at last we need the code that gets called by the interrupt – it just sends a UDP Message in the InfluxDB format for each Liter of water, the rest is down by the InfluxDB time series database.
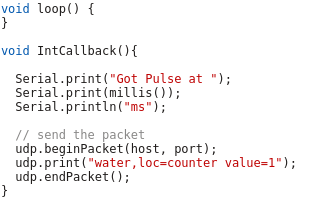
As you see the code is really easy – the complicated stuff is done by the InfluxDB.
Visualization and Alerting
Sure I could write my own visualization and alerting and I have done so in the past but these times are gone. InfluxDB and some additional projects from the same guys do everything and better than I could for such a home project. You will see how easy it really is. I started with an empty LXC container on my Linux home server. I use Debian 9 in the container, but InfluxDB is packaged for all major distributions.
First we need to install curl and https support for apt – my contains are as small as possible.
# apt install curl apt-transport-https
Download the signing key for the InfluxDB repository.
# curl -sL https://repos.influxdata.com/influxdb.key | apt-key add -
This is followed by adding the repository to the list
# cat >> /etc/apt/sources.list

deb https://repos.influxdata.com/debian stretch stable
and installing the software.
# apt update

# apt-get install influxdb chronograf kapacitor
By default, the UDP interface on InfluxDB is disabled. You’ll want to modify the configuration file /etc/influxdb/influxdb.conf to look similar to this:
[[udp]]

enabled = true

bind-address = ":8888"

database = "db_iot"
Now we just need to enable the various services
# systemctl enable influxdb

# systemctl start influxdb

# systemctl enable kapacitor

# systemctl start kapacitor
If everything works you should see something like this
# netstat -lpn | grep 8888

tcp6 0 0 :::8888 :::* LISTEN 1505/chronograf

udp6 0 0 :::8888 :::* 1539/influxd
Now we just need to create the database, we configured to use for UDP:
# influx

Connected to http://localhost:8086 version 1.7.6

InfluxDB shell version: 1.7.6

Enter an InfluxQL query

> CREATE DATABASE db_iot

> exit
After this just open your browser and connect to http://<ipAddressOfServer>:8888 and fill out the form with the following details:
- Connection String: Enter the hostname or IP of the machine that InfluxDB is running on, and be sure to include InfluxDB’s default port 8086. In my/our case it is localhost / 127.0.0.1
- Connection Name: Enter a name for your connection string.
- Username and Password: These fields can remain blank unless you’ve enabled authorization in InfluxDB.
- Telegraf Database Name: Optionally, enter a name for your Telegraf database. The default name is Telegraf.
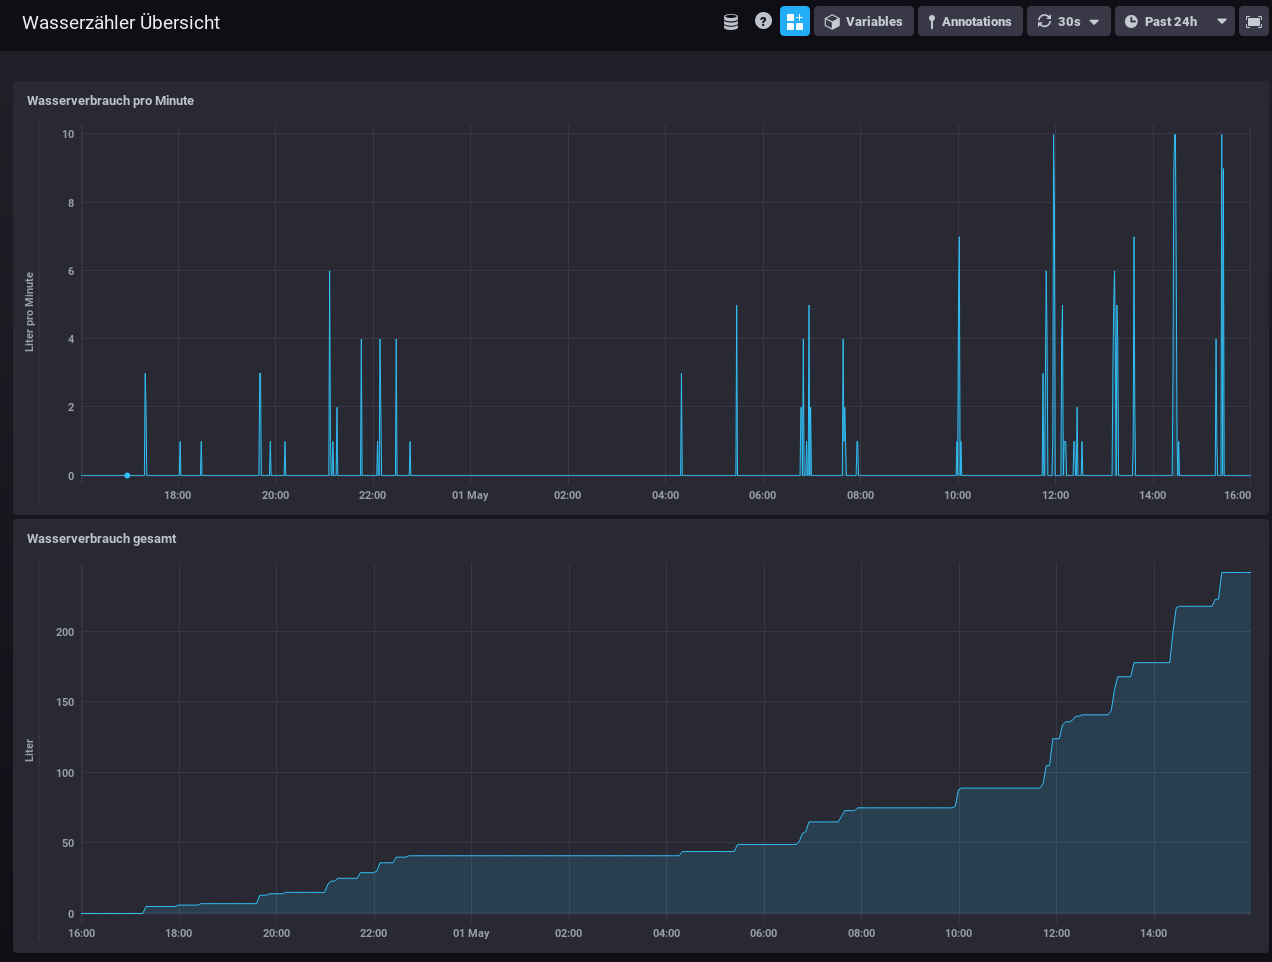
Everything else can be done via the browser – Just take a look at the configuration of one of my dashboard elements – the SQL code is written by clicking around :-).
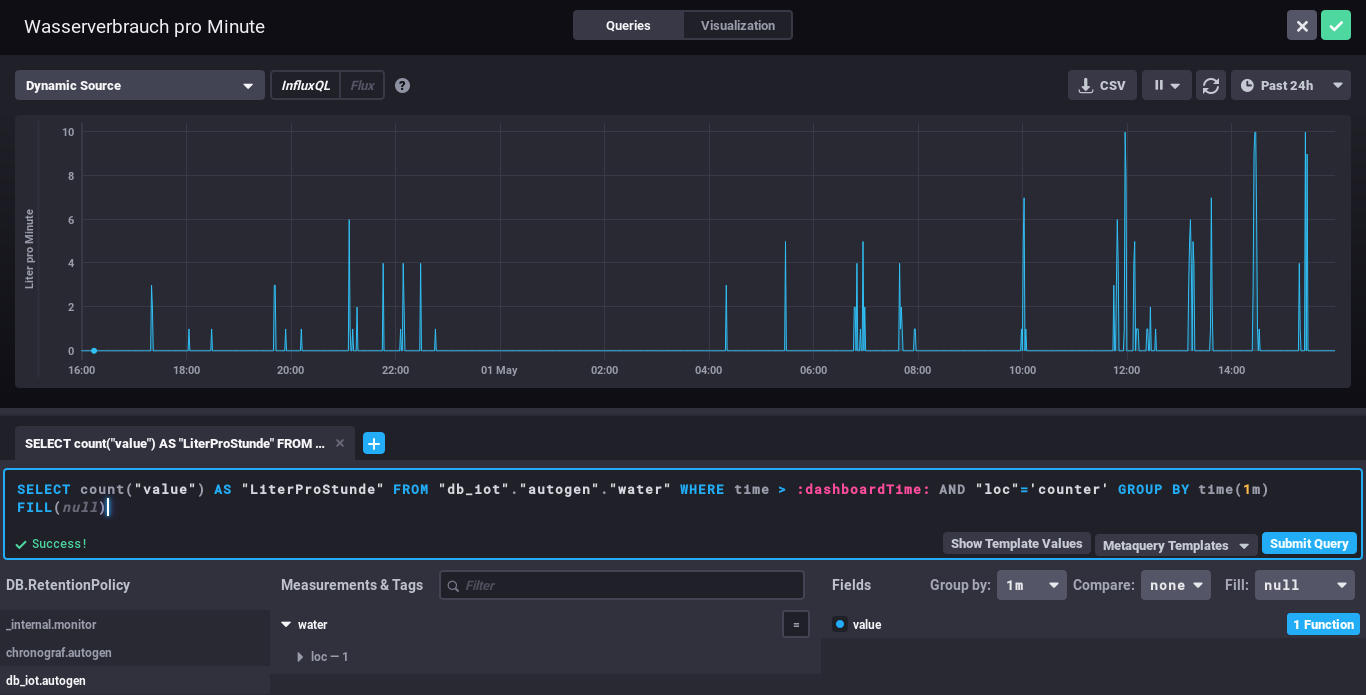
My water meter dashboard looks currently like this:
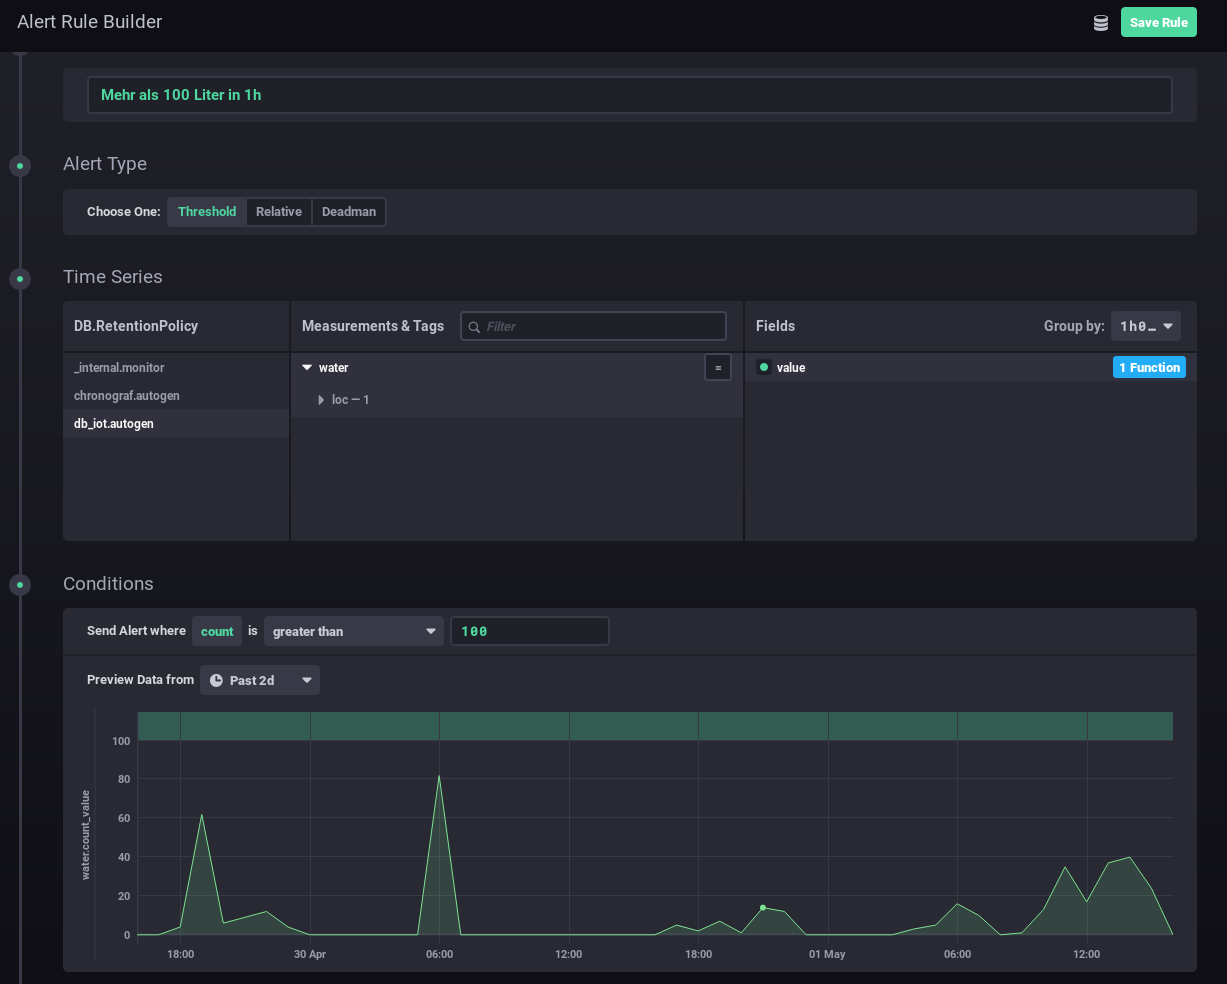
And you can also define alerts. In this case I wanted to get an alert message send, if more than 100 Liter of water is used in one hour – I should know if that happens and if it is OK.
I hope you see how easy visualizing and alerting a water meter can be. It is also really cheap – about 5 Euro for everything, if you’ve already a server otherwise let it run on a Raspberry PI (about 30 Euro), rent a virtual server for 1-2 Euro/month or use the container feature of your NAS.
Powered by WordPress
Entries and comments feeds.
Valid XHTML and CSS.
39 queries. 0.075 seconds.