Mapping a serial device to a KVM guest may lead to communication problems
December 16, 2012
I’m monitoring my heat pump from my server at home. Last week I moved the monitoring part into a KVM VM and mapped the serial interface (serial to USB adapter) to the virtual machine. Basically it worked, but some queries never worked, but they did before the move and nothing else has been changed. After hours of searching rewriting parts of my software and searching for an error in the heap pump controller, I got the idea to map the serial to USB adapter into the VM and not only the ttyUSB0 device …. and at once it worked again. So this post is basically a hint for others who run into the same problem. I’m talking with following settings to my heatpump 57600, 8, N, 1, and I’m running up to date Centos/SL 6 as host and guest.
ps: Before moving the software into a KVM VM, I had it running withing a openvz container without problems for years, but I needed a custom kernel for it and that doesn’t play that well with a cutting edge BTRFS kernel. 😉
D-root is changing its IPv4 address on the 3rd of January.
December 15, 2012
I repost the full advanced notice from the University of Maryland (which administrates the D root DNS server).
Here the original Post:
This is advance notice that there is a scheduled change to the IPv4 address for one of the authorities listed for the DNS root zone and the .ARPA TLD. The change is to D.ROOT-SERVERS.NET, which is administered by the University of Maryland.
The new IPv4 address for this authority is 199.7.91.13. The current IPv6 address for this authority is 2001:500:2d::d and it will continue to remain unchanged.
This change is anticipated to be implemented in the root zone on 3 January 2013, however the new address is currently operational. It will replace the previous IP address of 128.8.10.90 (also once known as TERP.UMD.EDU).
We encourage operators of DNS infrastructure to update any references to the old IP address, and replace it with the new address. In particular, many DNS resolvers have a DNS root “hints” file. This should be updated with the new IP address.
New hints files will be available at the following URLs once the change has been formally executed:
http://www.internic.net/domain/named.root
http://www.internic.net/domain/named.cache
The old address will continue to work for at least six months after the transition, but will ultimately be retired from service.
A howto for using a Canon PIXMA MG4250 under Ubuntu
December 7, 2012
We’ve bought a new multi functions printer at home, a Canon PIXMA MG4250 and as we’re a Linux shop (PCs and notebooks under Linux, mobiles and tablets under Android) I needed to make the printer work under Ubuntu, in our case Ubuntu 12.04, but the solution should work also under newer versions. We’ve connected the printer via WiFi and therefore need both printing and scanning to work via WiFi.
At least at the time of writing this blog post, searching for a driver or howto was not that easy, specially if you search on the US or European Canon Site …. you need to got the Asian site. You wont find the MG4250 listed there but the MG4270. Take it. I should lead you to a driver site where you can choose “Linux” and than 2 links are interesting for you
- MG4200 series ScanGear MP Ver. 2.00 for Linux (debian …
- MG4200 series IJ Printer Driver Ver. 3.80 for Linux (debian …
I provided direct links to the drivers above but the version may change or the URLs themselves – so maybe the links are broken at the time you’re reading it – in this case you need to click through the site to the new pages.
As you see the drivers are generic for the whole MG4200 series so we’re good. Download the tar.gz files and open a console (e.g. CTRL-ALT-T) and change to that directory.
Printing Part
Lets start with the printing part by extracting the tar.gz and changing into the newly created directory.
$ tar xzf cnijfilter-mg4200series-3.80-1-deb.tar.gz

$ cd cnijfilter-mg4200series-3.80-1-deb/
And let the installation process begin with (if prompted for a password use your user password )
$ ./install.sh
After installing the packages you will be asked some questions. The first one is to connect your printer and switch it on. This is followed by the connection method you’re using (USB vs network). In the case of network it will broadcast within the same subnet, so it only works if the PC and the printer are on the same subnet. After it detected the printer you need knowledge that and choose if it should be the default printer.
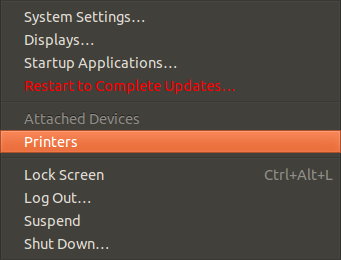
After all this just go to the most top right icon and click onto it to the following menu, choose printers …

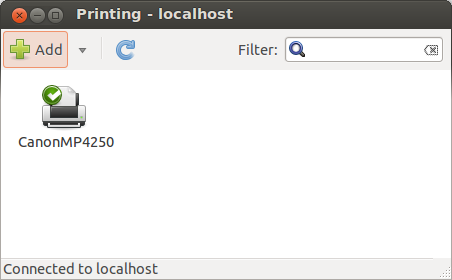
…. and it should show you following with your printer:

Ok, printing is working … lets go to scanning
Scanning Part
As with the printing part extract the tar.gz and change into the newly created directory.
$ tar xzf scangearmp-mg4200series-2.00-1-deb.tar.gz

$ cd scangearmp-mg4200series-2.00-1-deb/
And again we’re using the install script (if prompted for a password use your user password ).
$ ./install.sh
You’ll be asked no questions and after the installation just start the scanning program with following command
$ scangearmp
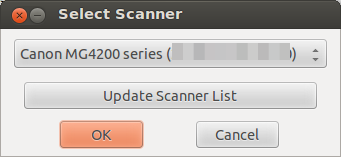
It will show you an error message that no configured scanner has been detected, click Ok. Now following window is shown:

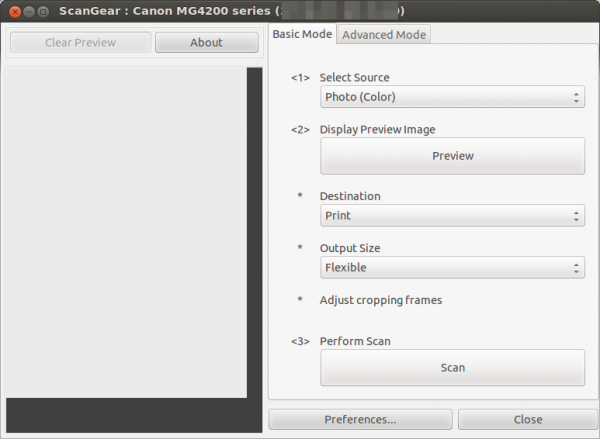
In the case of the first start the list is empty, you need to click onto “Update Scanner List”, after this you should see the same window with your printer. Click onto Ok and you get following:

And we’re done.
Update for Ubuntu 13.10 (and possible other versions) users:
If you get following error message:
Unpacking cnijfilter-mg4200series (from .../cnijfilter-mg4200series_3.80-1_amd64.deb) ...

dpkg: dependency problems prevent configuration of cnijfilter-mg4200series:

cnijfilter-mg4200series depends on libtiff4; however:

Package libtiff4 is not installed.
dpkg: error processing cnijfilter-mg4200series (--install):

dependency problems - leaving unconfigured

Errors were encountered while processing:

cnijfilter-mg4200series
Just install the library with
$ sudo apt-get install libtiff4
and the call the install.sh again and it will work.
Powered by WordPress
Entries and comments feeds.
Valid XHTML and CSS.
29 queries. 0.135 seconds.


