
-

-

-

- Austria (27)
- General (16)
- HowTo (122)
- IT Security (129)
- Linux (128)
- Networking (65)
- Other (4)
-

- CDemu - a free, gpl cd/dvd-rom device emulator for linux
- heatpumpMonitor - Monitoring a Stiebel Eltron LWZ
- ignis backup tool - the heat-strengthened backup tool
-

- May 2026 (1)
- December 2021 (2)
- September 2019 (1)
- May 2019 (1)
- April 2019 (1)
- January 2019 (1)
- October 2018 (1)
- August 2018 (1)
- February 2018 (1)
- September 2017 (1)
- August 2017 (2)
- May 2017 (1)
- April 2017 (1)
- February 2017 (1)
- January 2017 (2)
- December 2016 (1)
- November 2016 (2)
- October 2016 (1)
- September 2016 (1)
- August 2016 (1)
- July 2016 (2)
- April 2016 (1)
- March 2016 (3)
- February 2016 (4)
- January 2016 (2)
- December 2015 (2)
- November 2015 (2)
- September 2015 (2)
- July 2015 (5)
- June 2015 (4)
- May 2015 (2)
- February 2015 (1)
- January 2015 (4)
- December 2014 (1)
- November 2014 (5)
- October 2014 (4)
- September 2014 (1)
- August 2014 (4)
- July 2014 (3)
- June 2014 (5)
- May 2014 (5)
- April 2014 (1)
- March 2014 (2)
- February 2014 (3)
- January 2014 (5)
- December 2013 (2)
- November 2013 (3)
- September 2013 (3)
- August 2013 (2)
- May 2013 (4)
- April 2013 (1)
- March 2013 (1)
- February 2013 (3)
- December 2012 (3)
- November 2012 (3)
- October 2012 (1)
- September 2012 (2)
- June 2012 (1)
- May 2012 (1)
- April 2012 (1)
- March 2012 (1)
- February 2012 (1)
- January 2012 (1)
- December 2011 (4)
- November 2011 (1)
- August 2011 (1)
- March 2011 (1)
- October 2010 (1)
- May 2010 (3)
- January 2010 (1)
- September 2009 (1)
- August 2009 (5)
- July 2009 (5)
- June 2009 (4)
- May 2009 (1)
- April 2009 (1)
- January 2009 (1)
- December 2008 (6)
- November 2008 (6)
- October 2008 (2)
- September 2008 (11)
- August 2008 (4)
- July 2008 (7)
- June 2008 (2)
- May 2008 (7)
- April 2008 (5)
- March 2008 (9)
- February 2008 (15)
- January 2008 (11)
- December 2007 (3)
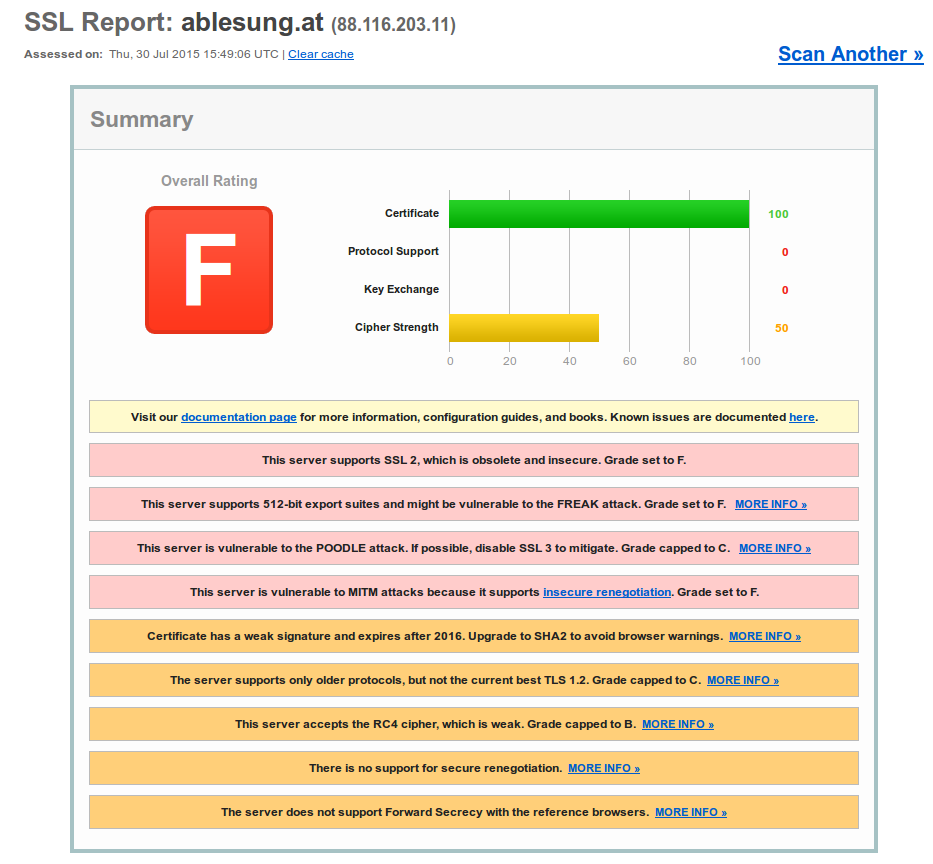
My heart misgives me, if I think about them implementing smart meters
July 30, 2015
Update: The site is used by TINETZ but not operated by it – so their IT department is not responsible. The Whois entries shows this also.
I got today a letter that requests me to enter my electric meter counter reading into the web website of the electric supply company. After getting a warning in my browser I checked the site – and oh my god … they can’t even implement TLS correctly and they want to deploy smart meters with a remote kill switch? Opt-Out if you can 😉
ps: I heard they are ISO 27001 certified – guess not for the website. 😉
Beware: Extreme Networks EXOS ships with hidden SNMPv3 default admin user
July 28, 2015
Update:
Jan reported in the comments that the problem exists also with SNMPv2 – and that’s correct – Just didn’t see that as we’re using only SNMPv3
show configuration "snmp" detail
shows following
configure snmpv3 add community private name private user v1v2c_rw

configure snmpv3 add community public name public user v1v2c_ro
You need to delete that with:
configure snmpv3 del community private

configure snmpv3 del community public
Original article:
A college of mine just found something by performing security hardening on our Extreme Network switches (Thx for this!). We’ve moved away from SNMPv2 sometime ago and are using only SNMPv3. So as we did
disable snmp access snmp-v1v2c
and configured our own SNMPv3 users and we thoughed we’re safe. But that is not true even if typing
show configuration "snmp"
shows only your own users. Typing
show configuration "snmp" detail (detail = display all configuration data including default, otherwise default would not be displayed)
shows following
configure snmpv3 engine-id xxxxx

configure snmpv3 add user admin authentication md5 auth-encrypted hex 35:dc:03:fb:58:13:d3:54:92:0e:1d:fd:ab:3f:b5:9a privacy privacy-encrypted hex 35:dc:03:fb:58:13:d3:54:92:0e:1d:fd:ab:3f:b5:9a

configure snmpv3 add user initial

configure snmpv3 add user initialmd5 authentication md5 auth-encrypted hex 72:e7:51:a0:6b:37:81:a1:26:a5:f0:a1:b8:25:e6:b6

configure snmpv3 add user initialsha authentication sha auth-encrypted hex e9:9d:30:c1:6a:bf:21:45:7e:20:e4:ff:14:2e:28:5f:9c:2e:f3:30

configure snmpv3 add user initialmd5Priv authentication md5 auth-encrypted hex d1:67:eb:88:85:19:4d:7b:c7:09:a4:d4:d5:ba:21:eb privacy privacy-encrypted hex d1:67:eb:88:85:19:4d:7b:c7:09:a4:d4:d5:ba:21:eb

configure snmpv3 add user initialshaPriv authentication sha auth-encrypted hex 34:1d:66:c1:a2:ba:4d:26:8a:da:f5:f6:00:2a:e6:04:88:47:f0:4c privacy privacy-encrypted hex 34:1d:66:c1:a2:ba:4d:26:8a:da:f5:f6:00:2a:e6:04:88:47:f0:4c

configure snmpv3 add group v1v2c_ro user v1v2c_ro sec-model snmpv1

configure snmpv3 add group v1v2c_rw user v1v2c_rw sec-model snmpv1

configure snmpv3 add group v1v2c_ro user v1v2c_ro sec-model snmpv2c

configure snmpv3 add group v1v2c_rw user v1v2c_rw sec-model snmpv2c

configure snmpv3 add group v1v2cNotifyGroup user v1v2cNotifyUser1 sec-model snmpv2c

configure snmpv3 add group v1v2cNotifyGroup user v1v2cNotifyUser2 sec-model snmpv2c

configure snmpv3 add group admin user admin sec-model usm

configure snmpv3 add group initial user initial sec-model usm

configure snmpv3 add group initial user initialmd5 sec-model usm

configure snmpv3 add group initial user initialsha sec-model usm

configure snmpv3 add group initial user initialmd5Priv sec-model usm

configure snmpv3 add group initial user initialshaPriv sec-model usm

configure snmpv3 add access admin sec-model usm sec-level priv read-view defaultAdminView write-view defaultAdminView notify-view defaultNotifyView

configure snmpv3 add access initial sec-model usm sec-level noauth read-view defaultUserView notify-view defaultNotifyView

configure snmpv3 add access initial sec-model usm sec-level authnopriv read-view defaultUserView write-view defaultUserView notify-view defaultNotifyView

configure snmpv3 add access v1v2c_ro sec-model snmpv1 sec-level noauth read-view defaultUserView notify-view defaultNotifyView

configure snmpv3 add access v1v2c_ro sec-model snmpv2c sec-level noauth read-view defaultUserView notify-view defaultNotifyView

configure snmpv3 add access v1v2c_rw sec-model snmpv1 sec-level noauth read-view defaultUserView write-view defaultUserView notify-view defaultNotifyView

configure snmpv3 add access v1v2c_rw sec-model snmpv2c sec-level noauth read-view defaultUserView write-view defaultUserView notify-view defaultNotifyView

configure snmpv3 add access snmpv3group sec-model usm sec-level priv read-view defaultAdminView write-view None notify-view None

configure snmpv3 add access v1v2cNotifyGroup sec-model snmpv1 sec-level noauth notify-view defaultNotifyView

configure snmpv3 add access v1v2cNotifyGroup sec-model snmpv2c sec-level noauth notify-view defaultNotifyView

....

enable snmp access

disable snmp access snmp-v1v2c

enable snmp access snmpv3

enable snmpv3 default-group

enable snmpv3 default-user

enable snmp traps

configure snmp compatibility ip-fragmentation disallow

enable snmp access vr VR-Default

enable snmp access vr VR-Mgmt
Oh my god what are these users? A check into the manual (one of 1732 pages) shows following:

Yes, these are all default users, with published passwords – and sure it works as following shows:
$ snmpwalk -u admin -A password -a MD5 -X password -x DES -l authPriv switchIpAddress -v3

iso.3.6.1.2.1.1.1.0 = STRING: "ExtremeXOS (X450e-48p) version 15.3.4.6 v1534b6-patch1-8 by release-manager on Thu Oct 30 13:07:09 EDT 2014"

iso.3.6.1.2.1.1.2.0 = OID: iso.xxxxxxxxxxxxxx

.....
I really don’t know what the engineers smoked when they put default SNMPv3 users into the switch configuration! Whats the purpose? And then hiding them from show configuration! What do you need to do to fix this?
disable snmpv3 default-group

disable snmpv3 default-user
Now you get:
$ snmpwalk -u admin -A password -a MD5 -X password -x DES -l authPriv switchIpAddress -v3

Error in packet.

Reason: authorizationError (access denied to that object)
If you delete the users additionally with following commands:
configure snmpv3 delete user admin

configure snmpv3 delete user initial

configure snmpv3 delete user initialmd5

configure snmpv3 delete user initialsha

configure snmpv3 delete user initialmd5Priv

configure snmpv3 delete user initialshaPriv
You’ll get:
$ snmpwalk -u admin -A password -a MD5 -X password -x DES -l authPriv switchIpAddress -v3

snmpwalk: Unknown user name
I recommend deleting every configuration line (be it user or group) you don’t need. Only 2 lines protect you otherwise from a completely open switch …. some firmware did make the switch to forget a config line (e.g. when the syntax changed) … so lets be more save by also removing the users.
Looking for a way to change an email address and found clear text admin password
July 9, 2015
Today I wanted to change the email address of my admin User in the Unifi management software. As I couldn’t find anything in the GUI I started to look into the mongodb, which I’m already familiar with as I needed it for the last fix described here. So the part of changing the email was quite simple .. I just did that:
# /usr/bin/mongo --port 27117

MongoDB shell version: 2.6.10

connecting to: 127.0.0.1:27117/test

> use ace

switched to db ace

> db.admin.find()

{ "_id" : ObjectId("YYYYYYYYYYYYY"), "name" : "admin", "lang" : "en_US", "x_password" : "XXXXXXXXX", "email_alert_enabled" : true, "email" : "[email protected]" }

> db.admin.update({"_id" : ObjectId("YYYYYYYYYYYYY")}, { $set: {"email" : "[email protected]"}})

WriteResult({ "nMatched" : 1, "nUpserted" : 0, "nModified" : 1 })

> db.admin.find()

{ "_id" : ObjectId("YYYYYYYYYYYYY"), "name" : "admin", "lang" : "en_US", "x_password" : "XXXXXXX", "email_alert_enabled" : true, "email" : "[email protected]" }

>
But as you see there is a field x_password with the admin password in the clear. What the heck? Why that, this is only needed for login on, the device password can be set per site. So I searched in the internet that someone else found it – and yes, this was reported to the vendor over a year ago.
Unifi upgrade 2.4.6 to 3.2.10: maps not working
July 8, 2015
So after the migration itself worked and I’ve updated the access points I looked into the problem that my maps did not work anymore. Every map showed only white and I was not able to add new maps. After long googling I found part of the answer here. My solution is a bit different and works on the fly:
- Unifi management needs to be running
- check where your mongod is running … on my system its ports 27117
# netstat -pnl | grep mongod

tcp 0 0 127.0.0.1:27117 0.0.0.0:* LISTEN 16760/bin/mongod - login with
/usr/bin/mongo --port 27117 - and type following
use acefollowed bydb.map.chunks.dropIndex("files_id_1_n_1")- choose a new map in the drop down box and it should work again
the full communication looks like this:
# /usr/bin/mongo --port 27117

MongoDB shell version: 2.6.10

connecting to: 127.0.0.1:27117/test

> use ace

switched to db ace

> db.map.chunks.dropIndex("files_id_1_n_1")

{ "nIndexesWas" : 2, "ok" : 1 }

>

bye
Unifi upgrade 2.4.6 to 3.2.10: exception: remove needs a query at src/mongo/shell/collection.js
If you try to upgrade Ubiquiti Networks Unifi system from version 2.4.6 to 3.2.10 it is possible that you’ll run into following problem:
Exception in thread "launcher" org.springframework.beans.factory.BeanCreationException: Error creating bean with name 'class.super': Instantiation of bean failed; nested exception is org.springframework.beans.factory.BeanDefinitionStoreException: Factory method [public final com.ubnt.A.new.B com.ubnt.A.new$$EnhancerByCGLIB$$ad7756e2.class.super()] threw exception; nested exception is org.springframework.beans.factory.BeanCreationException: Error creating bean with name 'Ø00000': Invocation of init method failed; nested exception is com.mongodb.CommandResult$CommandFailure: command failed [$eval]: { "serverUsed" : "/127.0.0.1:27117" , "errmsg" : "exception: remove needs a query at src/mongo/shell/collection.js:299" , "code" : 16722 , "ok" : 0.0}
when trying to start it like this
/usr/bin/java -jar /opt/UniFi/lib/ace.jar start
Searching through the Internet shows that more people have the problem but a working solution is not posted anywhere. So here is it:
The reason for the problem is quit easily found here. Basically the syntax of the command is not correct. So I started to search through the lib directory for a file that contains this incorrect string. It is within /opt/UniFi/lib/ace.jar so I installed the jar command line utility (on Centos 6)
yum install java-1.7.0-openjdk-devel
and extracted all files to search in which it was. As I found it, its easier for you just type:
jar xf ace.jar com/ubnt/A/ooOO/OOoO.class
Now you need a Java class editor – we use this Java one. Download and extract it and start it like this:
java -jar ce.jar
Now you need to find and change the values:
- Click on “Constant Pool”
- Type
db.cache_device.removein the search field and find the line 459 - Activate the “Modify Mode” and change the values
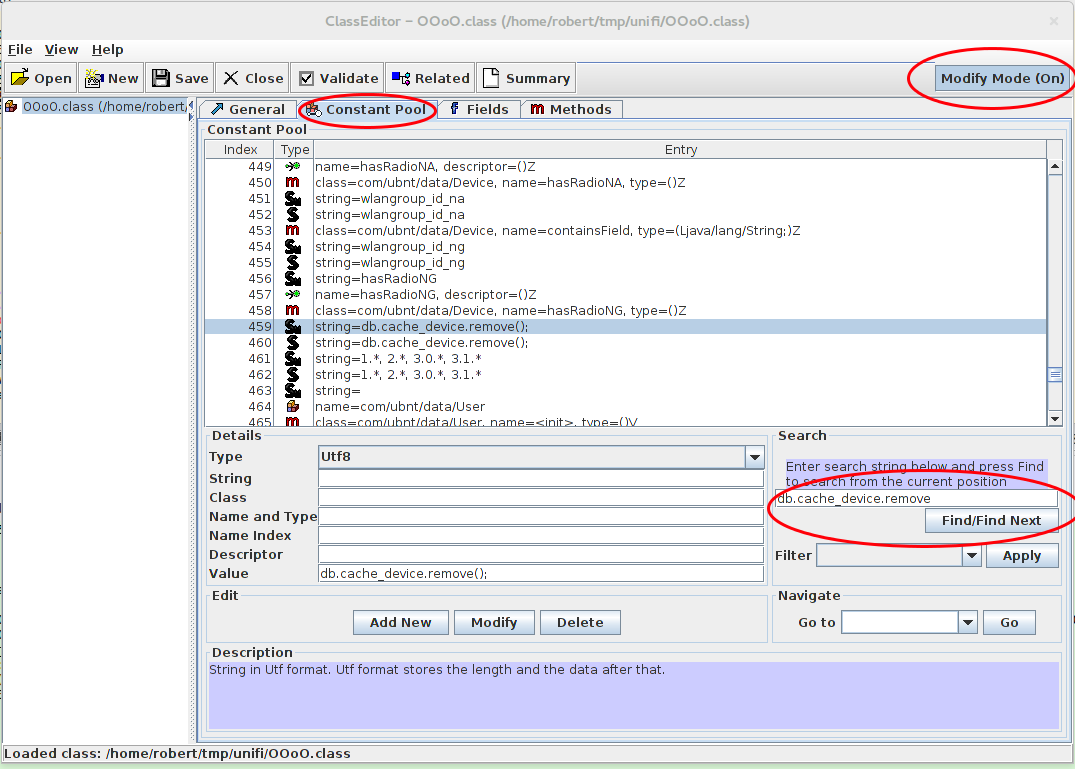
In the end it should look like this (the second one is a link to the fist, just update):
![]()
Now save the file and update the jar file:
jar uf ace.jar com/ubnt/A/ooOO/OOoO.class
Now a restart and migration should work. Hope this helps others .. it took me one hour to find my solution, so I hope its now faster for you. 😉
Powered by WordPress
Entries and comments feeds.
Valid XHTML and CSS.
40 queries. 0.058 seconds.