
-

-

-

- Austria (27)
- General (16)
- HowTo (122)
- IT Security (129)
- Linux (128)
- Networking (65)
- Other (4)
-

- CDemu - a free, gpl cd/dvd-rom device emulator for linux
- heatpumpMonitor - Monitoring a Stiebel Eltron LWZ
- ignis backup tool - the heat-strengthened backup tool
-

- May 2026 (1)
- December 2021 (2)
- September 2019 (1)
- May 2019 (1)
- April 2019 (1)
- January 2019 (1)
- October 2018 (1)
- August 2018 (1)
- February 2018 (1)
- September 2017 (1)
- August 2017 (2)
- May 2017 (1)
- April 2017 (1)
- February 2017 (1)
- January 2017 (2)
- December 2016 (1)
- November 2016 (2)
- October 2016 (1)
- September 2016 (1)
- August 2016 (1)
- July 2016 (2)
- April 2016 (1)
- March 2016 (3)
- February 2016 (4)
- January 2016 (2)
- December 2015 (2)
- November 2015 (2)
- September 2015 (2)
- July 2015 (5)
- June 2015 (4)
- May 2015 (2)
- February 2015 (1)
- January 2015 (4)
- December 2014 (1)
- November 2014 (5)
- October 2014 (4)
- September 2014 (1)
- August 2014 (4)
- July 2014 (3)
- June 2014 (5)
- May 2014 (5)
- April 2014 (1)
- March 2014 (2)
- February 2014 (3)
- January 2014 (5)
- December 2013 (2)
- November 2013 (3)
- September 2013 (3)
- August 2013 (2)
- May 2013 (4)
- April 2013 (1)
- March 2013 (1)
- February 2013 (3)
- December 2012 (3)
- November 2012 (3)
- October 2012 (1)
- September 2012 (2)
- June 2012 (1)
- May 2012 (1)
- April 2012 (1)
- March 2012 (1)
- February 2012 (1)
- January 2012 (1)
- December 2011 (4)
- November 2011 (1)
- August 2011 (1)
- March 2011 (1)
- October 2010 (1)
- May 2010 (3)
- January 2010 (1)
- September 2009 (1)
- August 2009 (5)
- July 2009 (5)
- June 2009 (4)
- May 2009 (1)
- April 2009 (1)
- January 2009 (1)
- December 2008 (6)
- November 2008 (6)
- October 2008 (2)
- September 2008 (11)
- August 2008 (4)
- July 2008 (7)
- June 2008 (2)
- May 2008 (7)
- April 2008 (5)
- March 2008 (9)
- February 2008 (15)
- January 2008 (11)
- December 2007 (3)
Howto install and use the Burp Suite as HTTPS Proxy on Ubuntu 14.04
June 26, 2014
This article shows you how to intercept and analyze HTTPS traffic. This of course only works if you can add your CA to the client system or the client system does not check the key chain. But you would not believe how many clients, specially embedded devices and mobiles apps don’t check it. The software I use in this post is the Free version of the Burp Suite – from the homepage of the Burp Suite:
Burp Suite is an integrated platform for performing security testing of web applications. Its various tools work seamlessly together to support the entire testing process, from initial mapping and analysis of an application’s attack surface, through to finding and exploiting security vulnerabilities.
Installation
As it is written in Java it is really easy to install and run. Just these 3 commands
sudo apt-get install openjdk-7-jre

wget http://portswigger.net/burp/burpsuite_free_v1.6.jar

sudo java -jar -Xmx2g burpsuite_free_v1.6.jar
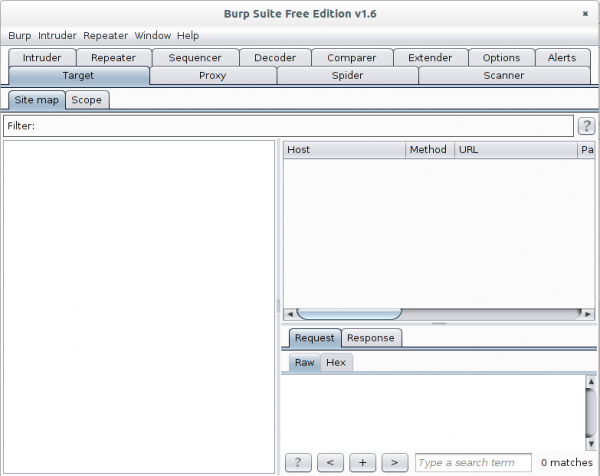
I use sudo for the Java process as it needs in my cases to listen on ports lower than 1024 and this requires root permissions. After entering the last command and accepting the EULA you get following window:
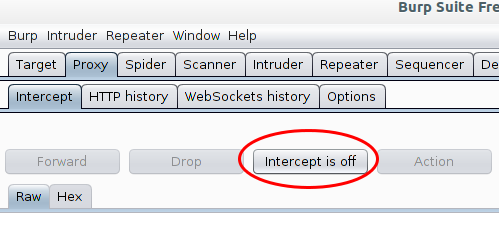
Now go to the Proxy | Intercept tab and click onto “Intercept is on” button to disabled it. Otherwise you’ll need to acknowledge every request.
The proxy is already running but only on localhost, we need it to listen on all to look at traffic from other devices.
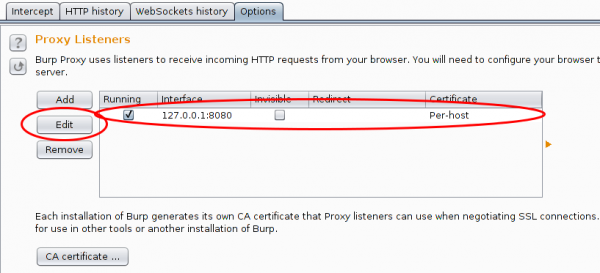
And in this case I want to see the traffic to a specific host from my mobile, so I set Burp to port 443 and to invisible mode and define a redirect IP address (the original host IP address).

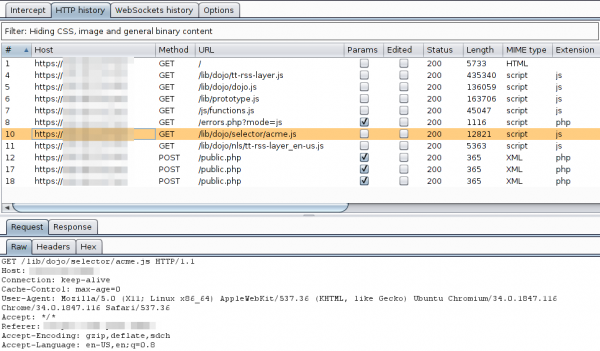
After this, you only need to set on my local DNS Server the wished host name to my desktop IP address and the traffic runs over it and if the client accepts the faked certificate you can look at the traffic. Which looks e.g. like this:
For other devices or requirements it is also possible to use Burp as a HTTP Proxy, just configured it on the client. ARP spoofing is also an idea…..
5 Comments »
RSS feed for comments on this post. TrackBack URI
Leave a comment
Powered by WordPress
Entries and comments feeds.
Valid XHTML and CSS.
51 queries. 0.073 seconds.
Great Post! Was jw if anyone knew what do the options after the sudo java statement mean/do (specifically -Xmx2g)? thanks.
Comment by ano — June 27, 2014 #
From “man java”
-Xmxn
Specifies the maximum size, in bytes, of the memory allocation pool. This value must a multiple of 1024 greater than 2 MB. Append the letter k or K to indicate kilobytes, or m or M to indicate megabytes. The default value is chosen at runtime based on
system configuration.
For server deployments, -Xms and -Xmx are often set to the same value. See Garbage Collector Ergonomics at http://docs.oracle.com/javase/7/docs/technotes/guides/vm/gc-ergonomics.html
Examples:
-Xmx83886080
-Xmx81920k
-Xmx80m
Comment by robert — June 27, 2014 #
[…] time ago I wrote a blog post on Burp as a MitM Proxy (Man-in-the-Middle) – now there is for some purposes an even easier […]
Pingback by US-CERT releases virtual appliance for MitM attacks | Robert Penz Blog — August 24, 2014 #
Thank you for the guide. It was very helpful.
Comment by Mike — March 12, 2015 #
[…] Burp and configured it as an HTTPS proxy on my PC. I’ve already shown how to do that in this blog post. After that I needed only to do following on the […]
Pingback by Blue Code mobile payment – All show and no substance | Robert Penz Blog — March 20, 2016 #