
-

-

-

- Austria (27)
- General (16)
- HowTo (122)
- IT Security (129)
- Linux (128)
- Networking (65)
- Other (4)
-

- CDemu - a free, gpl cd/dvd-rom device emulator for linux
- heatpumpMonitor - Monitoring a Stiebel Eltron LWZ
- ignis backup tool - the heat-strengthened backup tool
-

- May 2026 (1)
- December 2021 (2)
- September 2019 (1)
- May 2019 (1)
- April 2019 (1)
- January 2019 (1)
- October 2018 (1)
- August 2018 (1)
- February 2018 (1)
- September 2017 (1)
- August 2017 (2)
- May 2017 (1)
- April 2017 (1)
- February 2017 (1)
- January 2017 (2)
- December 2016 (1)
- November 2016 (2)
- October 2016 (1)
- September 2016 (1)
- August 2016 (1)
- July 2016 (2)
- April 2016 (1)
- March 2016 (3)
- February 2016 (4)
- January 2016 (2)
- December 2015 (2)
- November 2015 (2)
- September 2015 (2)
- July 2015 (5)
- June 2015 (4)
- May 2015 (2)
- February 2015 (1)
- January 2015 (4)
- December 2014 (1)
- November 2014 (5)
- October 2014 (4)
- September 2014 (1)
- August 2014 (4)
- July 2014 (3)
- June 2014 (5)
- May 2014 (5)
- April 2014 (1)
- March 2014 (2)
- February 2014 (3)
- January 2014 (5)
- December 2013 (2)
- November 2013 (3)
- September 2013 (3)
- August 2013 (2)
- May 2013 (4)
- April 2013 (1)
- March 2013 (1)
- February 2013 (3)
- December 2012 (3)
- November 2012 (3)
- October 2012 (1)
- September 2012 (2)
- June 2012 (1)
- May 2012 (1)
- April 2012 (1)
- March 2012 (1)
- February 2012 (1)
- January 2012 (1)
- December 2011 (4)
- November 2011 (1)
- August 2011 (1)
- March 2011 (1)
- October 2010 (1)
- May 2010 (3)
- January 2010 (1)
- September 2009 (1)
- August 2009 (5)
- July 2009 (5)
- June 2009 (4)
- May 2009 (1)
- April 2009 (1)
- January 2009 (1)
- December 2008 (6)
- November 2008 (6)
- October 2008 (2)
- September 2008 (11)
- August 2008 (4)
- July 2008 (7)
- June 2008 (2)
- May 2008 (7)
- April 2008 (5)
- March 2008 (9)
- February 2008 (15)
- January 2008 (11)
- December 2007 (3)
Howto setup a Debian 9 with Proxmox and containers using as few IPv4 and IPv6 addresses as possible
August 4, 2017
My current Linux Root-Server needs to be replaced with a newer Linux version and should also be much cheaper then the current one. So at first I did look what I don’t like about the current one:
- It is expensive with about 70 Euros / months. Following is responsible for that
- My own HPE hardware with 16GB RAM and a software RAID (hardware raid would be even more expensive) – iLo (or something like it) is a must for me 🙂
- 16 additional IPv4 addresses for the visualized container and servers
- Large enough backup space to get back some days.
- A base OS which makes it hard to run newer Linux versions in the container (sure old ones like CentOS6 still get updates, but that will change)
- Its time to move to newer Linux versions in the containers
- OpenVZ based containers which are not mainstream anymore
Then I looked what surrounding conditions changed since I did setup my current server.
- I’ve IPv6 at home and 70% of my traffic is IPv6 (thx to Google (specially Youtube) and Cloudflare)
- IPv4 addresses got even more expensive for Root-Servers
- I’m now using Cloudflare for most of the websites I host.
- Cloudflare is reachable via IPv4 and IPv6 and can connect back either with IPv4 or IPv6 to my servers
- With unprivileged containers the need to use KVM for security lessens
- Hosting providers offer now KVM servers for really cheap, which have dedicated reserved CPUs.
- KVM servers can host containers without a problem
This lead to the decision to try following setup:
- A KVM based Server for less than 10 Euro / month at Netcup to try the concept
- No additional IPv4 addresses, everything should work with only 1 IPv4 and a /64 IPv6 subnet
- Base OS should be Debian 9 (“Stretch”)
- For ease of configuration of the containers I will use the current Proxmox with LXC
- Don’t use my own HTTP reverse proxy, but use exclusively Cloudflare for all websites to translate from IPv4 to IPv6
![]()
After that decision was reached I search for Howtos which would allow me to just set it up without doing much research. Sadly that didn’t work out. Sure, there are multiple Howtos which explain you how to setup Debian and Proxmox, but if you get into the nifty parts e.g. using only minimal IP addresses, working around MAC address filters at the hosting providers (which is quite a important security function, BTW) and IPv6, they will tell you: You need more IP addresses, get a really complicated setup or just ignore that point at all.
As you can read that blog post you know that I found a way, so expect a complete documentation on how to setup such a server. I’ll concentrate on the relevant parts to allow you to setup a similar server. Of course I did also some security harding like making a secure ssh setup with only public keys, the right ciphers, …. which I won’t cover here.
Setting up the OS
I used the Debian 9 minimal install, which Netcup provides, and did change the password, hostname, changed the language to English (to be more exact to C) and moved the SSH Port a non standard port. The last one I did not so much for security but for the constant scans on port 22, which flood the logs.
passwd

vim /etc/hosts

vim /etc/hostname

dpkg-reconfigure locales

vim /etc/ssh/sshd_config

/etc/init.d/ssh restart
I followed that with making sure no firewall is active and installed the net-tools so I got netstat and ifconfig.
apt install net-tools
At last I did a check if any packages needs an update.
apt update

apt upgrade
Installing Proxmox
First I checked if the IP address returns the correct hostname, as otherwise the install fails and you need to start from scratch.
hostname --ip-address
Adding the Proxmox Repos to the system and installing the software:
echo "deb http://download.proxmox.com/debian/pve stretch pve-no-subscription" > /etc/apt/sources.list.d/pve-install-repo.list

wget http://download.proxmox.com/debian/proxmox-ve-release-5.x.gpg -O /etc/apt/trusted.gpg.d/proxmox-ve-release-5.x.gpg

apt update && apt dist-upgrade

apt install proxmox-ve postfix open-iscsi
After that I did a reboot and booted the Proxmox kernel, I removed some packages I didn’t need anymore
apt remove os-prober linux-image-amd64 linux-image-4.9.0-3-amd64
Now I did my first login to the admin GUI to https://<hostname>:8006/ and enabled the Proxmox firewall
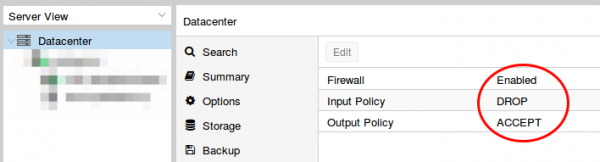
Than set the firewall rules for protecting the host (I did that for the whole datacenter even if I only have one server at this moment). Ping is allowed, the Webgui and ssh.

I mate sure with
iptables -L -xvn
that the firewall was running.
BTW, if you don’t like the nagging windows at every login that you need a license and if this is only a testing machine as mine is currently, type following:
sed -i.bak 's/NotFound/Active/g' /usr/share/perl5/PVE/API2/Subscription.pm && systemctl restart pveproxy.service
Now we need to configure the network (vmbr0) for our virtual systems and this is the point where my Howto will go an other direction. Normally you’re told to configure the vmbr0 and put the physical interface into the bridge. This bridging mode is the easiest normally, but won’t work here.
Routing instead of bridging
Normally you are told that if you use public IPv4 and IPv6 addresses in containers you should bridge it. Yes thats true, but there is one problem. LXC containers have their own MAC addresses. So if they send traffic via the bridge to the datacenter switch, the switch sees the virtual MAC address. In a internal company network on a physical host that is normally not a problem. In a datacenter where different people rent their servers thats not good security practice. Most hosting providers will filter the MAC addresses on the switch (sometimes additional IPv4 addresses come with the right to use additional MAC addresses, but we want to save money here 🙂 ). As this server is a KVM guest OS the filtering is most likely part of the virtual switch (e.g. for VMware ESX this is the default even).
With ebtables it is possible to configure a SNAT for the MAC addresses, but that will get really complicated really fast – trust me with networking stuff – when I say complicated it is really complicated fast. 🙂
So, if we can’t use bridging we need to use routing. Yes the routing setup on the server is not so easy, but it is clean and easy to understand.
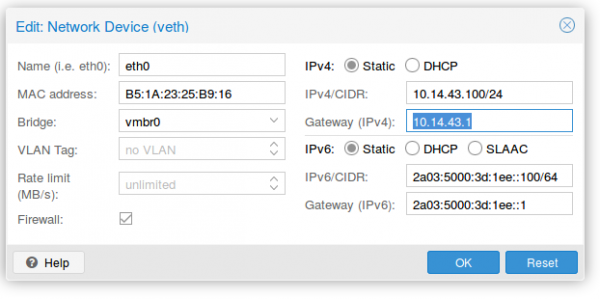
First we configure the physical interface in the admin GUI
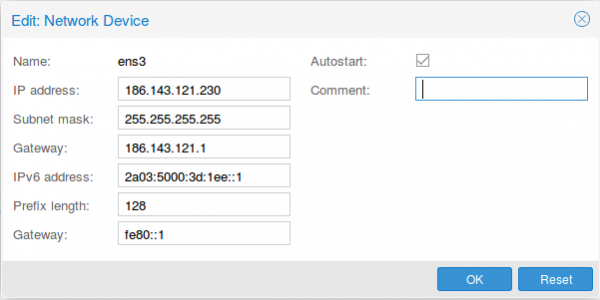
Two configurations are different than at normal setups. The provider gave you most likely a /23 or /24, but I use a subnet mask /32 (255.255.255.255), as I only want to talk to the default gateway and not the other servers from other customers. If the switch thinks traffic is ok, he can reroute it for me. The provider switch will defend its IP address against ARP spoofing, I’m quite sure as otherwise a incorrect configuration of a customer will break the network for all customer – the provider will make that mistake only once. For IPv6 we do basically the same with /128 but in this case we also want to reuse the /64 subnet on our second interface.

As I don’t have additional IPv4 addresses, I’ll use a local subnet to provide access to IPv4 addresses to the containers (via NAT), the IPv6 address gets configured a second time with the /64 subnet mask. This setup allows use to route with only one /64 – we’re cheap … no extra money needed.
Now we reboot the server so that the /etc/network/interfaces config gets written. We need to add some additional settings there, so it looks like this
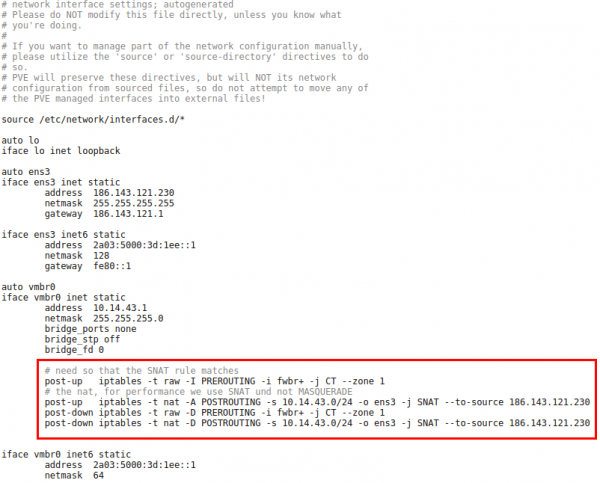
The first command in the red frame is needed to make sure that traffic from the containers pass the second rule. Its some kind lxc specialty. The second command is just a simple SNAT to your public IPv4 address. The last 2 are for making sure that the iptable rules get deleted if you stop the network.
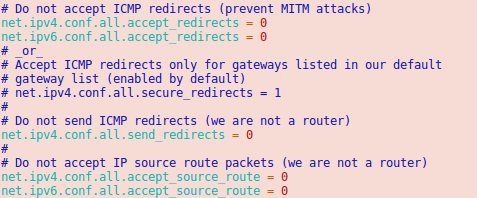
Now we need to make sure that the container traffic gets routed so we put following lines into /etc/sysctl.conf
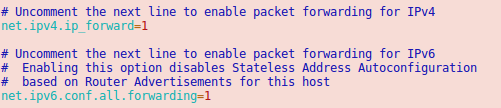
And we should also enable following lines
Now we’re almost done. One point remains. The switch/router which is our default gateway needs to be able to send packets to our containers. For this he does for IPv6 something similar to an ARP request. It is called neighbor discovery and as the network of the container is routed we need to answer the request on the host system.
Neighbor Discovery Protocol (NDP) Proxy
We could now do this by using proxy_ndp, the IPv6 variant of proxy_arp. First enable proxy_ndp by running:
sysctl -w net.ipv6.conf.all.proxy_ndp=1
You can enable this permanently by adding the following line to /etc/sysctl.conf:
net.ipv6.conf.all.proxy_ndp = 1
Then run:
ip -6 neigh add proxy 2a03:5000:3d:1ee::100 dev ens3
This means for the host Linux system to generate Neighbor Advertisement messages in response to Neighbor Solicitation messages for 2a03:5000:3d:1ee::100 (e.g. our container with ID 100) that enters through ens3.
While proxy_arp could be used to proxy a whole subnet, this appears not to be the case with proxy_ndp. To protect the memory of upstream routers, you can only proxy defined addresses. That’s not a simple solution, if we need to add an entry for every container. But we’re saved from that as Debian 9 ships with an daemon that can proxy a whole subnet, ndppd. Let’s install and configure it:
apt install ndppd

cp /usr/share/doc/ndppd/ndppd.conf-dist /etc/ndppd.conf
and write a config like this
route-ttl 30000

proxy ens3 {

router no

timeout 500

ttl 30000

rule 2a03:5000:3d:1ee::/64 {

auto

}

}
now enable it by default and start it
update-rc.d ndppd defaults

/etc/init.d/ndppd start
Now it is time to boot the system and create you first container.
Container setup
The container setup is easy, you just need to use the Proxmox host as default gateway.
As you see the setup is quite cool and it allows you to create containers without thinking about it. A similar setup is also possible with IPv4 addresses. As I don’t need it I’ll just quickly describe it here.
Short info for doing the same for an additional IPv4 subnet
Following needs to be added to the /etc/network/interfaces:
iface ens3 inet static

pointopoint 186.143.121.1
iface vmbr0 inet static

address 186.143.121.230 # Our Host will be the Gateway for all container

netmask 255.255.255.255

# Add all single IP's from your /29 subnet

up route add -host 186.143.34.56 dev br0

up route add -host 186.143.34.57 dev br0

up route add -host 186.143.34.58 dev br0

up route add -host 186.143.34.59 dev br0

up route add -host 186.143.34.60 dev br0

up route add -host 186.143.34.61 dev br0

up route add -host 186.143.34.62 dev br0

up route add -host 186.143.34.63 dev br0

.......
We’re reusing the ens3 IP address. Normally we would add our additional IPv4 network e.g. a /29. The problem with this straight forward setup would be that we would lose 2 IP addresses (netbase and broadcast). Also the pointopoint directive is important and tells our host to send all requests to the datacenter IPv4 gateway – even if we want to talk to our neighbors later.
The for the container setup you just need to replace the IPv4 config with following
auto eth0

iface eth0 inet static

address 186.143.34.56 # Any IP of our /29 subnet

netmask 255.255.255.255

gateway 186.143.121.13 # Our Host machine will do the job!

pointopoint 186.143.121.1
How that saved you some time setting up you own system!
A security minded guy forced to buy a Wifi enabled cleaning robot
August 1, 2017
First I want to tell you all that I wanted a vacuum cleaning robot without Internet connection, but I couldn’t find one which fulfilled the requirements. At first I thought the DEEBOT M81 from ECOVACS would be such a device (vacuum and mop combo and possible to carry between rooms as it works randomly), but don’t buy it if you’ve stairs. On the first day alone at home it went 2 floors down, somehow it did look okay and still worked after the kamikaze. We just needed to search for it through the whole house. After that I did some tests, I found out that it stops 6 times at the stairs and falls down the 7 or 8 time. Searching through the Internet showed me that I’m not the only one. The second problem was that configuring the timer differently for some days (like not cleaning on weekends) was not possible. After loosing my last chance for a non Internet connected device I went for the DEEBOT M81 Pro which needs an Android or IPhone app and WiFi, if you want to configure the timer for not cleaning on weekends. This is my story about that – I guess – a typical IoT device.

The App – ECOVACS
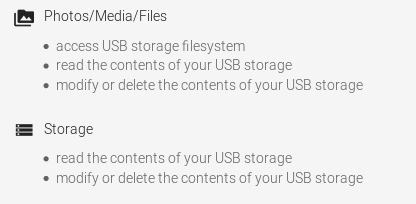
After unpacking and charging of the robot, I went and installed the App on my test mobile. Why not on my real mobile? Take a look at the required permissions:
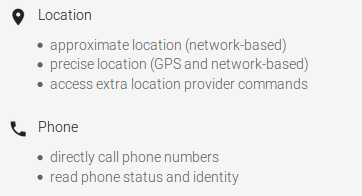
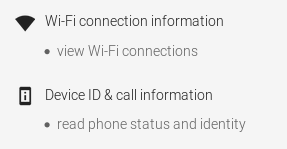
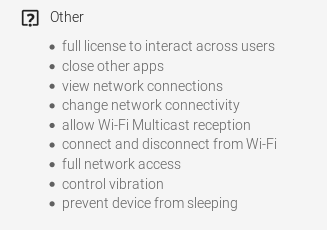
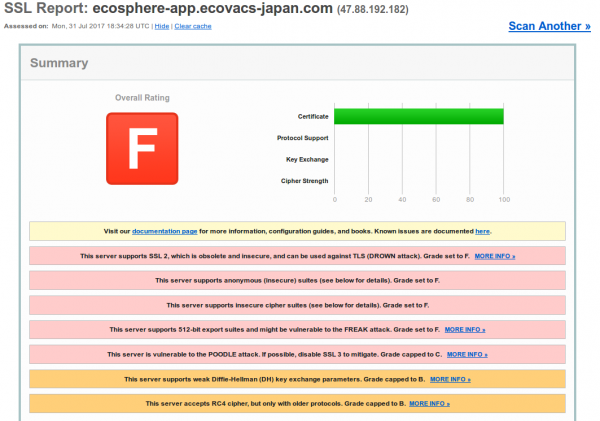
I though that is just an App to control my vacuum robot …. guess not. Anyway I installed it on my test system and created a dummy user. Of course I took a look at the traffic. First it connects to ecosphere-app.ecovacs-japan.com,
![]()
where it does an HTTPS connect. Hm, maybe thats better than I thought, but the TLS config of the server is bad, but at least it encrypted – so there is still hope.
Looking at the other traffic I saw a XMPP / jabber connection (lbat.ecouser.net / 47.91.78.247), which was encrypted, but sadly with a self signed certificate. I’ll thought I’ll take a look at the traffic via MitM later, lets get it to work before.
Getting it to work
It looks like the robot is creating a SSID for the App on the mobile to connect to, after you pressed the WiFi button >3 sec. So the exchange of the WiFi password seems to secure enough. But it took me almost 1h to get the robot to connect to my IoT network and I didn’t find any information or tips online. I changed following on my side to get it to work, maybe that helps somebody else:
- I enabled the location stuff (which I’ve disabled by default) on the mobile as I remembered the WiFi Analyser App always tells me to enabled that to sees WiFi networks.
- I needed to change my IoT network to support legacy WiFi modes. My normal setup is:

I needed to change it to following in order for the robot to be able to connect:
Robot traffic
The first request from the robot after getting an IP address is to request a HTTP connection to lbo.ecouser.net (47.91.78.247) on Port 8007
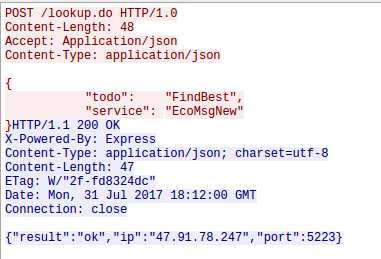
Hey we know the IP address and port – that’s the Jabber server the App also connects to. But before the robot connects to the Jabber server he does a second HTTP request, this time to an IP address (47.88.193.19:8005) and not a DNS name. Thats interesting:
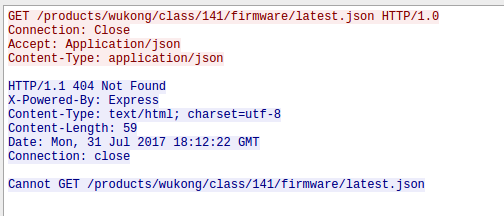
That looks like a check for newer firmware …. firmware updates unencrypted .. what can possible go wrong here. As the request currently returns no new firmware I can’t look at that more closely – something for the future. Checking Shodan Info on that IP address is interesting. It runs a portmapper and ntp server reachable from the internet … someone already using that as DDOS amplifier? I’m not talking about the not configured nginx which also leaks IP addresses in the certificate: IP Address:120.26.244.107, IP Address:121.41.41.198, IP Address:47.88.193.19
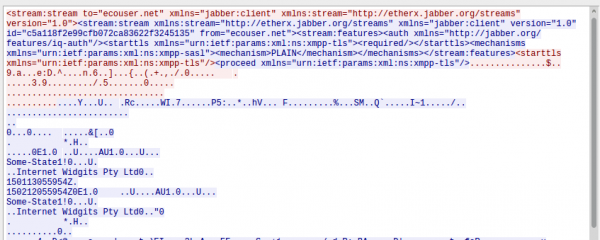
Let’s go back to the Jabber server the robot connect to. The App uses a self signed certificate “protected” channel but the robot does connect completely in the clear – thats nice so I don’t need to do a MitM attack. The wireshark trace is so full on information that I’m really not sure what I can show you without making it too easy for you to control my robot.
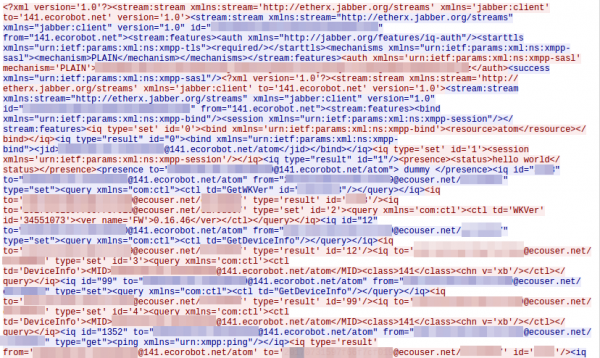
Following is shown in the screenshot (which shows only a a part of the communication):
- The logon to the server via PLAIN authentication, which is comprised of
- username: Is the serial number of the device, which is also printed onto the box the device is sold in.

- password: Looks like a MD5 hash of something, as its 32 hex chars – something to investigate
- username: Is the serial number of the device, which is also printed onto the box the device is sold in.
- It shares its online (presence status in jabber terms) with the app
- It gets asked for a version, I guess the firmware version which it returns as 0.16.46 – hope a thats already stable
Looking at later traffic following requests issued by the app:
- GetDeviceInfo
- SetTime
- GetChargeState
- GetBatteryInfo
- GetWKVer
- GetError
- GetOnOff
- GetSched
- GetLifeSpan
I didn’t control the device via the App otherwise there should be much more commands.
Questions and thoughts
I don’t really see a peering which makes sure that only the right App can control a robot, so it is maybe possible to control other robots. As the user ID used on the Jabber server is just the serial number with @141.ecorobot.net/atom added, it should be ease to guess additional user IDs. There is no need to know the password of the robot. On the other side it should be possible to create your own Jabber server and redirect traffic to it. Also writing a DIY App without all that App permissions should be possible and not to hard. The robot I bought is not so interesting for an attacker as it cannot provide room layouts as the more expensive ones provide. The screenshots of the App show what is possible:
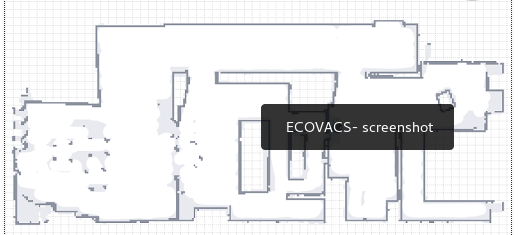
I guess I wait for the next versions of the robots that provide a microphone and/or a camera – than it gets really interesting.
As I was able to configure the schedules via the App and set the time, I’ll try if that still works if the robot is not able to connect to the Internet. If so I’ll got that route and enable the Internet connection only if I need to change the schedules.
Ps: you should really have a separate IoT network.
Powered by WordPress
Entries and comments feeds.
Valid XHTML and CSS.
40 queries. 0.055 seconds.