
-

-

-

- Austria (27)
- General (16)
- HowTo (122)
- IT Security (129)
- Linux (128)
- Networking (65)
- Other (4)
-

- CDemu - a free, gpl cd/dvd-rom device emulator for linux
- heatpumpMonitor - Monitoring a Stiebel Eltron LWZ
- ignis backup tool - the heat-strengthened backup tool
-

- May 2026 (1)
- December 2021 (2)
- September 2019 (1)
- May 2019 (1)
- April 2019 (1)
- January 2019 (1)
- October 2018 (1)
- August 2018 (1)
- February 2018 (1)
- September 2017 (1)
- August 2017 (2)
- May 2017 (1)
- April 2017 (1)
- February 2017 (1)
- January 2017 (2)
- December 2016 (1)
- November 2016 (2)
- October 2016 (1)
- September 2016 (1)
- August 2016 (1)
- July 2016 (2)
- April 2016 (1)
- March 2016 (3)
- February 2016 (4)
- January 2016 (2)
- December 2015 (2)
- November 2015 (2)
- September 2015 (2)
- July 2015 (5)
- June 2015 (4)
- May 2015 (2)
- February 2015 (1)
- January 2015 (4)
- December 2014 (1)
- November 2014 (5)
- October 2014 (4)
- September 2014 (1)
- August 2014 (4)
- July 2014 (3)
- June 2014 (5)
- May 2014 (5)
- April 2014 (1)
- March 2014 (2)
- February 2014 (3)
- January 2014 (5)
- December 2013 (2)
- November 2013 (3)
- September 2013 (3)
- August 2013 (2)
- May 2013 (4)
- April 2013 (1)
- March 2013 (1)
- February 2013 (3)
- December 2012 (3)
- November 2012 (3)
- October 2012 (1)
- September 2012 (2)
- June 2012 (1)
- May 2012 (1)
- April 2012 (1)
- March 2012 (1)
- February 2012 (1)
- January 2012 (1)
- December 2011 (4)
- November 2011 (1)
- August 2011 (1)
- March 2011 (1)
- October 2010 (1)
- May 2010 (3)
- January 2010 (1)
- September 2009 (1)
- August 2009 (5)
- July 2009 (5)
- June 2009 (4)
- May 2009 (1)
- April 2009 (1)
- January 2009 (1)
- December 2008 (6)
- November 2008 (6)
- October 2008 (2)
- September 2008 (11)
- August 2008 (4)
- July 2008 (7)
- June 2008 (2)
- May 2008 (7)
- April 2008 (5)
- March 2008 (9)
- February 2008 (15)
- January 2008 (11)
- December 2007 (3)
Block Ransomware botnet C&C traffic with a Mikrotik router
March 14, 2016
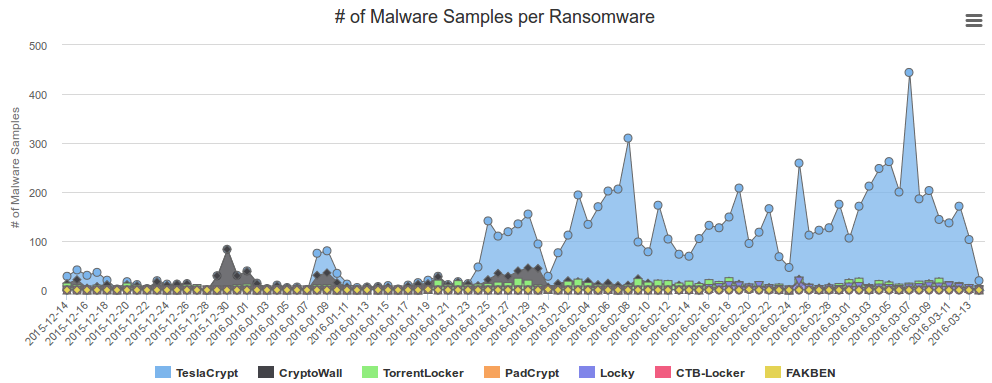
In my last blog post I wrote about blocking, detecting and mitigating the Locky Ransomware. I’ve referenced to a earlier blog post of mine which allows to block traffic to/from the Tor network. This blog post combines both – a way to block Ransomware botnet C&C traffic on a Mikrotik router. The base are the block lists from Abuse.ch, which also provide a nice statistic. Locky is not the most common Ransomware today.
Linux part
You need also a small Linux/Unix server to help. This server needs to be trustworthy one as the router executes a script this server generates. This is required as RouterOS is only able to parse text files up to 4096 by itself, and the IP address and domain list is longer.
So first we create the script /usr/local/sbin/generateMalwareBlockScripts.py on the Linux server by downloading following Python script. Open the file and change the paths to your liking. The filename path works on CentOS, on Ubuntu you need to remove the html directory. Now make the file executable
chmod 755 /usr/local/sbin/generateMalwareBlockScripts.py
and execute it
/usr/local/sbin/generateMalwareBlockScripts.py
No output is good. Make sure that the file is reachable via HTTP (e.g. install httpd on CentOS) from the router. If everything works make sure that the script is called once every hour to update the list. e.g. place a symlink in /etc/cron.hourly:
ln -s /usr/local/sbin/generateMalwareBlockScripts.py /etc/cron.hourly/generateMalwareBlockScripts.py
Mikrotik part
Copy and paste following to get the IP address script onto the router:
/system script

add name=scriptUpdateMalwareIPs owner=admin policy=ftp,reboot,read,write,policy,test,password,sniff,sensitive source="# Script which will download a script which adds the malware IP addresses to an address-list\

\n# Using a script to add this is required as RouterOS can only parse 4096 byte files, and the list is longer\

\n# Written by Robert Penz <[email protected]> \

\n# Released under GPL version 3\

\n\

\n# get the \"add script\"\

\n/tool fetch url=\"http://10.xxx.xxx.xxx/addMalwareIPs.rsc\" mode=http\

\n:log info \"Downloaded addMalwareIPs.rsc\"\

\n\

\n# remove the old entries\

\n/ip firewall address-list remove [/ip firewall address-list find list=addressListMalware]\

\n\

\n# import the new entries\

\n/import file-name=addMalwareIPs.rsc\

\n:log info \"Removed old IP addresses and added new ones\"\

\n"
and copy and paste following for the DNS filtering script – surely you can combine them … I let them separated as maybe someone needs only one part:
/system script

add name=scriptUpdateMalwareDomains owner=admin policy=ftp,reboot,read,write,policy,test,password,sniff,sensitive source="# Script which will download a script which adds the malware domains as static DNS entry\

\n# Using a script to add this is required as RouterOS can only parse 4096 byte files, and the list is longer\

\n# Written by Robert Penz <[email protected]> \

\n# Released under GPL version 3\

\n\

\n# get the \"add script\"\

\n/tool fetch url=\"http://10.xxx.xxx.xxx/addMalwareDomains.rsc\" mode=http\

\n:log info \"Downloaded addMalwareDomains.rsc\"\

\n\

\n# remove the old entries\

\n/ip dns static remove [/ip dns static find comment~\"addMalwareDomains\"]\

\n\

\n# import the new entries\

\n/import file-name=addMalwareDomains.rsc\

\n:log info \"Removed old domains and added new ones\"\

\n"
To make the first try run use following command
/system script run scriptUpdateMalwareIPs
and
/system script run scriptUpdateMalwareDomains
if you didn’t get an error
/ip firewall address-list print
and
/ip dns static print
should show many entries. Now you only need to run the script once a hour which following command does:
/system scheduler add interval=1h name=schedulerUpdateMalwareIPs on-event=scriptUpdateMalwareIPs start-date=nov/30/2014 start-time=00:05:00
and
/system scheduler add interval=1h name=schedulerUpdateMalwareDomains on-event=scriptUpdateMalwareDomains start-date=nov/30/2014 start-time=00:10:00
You can use the address list and DNS blacklist now in various ways .. the simplest is following
/ip firewall filter

add chain=forward comment="just the answer packets --> pass" connection-state=established

add chain=forward comment="just the answer packets --> pass" connection-state=related

add action=reject chain=forward comment="no Traffic to malware IP addresses" dst-address-list=addressListMalware log=yes log-prefix=malwareIP out-interface=pppoeDslInternet

add action=reject chain=forward comment="report Traffic to DNS fake IP address" dst-address=10.255.255.255 log=yes log-prefix=malwareDNS out-interface=pppoeDslInternet

add chain=forward comment="everything from internal is ok --> pass" in-interface=InternalInterface
If a clients generates traffic to such DNS names or IP address you’ll get following in your log (and the traffic gets blocked):
20:07:16 firewall,info malwareIP forward: in:xxx out:pppoeDslInternet, src-mac xx:xx:xx:xx:xx:xx, proto ICMP (type 8, code 0), 10.xxx.xxx.xxx->104.xxx.xxx.xxx, len 84
or
20:09:34 firewall,info malwareDNS forward: in:xxx out:pppoeDslInternet, src-mac xx:xx:xx:xx:xx:xx, proto ICMP (type 8, code 0), 10.xxx.xxx.xxx ->10.255.255.255, len 84
ps: The Python script is done in a way that it easily allows you to add also other block lists … e.g. I added the Feodo blocklist from Abuse.ch.
Setup Let’s encrypt TLS certificate for Proxmox [Update]
February 21, 2016
The graphical interface of Proxmox runs on port 8006 and uses HTTPS. By default this is a self signed certificate, which is a problem if you login in from a client the first time. In this case you’re not sure if there is no MitM attack going on. But there is a solution for this by using Let’s encrypt.
First you need to install git
apt-get install git
download the client software
cd /root

git clone https://github.com/letsencrypt/letsencrypt
and now you need to “patch” it as with running containers the check for a free port 80 most likely fails as a container with a running a web server is quite common. Open this file /root/letsencrypt/letsencrypt/plugins/util.py with an editor and place
return False
as first command in the already_listening method. Make sure that it is aligned with the line above and below as Python requires that. It should look this:

ps: If you started to read this article after calling ./letsencrypt-auto the first time you also need to patch following file the same way.
/root/.local/share/letsencrypt/local/lib/python2.7/site-packages/letsencrypt/plugins/util.py
[Update] In the newer version the client is called certbot and so the path got changed to
/root/.local/share/letsencrypt/local/lib/python2.7/site-packages/certbot/plugins/util.py
[/Update]
Now make sure that Port 80 is not firewalled and therefore reachable from the Internet and call following command:
cd /root/letsencrypt/

./letsencrypt-auto certonly --standalone --standalone-supported-challenges http-01 -d <dnsname>
Replace with the <dnsname> with the dns name you use to connect to the management Web GUI. If all worked, you should see following:
IMPORTANT NOTES:

- Congratulations! Your certificate and chain have been saved at

/etc/letsencrypt/live//fullchain.pem. Your cert

will expire on 2016-05-21. To obtain a new version of the

certificate in the future, simply run Let's Encrypt again.

- If you like Let's Encrypt, please consider supporting our work by:

....
Now only saving the old certificate with these commands …
mv /etc/pve/pve-root-ca.pem /etc/pve/pve-root-ca.pem.orig

mv /etc/pve/local/pve-ssl.key /etc/pve/local/pve-ssl.key.orig

mv /etc/pve/local/pve-ssl.pem /etc/pve/local/pve-ssl.pem.orig
and copying the new ones to the correct place …
cp /etc/letsencrypt/live/<hostname>/chain.pem /etc/pve/pve-root-ca.pem

cp /etc/letsencrypt/live/<hostname>/privkey.pem /etc/pve/local/pve-ssl.key

cp /etc/letsencrypt/live/<hostname>/cert.pem /etc/pve/local/pve-ssl.pem
followed by a restart of the processes:
service pveproxy restart

service pvedaemon restart
is open.
The last 5 commands are needed, because the special file system Proxmox uses for /etc/pve does not support symlinks. You need to execute that 5 commands after each renewal. The option for this is “renew”. You can/should automate the renew process.
Unifi upgrade 2.4.6 to 3.2.10: maps not working
July 8, 2015
So after the migration itself worked and I’ve updated the access points I looked into the problem that my maps did not work anymore. Every map showed only white and I was not able to add new maps. After long googling I found part of the answer here. My solution is a bit different and works on the fly:
- Unifi management needs to be running
- check where your mongod is running … on my system its ports 27117
# netstat -pnl | grep mongod

tcp 0 0 127.0.0.1:27117 0.0.0.0:* LISTEN 16760/bin/mongod - login with
/usr/bin/mongo --port 27117 - and type following
use acefollowed bydb.map.chunks.dropIndex("files_id_1_n_1")- choose a new map in the drop down box and it should work again
the full communication looks like this:
# /usr/bin/mongo --port 27117

MongoDB shell version: 2.6.10

connecting to: 127.0.0.1:27117/test

> use ace

switched to db ace

> db.map.chunks.dropIndex("files_id_1_n_1")

{ "nIndexesWas" : 2, "ok" : 1 }

>

bye
Unifi upgrade 2.4.6 to 3.2.10: exception: remove needs a query at src/mongo/shell/collection.js
If you try to upgrade Ubiquiti Networks Unifi system from version 2.4.6 to 3.2.10 it is possible that you’ll run into following problem:
Exception in thread "launcher" org.springframework.beans.factory.BeanCreationException: Error creating bean with name 'class.super': Instantiation of bean failed; nested exception is org.springframework.beans.factory.BeanDefinitionStoreException: Factory method [public final com.ubnt.A.new.B com.ubnt.A.new$$EnhancerByCGLIB$$ad7756e2.class.super()] threw exception; nested exception is org.springframework.beans.factory.BeanCreationException: Error creating bean with name 'Ø00000': Invocation of init method failed; nested exception is com.mongodb.CommandResult$CommandFailure: command failed [$eval]: { "serverUsed" : "/127.0.0.1:27117" , "errmsg" : "exception: remove needs a query at src/mongo/shell/collection.js:299" , "code" : 16722 , "ok" : 0.0}
when trying to start it like this
/usr/bin/java -jar /opt/UniFi/lib/ace.jar start
Searching through the Internet shows that more people have the problem but a working solution is not posted anywhere. So here is it:
The reason for the problem is quit easily found here. Basically the syntax of the command is not correct. So I started to search through the lib directory for a file that contains this incorrect string. It is within /opt/UniFi/lib/ace.jar so I installed the jar command line utility (on Centos 6)
yum install java-1.7.0-openjdk-devel
and extracted all files to search in which it was. As I found it, its easier for you just type:
jar xf ace.jar com/ubnt/A/ooOO/OOoO.class
Now you need a Java class editor – we use this Java one. Download and extract it and start it like this:
java -jar ce.jar
Now you need to find and change the values:
- Click on “Constant Pool”
- Type
db.cache_device.removein the search field and find the line 459 - Activate the “Modify Mode” and change the values
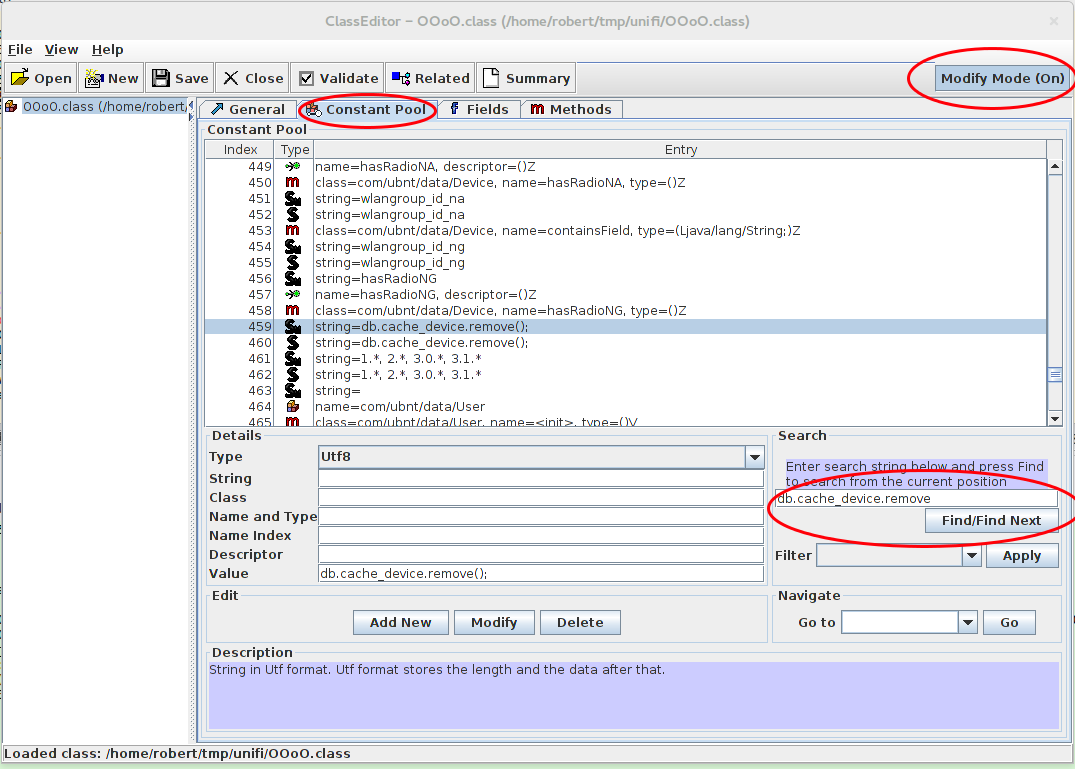
In the end it should look like this (the second one is a link to the fist, just update):
![]()
Now save the file and update the jar file:
jar uf ace.jar com/ubnt/A/ooOO/OOoO.class
Now a restart and migration should work. Hope this helps others .. it took me one hour to find my solution, so I hope its now faster for you. 😉
A practical example how broken MD5 really is
November 5, 2014
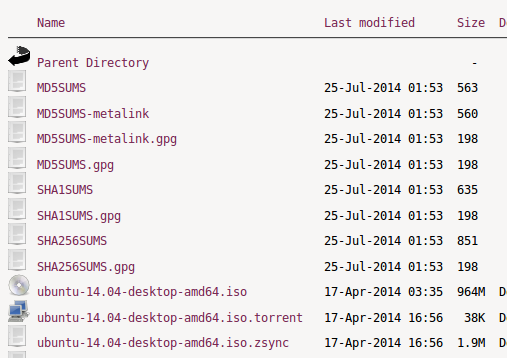
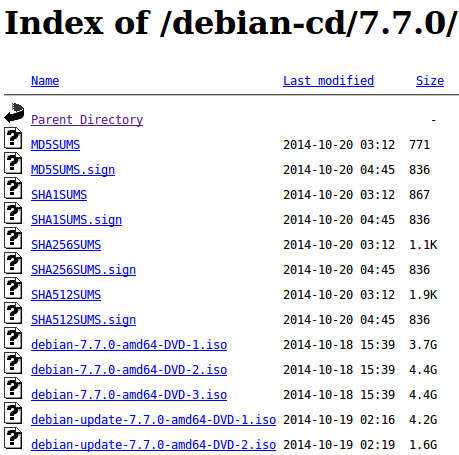
Nat McHugh did a wonderful post with two completely different monochrome pictures which have the same MD5 sum. Take a look! MD5 as a secure hash function should provide the properties shown in this Wikipedia article. But as Nat says in his own words:
I believe he is correct, nothing shows better how broken MD5 is than two images with the same MD5 sum and that really nobody should use it anymore for security reasons. Using it for checking file corruption during transfer is Ok, but the hash for ISO files or packages for Linux Distributions you download should not be checked with MD5. CPU power is cheap nowadays. The big ones like Ubuntu, Debian and CentOS already have changed to provide also SHA1 and SHA256 hashes for all the files. OpenSuse provides MD5 and SHA1 … better would be SHA256 too. Anyway use SHA256 were possible to verify your downloads!!
Howto get an A+-Rating at Qualys SSL Labs with Apache 2.2
November 1, 2014
One of my HTTPS servers currently gets an A- on Qualys SSL Labs test, as I’m running Ubuntu 12.04 LTS with Apache 2.2 which does not support the ECHDE-Cipher suites, which is required for Perfect Forward Secrecy with the Internet Explorer.

Upgrading to Ubuntu 14.04 needs some major rework for which I currently don’t have the time for.But there is now a trick to get that A-Rating and it is called TLS Interposer. It uses LD_PRELOAD to intercept the OpenSSL API calls and adds some additional features and security settings.
Currently there is no deb package for Ubuntu 12.04, so we need to compile it for our-self:
wget https://github.com/Netfuture/tlsinterposer/archive/master.zip

unzip master.zip

cd tlsinterposer-master/

make
Possible errors:
make: cc: Command not found-> install the gcc (apt-get install gcc)tlsinterposer.c:29:25: error: openssl/ssl.h: No such file or directory–> Install the OpenSSL Development package (apt-get install libssl-dev)
Now we need only an make install and we’re ready to try it. For this we add
export LD_PRELOAD=/usr/local/lib/libtlsinterposer.so
at the end of
/etc/apache2/envvars
and restart Apache with
/etc/init.d/apache2 restart
And you get
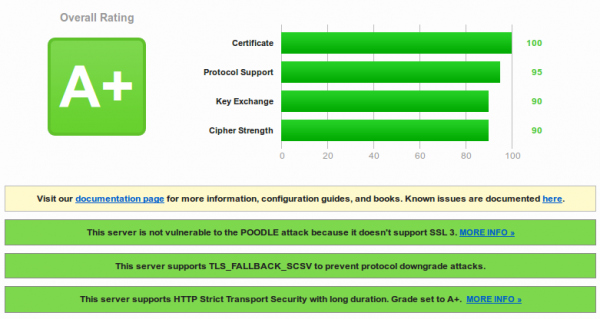
Success!!!
You need also following for an A+ Rating:
- Following needs to be still in the Apache config:
SSLProtocol ALL -SSLv2 -SSLv3

SSLHonorCipherOrder On

SSLCompression Off

# SSLCipherSuite settings will be ignored - You need to HSTS configured, check this link for how to enable it on Apache 2.2
So this is with Ubuntu 12.04 … I’ve tried the same with Centos 6 but I didn’t have success. Following problems did arise
1. Makefile
The Makefile does not support the names of the ssl libs on Centos 6 – when you compile, you get:
tlsinterposer.c:85: error: ‘DEFAULT_SSLLIB’ undeclared here (not in a function)
The Makefile has a regex that does not work with Centos 6. I changed following
# diff Makefile.orig Makefile

32c32

<       ldconfig -p | sed -n -e 's/^\t*\(libssl\.so\.[0-9]\.[0-9]\.[0-9]\).*/#define DEFAULT_SSLLIB "\1"/p' > $@

---

>       ldconfig -p | sed -n -e 's/^\t*\(libssl\.so\.[0-9][0-9]\).*/#define DEFAULT_SSLLIB "\1"/p' > $@
and deleted the file ssl-version.h and called make again and it compiled. I’ve reported that to author.
2. application’s cipher is not overwritten
Loading the TLS Interposer with putting it in /etc/sysconfig/httpd and than doing an /etc/init.d/httpd restart worked but the application’s cipher didn’t get changed. I could verify that with the test scripts which come with TLS Interposer:
# ./run_tests

gcc -O2 -Wall -Wextra simple_server.c -lcrypto -lssl -o simple_server

Test 1a pass

Test 1b FAIL!

Test 1c pass

Test 1d pass

Test 1e pass

Test 2a pass

Test 2b pass

Test 2c pass

Test 3a pass

Test 3b pass

Test 4a pass

Test 4b pass

Test 4c pass

Test 5a pass

Test 5b pass

Test 5c pass

Test 5d pass
I’ve reported that to the author. If I get an update on this I’ll report in my blog about this.
Take care if using Ubuntu 12.04 as a client – TLS 1.2 is not enabled by default
October 24, 2014
It got fixed with Ubuntu 14.04 but 12.04 is still supported and many people are still using 12.04 and even with the OpenSSL package update (2014-10-02) TLS 1.2 is not enabled by default. Take a look at this bug report and the statement from Marc Deslauriers (Ubuntu Security Engineer):
That USN doesn’t re-enable TLSv1.2 by default for clients in Ubuntu 12.04. It simply fixes an issue if someone _forced_ TLSv1.2 to be enabled.
You’re asking why we got into that problem in the first place … Marc tells us also this:
Ubuntu 12.04 contains openssl 1.0.1, which supports TLS v1.2. Unfortunately, because of the large number of sites which incorrectly handled TLS v1.2 negotiation, we had to disable TLS v1.2 on the client.
So someone thought again he is smarter than the OpenSSL guys … but this was not the first time …. lets remember this “optimization” of OpenSSL by the Debian guys .. could they please clean up their mess and enable TLS 1.2 by default as in 14.04?
Protect your PC against the BadUSB attack on Linux and Windows
October 12, 2014
At the Black Hat conference this year researchers from Berlin-based Security Research Labs (SRLabs) showed an attack method they called “BadUSB“, which allowed them, with manipulated USB device firmwares (e.g. from a USB Stick), to simulate an keyboard. With this keyboard they executed commands on the victims computer without he/she knowing it. The victim just inserted a USB stick to copy some data …. but the new keyboard executes some commands in the background.
To protect yourself against such an attack the computer needs to configured in a way that it does not bind any newly added device as new keyboard without asking the user. For Linux there is a kernel feature starting with 2.6.13-rc3 ( = since 2005) which allows to bind and unbind drivers from devices manually from user space. More information can be found on this topic here and here. And this blog post from Christian Vogel shows how to use it against BadUSB. What is currently missing is a simple GUI program which allows you to allow/deny devices with on click.
On the Windows site there is already such a program. This freeware program is made by the German security vendor (e.g. anti virus software) G DATA and is called “G DATA USB KEYBOARD GUARD” and can be downloaded from here. After installing you’ll be prompted following screen if a new keyboard is inserted.
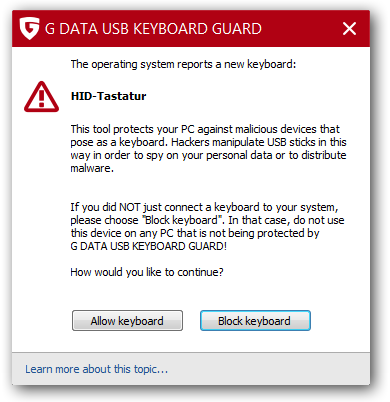
It would be nice if the various desktop environments on Linux add a similar feature … the kernel support is there already.
Check your hardening index of your Linux systems
October 6, 2014
I found a small program called Lynis, which does a system check of your Linux and Unix System. From the homepage:
Lynis is an open source security auditing tool. Primary goal is to help users with auditing and hardening of Unix and Linux based systems. The software is very flexible and runs on almost every Unix based system (including Mac). Even the installation of the software itself is optional!
To test a system is really easy, just download the tar.gz from here and extract the tar as root (otherwise it will complain) and change into its directory and call
./lynis -c
for the interactive mode (waits after each section) or
./lynis -q
for the quick mode which only logs the results to the log file. In both cases the log is written to /var/log/lynis.log.
For the following screenshots a I did setup a test system with some changes to show you some errors and warnings :-):
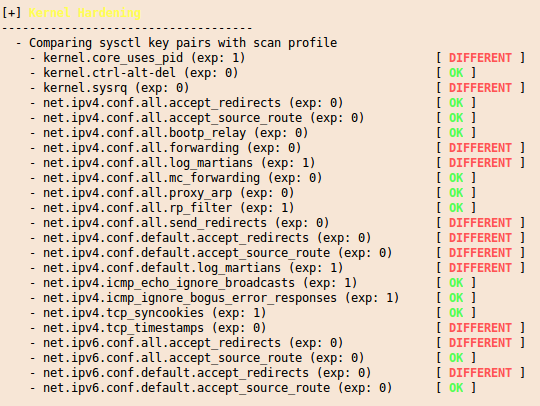
and at the end you get a summary with entries like this:
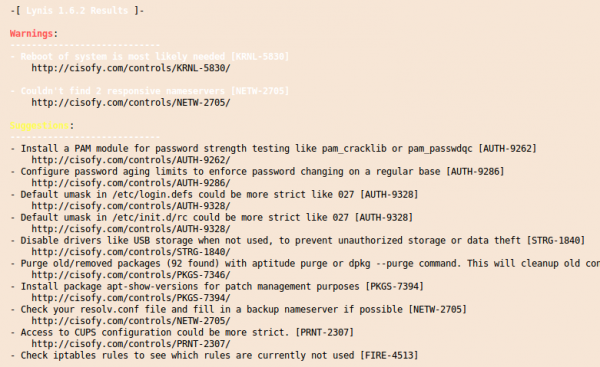
And you’ll get also a “Hardening index” which allows you to compare various systems against each other. 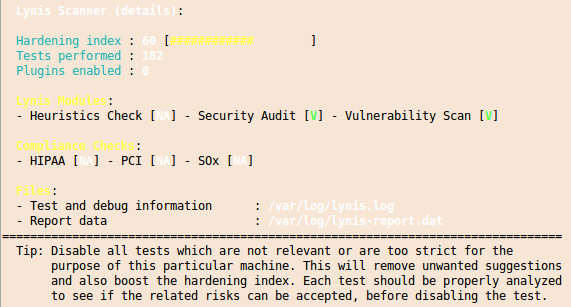

I you want to check multiple systems it it also possible to create an rpm file with the lynis.spec file from the Lynis homepage. You should run this software every time you setup a new system to make sure that you didn’t leave the big whole open.
Solution for high CPU load when using the flash player in the browser on Linux
September 17, 2014
For some time now I wondered why I had such a high CPU load while watching e.g. YouTube videos, even if I’ve a Nvidia GeForce GTX 760 in my PC. Ok thats not the latest card, but normal HD video should be accelerated with it also. 20% CPU load on my modern CPU is too much for a simple YouTube video:
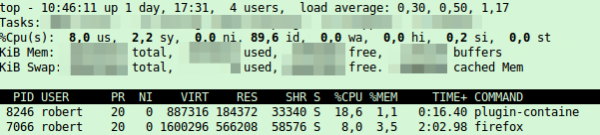
The solution is quite easy – the flash player has disabled the hardware acceleration by default. Following steps need to be done to enable it – as I only have an Nvidia card I was only able to test it for it, but looking around I found some tips for the other cards too.
- Check if you’ve
libvdpau1installed. On Ubuntu its done like this:
# dpkg -l | grep vdpau

ii libvdpau1:amd64 0.7-1 amd64 Video Decode and Presentation API for Unix (libraries) - You need a fitting graphics card driver:
- Nvidia: Nouveau and Closed Source driver should work
- AMD Radeon: You need the Mesa projects drivers (r300g, r600g or radeonsi)
- Intel: You need also following library/packaged installed:
libvdpau-va-gl1(as Intel supports only the libva interface for video acceleration)
- You need (most likely) to create following file
/etc/adobe/mms.cfgwith following content. It is possible that the directory and file exists in this case add the lines:
EnableLinuxHWVideoDecode=1

OverrideGPUValidation=1 - Now you need to make sure that the player is not running anymore:
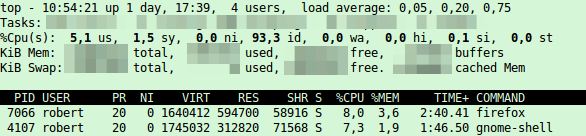
# ps aux | grep plugin-containe

robert 8246 0.1 0.9 798312 153260 ? Sl Sep16 0:57 /usr/lib/firefox/plugin-container /usr/lib/flashplugin-installer/libflashplayer.so -greomni /usr/lib/firefox/omni.ja -appomni /usr/lib/firefox/browser/omni.ja -appdir /usr/lib/firefox/browser 7066 true plugin

# kill 8246 - Now open the YouTube page again you tried before and top should show following – under 10% CPU Load, thats better.
Powered by WordPress
Entries and comments feeds.
Valid XHTML and CSS.
57 queries. 0.077 seconds.