
-

-

-

- Austria (27)
- General (16)
- HowTo (122)
- IT Security (129)
- Linux (128)
- Networking (65)
- Other (4)
-

- CDemu - a free, gpl cd/dvd-rom device emulator for linux
- heatpumpMonitor - Monitoring a Stiebel Eltron LWZ
- ignis backup tool - the heat-strengthened backup tool
-

- May 2026 (1)
- December 2021 (2)
- September 2019 (1)
- May 2019 (1)
- April 2019 (1)
- January 2019 (1)
- October 2018 (1)
- August 2018 (1)
- February 2018 (1)
- September 2017 (1)
- August 2017 (2)
- May 2017 (1)
- April 2017 (1)
- February 2017 (1)
- January 2017 (2)
- December 2016 (1)
- November 2016 (2)
- October 2016 (1)
- September 2016 (1)
- August 2016 (1)
- July 2016 (2)
- April 2016 (1)
- March 2016 (3)
- February 2016 (4)
- January 2016 (2)
- December 2015 (2)
- November 2015 (2)
- September 2015 (2)
- July 2015 (5)
- June 2015 (4)
- May 2015 (2)
- February 2015 (1)
- January 2015 (4)
- December 2014 (1)
- November 2014 (5)
- October 2014 (4)
- September 2014 (1)
- August 2014 (4)
- July 2014 (3)
- June 2014 (5)
- May 2014 (5)
- April 2014 (1)
- March 2014 (2)
- February 2014 (3)
- January 2014 (5)
- December 2013 (2)
- November 2013 (3)
- September 2013 (3)
- August 2013 (2)
- May 2013 (4)
- April 2013 (1)
- March 2013 (1)
- February 2013 (3)
- December 2012 (3)
- November 2012 (3)
- October 2012 (1)
- September 2012 (2)
- June 2012 (1)
- May 2012 (1)
- April 2012 (1)
- March 2012 (1)
- February 2012 (1)
- January 2012 (1)
- December 2011 (4)
- November 2011 (1)
- August 2011 (1)
- March 2011 (1)
- October 2010 (1)
- May 2010 (3)
- January 2010 (1)
- September 2009 (1)
- August 2009 (5)
- July 2009 (5)
- June 2009 (4)
- May 2009 (1)
- April 2009 (1)
- January 2009 (1)
- December 2008 (6)
- November 2008 (6)
- October 2008 (2)
- September 2008 (11)
- August 2008 (4)
- July 2008 (7)
- June 2008 (2)
- May 2008 (7)
- April 2008 (5)
- March 2008 (9)
- February 2008 (15)
- January 2008 (11)
- December 2007 (3)
Howto capture traffic from a Mikrotik router on Linux
February 15, 2014
If you as I need to get some traffic from a Mikrotik router and /tool sniffer quick doesn’t cut it, as you need not just the headers the best way is stream the traffic to the a Linux box. The Mikrotik configuration is easy, just set the server you want to stream to:
/tool sniffer set streaming-enabled=yes streaming-server=<ip_of_the_server>
Configure a filter as you don’t want to stream everything:
/tool sniffer set filter-ip-address=<an_example_filter_ip>
and now you need only to start it with
/tool sniffer start
and check with
/tool sniffer print
if everything is running.
But now comes the part that is not documented that well. Searching through the internet I found some posts/articles on how to use Wireshark for capturing, but that does not work correctly – at least not for me.
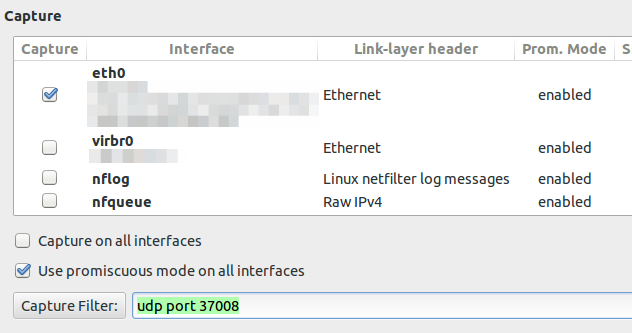
If you configure the capture filter to udp port 37008 to get everything the router sends via TZSP you will see following lines
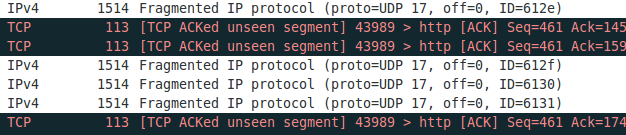
If you now set the display filter to show only TZSP these packets are not displayed any more. This packets contain information we need and I was not able to configure Wireshark 1.10.2 to work correctly. If you know how to get it to work, please write a comment. I changed my approach to use an other program to write the packets to disk and look at them later with Wireshark. And I found a program from Mikrotik directly which does that. Go to the download page and download Trafr and extract and use it like this:
$ tar xzf trafr.tgz

$ ./trafr

usage: trafr <file | -s> [ip_addr]

-s      write output to stdout. pipe it into tcpdump for example:

./trafr -s | /usr/sbin/tcpdump -r -

ip_addr use to filter one source router by ip address

$ ./trafr test.pcap <ip_of_the_router>
After you stopped the program you can open the file in Wireshark and no packets are missing.
At the Tone, the Time will be.
January 12, 2014
Last week we at work got a mail from CERT.at that 2 IP addresses in our AS where probably running misconfigured NTP Servers, which can be abused for DDoS attacks via NTP Reflection. But first we need to start with the background.
Background
In the last weeks multiple DDoS attacks were using NTP Reflection. The attackers are making use of the monlist commands, which is enabled on older versions of the NTP daemon. With that command it is possible to get a list of up to the last 600 hosts / ip address which connected to the NTP daemon. As NTP is UDP based, an attacker fakes its source IP address and the answer packet from the NTP daemon is send to the victim. Beside hiding the attackers IP addresses to the victim it amplifies the attack as the request packet is much smaller than the answer packet. The other problem with this monlist command is, that it releases potential sensitive information (the IP address of the clients using NTP)
How to verify you’re vulnerable?
First you need to find your NTP servers – and thats not so easy as it seams. E.g. our 2 reported NTP servers where not our official NTP servers … but more about that later. To find NTP Servers which are reachable from the Internet use e.g. nmap in a way like this:
sudo nmap -p 123 -sV -sU -sC -P0 <your_network/subnet_mask>
This will return for a linux ntp server something like this
Nmap scan report for xxxxx (xxxxxxxx)

Host is up (0.00016s latency).

PORT    STATE SERVICE VERSION

123/udp open  ntp     NTP v4

| ntp-info:

|   receive time stamp: 2014-01-12T11:02:30

|   version: ntpd [email protected] Wed Nov 24 19:02:17 UTC 2010 (1)

|   processor: x86_64

|   system: Linux/2.6.32-358.18.1.el6.x86_64

|   leap: 0

|   stratum: 3

|   precision: -24

|   rootdelay: 20.807

|   rootdispersion: 71.722

|   peer: 56121

|   refid: 91.206.8.36

|   reftime: 0xd67cedcd.b514b142

|   poll: 10

|   clock: 0xd67cf4be.9a6959a7

|   state: 4

|   offset: 0.042

|   frequency: -3.192

|   jitter: 0.847

|   noise: 1.548

|   stability: 0.163

|_  tai: 0
But you may find also something like this
Nmap scan report for xxxxx

Host is up (0.00017s latency).

PORT    STATE SERVICE VERSION

123/udp open  ntp     NTP v4

| ntp-info:

|_  receive time stamp: 2014-01-12T11:02:55
from a system you had not on the list. After this deactivate and/or filter the services you don’t need – a running service which is not needed is always a bad idea. But surely you also want to know how to probe the NTP daemon for the monlist command – just like this:
ntpdc -n -c monlist <ip_address>
If the daemon is vulnerable you’ll get a list of ip address which connected to the daemon. If the NTP daemon is running on a Linux, Cisco or Juniper System take look at this page which describes how to configure it correctly.
But I guess you’re curious, which systems where running on the 2 ip addresses we got reported? They where Alcatel Lucent Switches which have the NTP daemon activated by default it seams. So its really important to check all your IP addresses not only the known NTP Servers.
Howto install Teamviewer 9.x on Ubuntu >= 12.04 64bit (in my case 13.10)
January 2, 2014
Basically it is simple but the 64bit makes it a little bit more difficult. It is not logical from the outside but don’t use the 64bit version. Why? As described here distributions with multiarch support can’t resolve the ia32-libs packages. But there is a simple solution to this which is not described there, as adding an additional architecture doesn’t feel right.
Install gdebi (gdebi lets you install local deb packages resolving and installing its dependencies. apt does the same, but only for remote (http, ftp) located packages.):
sudo apt-get install gdebi
Download the 32bit version
wget http://www.teamviewer.com/download/teamviewer_linux.deb
Use gdebi to install and resolve the dependencies:
$ sudo gdebi teamviewer_linux.deb

Reading package lists... Done

Building dependency tree

Reading state information... Done

Building data structures... Done

Building data structures... Done

Requires the installation of the following packages: libxtst6:i386
TeamViewer (Remote Control Application)

TeamViewer is a remote control application. TeamViewer provides easy, fast and secure remote access to Linux, Windows PCs, and Macs.

.

TeamViewer is free for personal use. You can use TeamViewer completely free of charge to access your private computers or to help your friends with their computer problems.

.

To buy a license for commercial use, please visit http://www.teamviewer.com

Do you want to install the software package? [y/N]:y

Get:1 http://at.archive.ubuntu.com/ubuntu/ saucy/main libxtst6 i386 2:1.2.2-1 [13.8 kB]

Fetched 13.8 kB in 0s (0 B/s)

Selecting previously unselected package libxtst6:i386.

(Reading database ... 250452 files and directories currently installed.)

Unpacking libxtst6:i386 (from .../libxtst6_2%3a1.2.2-1_i386.deb) ...

Setting up libxtst6:i386 (2:1.2.2-1) ...

Processing triggers for libc-bin ...

Selecting previously unselected package teamviewer.

(Reading database ... 250454 files and directories currently installed.)

Unpacking teamviewer (from teamviewer_linux.deb) ...

Setting up teamviewer (9.0.24147) .
Some thoughts on NFS
December 23, 2013
In the last weeks I was working (from time to time 😉 ) on a new setup of my NAS at home. During this I learn some stuff I didn’t know about NFS which I want to share here. I assume that you got the basis NFS stuff working or know how it works and want some addition tips and ticks
- How to query a NFS server for the exported directories and the settings? Easy, use
showmount -e <servername>. Here an example:
$ showmount -e 10.x.x.x

Export list for 10.x.x.x:

/data/home 10.x.x.0/255.255.255.0 - Use fsid – why?
- NFS needs to be able to identify each filesystem that it exports. Normally it will use a UUID for the filesystem (if the filesystem has such a thing) or the device number of the device holding the filesystem (if the filesystem is stored on the device). If you want to an export different file system (e.g. replacement HDD) the fsid changes and you’re clients have to remount (as they have a stale NFS mount). Read more on this topic here.
- Some file systems don’t have a UUID, e.g. encfs does not … use a separate fsid for each export!
- You can export multiple file system with one mount request by the client, if you use nohide. Normally, if a server exports two file systems one of which is mounted on the other, then the client will have to mount both file systems explicitly to get access to them. If it just mounts the parent, it will see an empty directory at the place where the other file system is mounted. That file system is “hidden” – if you don’t want that use nohide, like in this example:
/data/media     10.x.x.0/255.255.255.0(fsid=1,rw,async,no_subtree_check)

/data/media/movies 10.x.x.0/255.255.255.0(fsid=2,rw,async,no_subtree_check,nohide) - If you changed
/etc/exportsyou don’t need to restart your NFS daemon. If the init script provides a reload thats good – if not useexportfs -rav.
So far that are my new learned tips and tricks … I think there was one more but I can’t remember it now. Will add it later if I remember.
Howto restart a suspended KVM guest which can’t be resumed
November 3, 2013
I just had the problem that I was not able to resume a suspended KVM guest. It happened when I powered my KVM server down to add a new hard disk. My server did not power the guest down but did instead suspended them. I realized that only after I did have no “Run” .. just a “Restore” to choose from.
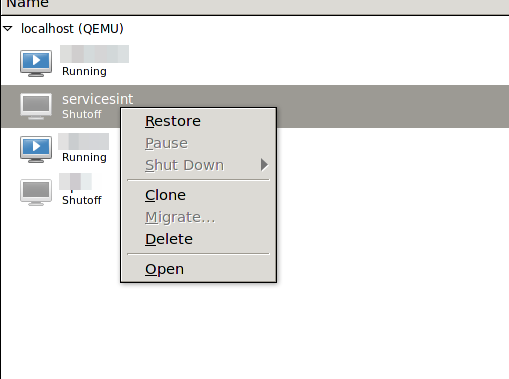
When I tried to “Restore” it I go following:
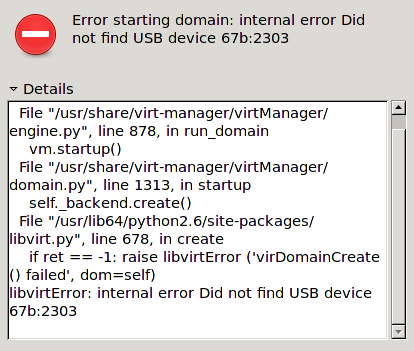
The problem was that I removed a mapped USB device some time ago but at resuming KVM checked for it. The solution was to remove the corrupted suspended virtual machine session so I could boot the machine again – naturally I did lose the suspended session, but that was ok.
[root@kvmserver ~]# virsh managedsave-remove <NameOfGuest>

Removed managedsave image for domain servicesint
Maybe there is a graphical way to do it, but I didn’t look further – as it worked.
Howto get your external IP address via command line
September 28, 2013
I just had to find out the external IP address (as seen from the Internet) of a Linux server which is behind a NAT router. The normal way to goto WhatsMyIP didn’t work as I was only connected via SSH to this server. But the solution is quite easy thanks to the guys from ipecho, just type:
wget http://ipecho.net/plain -O - -q ; echo
Thats so easy! And even faster than using a browser in the first way ….. 🙂
Session verification fails after update from PHP 5.3 to 5.4 with suhosin
September 15, 2013
I’ve just upgraded my PHP install from 5.3.25 to 5.4.19 and I ran into the problem that some PHP programs on my server stopped working. The first I found to have a problem was Tiny Tiny RSS as I use it myself. 🙂 I was not able to login into it anymore and in the log file I found following:
[Sun Sep 15 11:00:31 2013] [warn] [client xxx.xxx.xxx.xxx] mod_fcgid: stderr: PHP Warning: Unknown: Failed to write session data (user). Please verify that the current setting of session.save_path is correct (/var/xxxxxx/sessions/) in Unknown on line 0, referer: https://xxxxxxxx/
After searching really long I found out that it worked again if I disabled suhosin (which is a module to harden PHP) by editing /etc/php.d/suhosin.ini and putting a ; in front of
extension=suhosin.so
But this is not secure way to handle this, therefore I search further and found a pull request on GitHup which solves the problem. Ok you need to patch and compile the module … but technically it is fixed 😉
Howto access MTP devices via USB on Ubuntu 12.04
September 1, 2013
A friend asked me how he can access his Nexus 7 device via USB on his Ubuntu 12.04 notebook. With Android versions below 4.0 that was simple as the device registered as mass storage device. The problem now is the stock Ubuntu 12.04 does not support MTP via GVFS (the virtual filesystem of the GNOME desktop). Newer Ubuntu versions e.g. 13.04 have already a GVFS version which support MTP. But these are no LTS versions of Ubuntu, which I recommend for the average user. But it is quite easy to install a newer version of GVFS on Ubuntu 12.04 (and 12.10) that does support it.
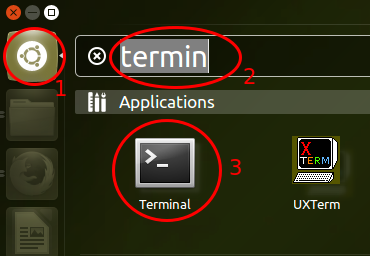
First you need to start a terminal. For this click on the dash home icon (1) and than type “terminal” (2) and you’ll the terminal icon – click on it (3.)
Now copy and paste following into the Terminal (the PC needs to be connected to the Internet while going through these steps):
sudo add-apt-repository ppa:langdalepl/gvfs-mtp
Enter your user password and than you’ll be shown following text:
You are about to add the following PPA to your system:

These builds of gvfs have my native mtp backend backported from gvfs master. Use this to easily access MTP based devices with Nautilus.

More info: https://launchpad.net/~langdalepl/+archive/gvfs-mtp

Press [ENTER] to continue or ctrl-c to cancel adding it
Hit the Enter Key. After this is done you need to type following command, which updates the package list:
sudo apt-get update
After this was successful you need to upgrade the installed packages with:
sudo apt-get upgrade
It should show something like this:
Reading package lists... Done

Building dependency tree

Reading state information... Done

The following packages will be upgraded:

gvfs gvfs:i386 gvfs-backends gvfs-bin gvfs-common gvfs-daemons gvfs-fuse gvfs-libs gvfs-libs:i386 libmtp-common libmtp-runtime libmtp9

12 upgraded, 0 newly installed, 0 to remove and 0 not upgraded.

Need to get 4,193 kB of archives.

After this operation, 4,157 kB of additional disk space will be used.

Do you want to continue [Y/n]?
Just press Enter here (the Y is the default section) to install the packages.
Now you just need to restart your PC and after login just connect your Android device to the PC and the file manager Nautilus will launch with your USB device.
Howto migrate mails from courier-imap without the passwords
August 26, 2013
I needed to move to a new mail server as the old one got too old. I had one problem – i didn’t know the old passwords of the virtual courier-imap users and the new system didn’t use the same hashing. It was ok to use new passwords for the new server, but as I needed to sync the most mails before I disabled the old mail server. This was needed as some users had really big mailboxes which would take too long to sync. So I needed a way to access the mails without knowing or reseting the old password. This post describes how I did the migration:
- I created a new user called “migrate” on the old mail server. I removed than its mail directory, in my case:
rm -rf /var/mail/domains/penz.name/migrate
And than I created a symlink to the mail of a user I wanted the mails to migrate:
ln -s /var/mail/domains/penz.name/robert/ /var/mail/domains/penz.name/migrate
Now I was able to login to the account with the “migrate” user and password - For the migration I used the defacto standard “imapsync”. I called it for the first user to check if it worked correctly. (checked also the mails on the new server and so on …)
- Now I wrote a small script which did create a symlink, started imapsync, removed the symlink, create a new symlink, …… sure with some error handling 😉
- All of the above was done without the user noticing. Most Mails where now migrated except the changes to the old mailboxes after imapsync did its job.
- I did send a mail to the users telling them of the move to the new server and providing them with the exact date of the change and their new login data, and that it could take some hours until all of there mails were migrated.
- At the given date I changed the DNS entries to the new server and stopped the SMTP/Webmail service on the old server and made sure the IMAP service was only reachable for the imapsync script (with iptables – localhost and uid check). The users which already got to the new mailserver (be it with Webmail or IMAP) got most of their mails – they others couldn’t connect until there dns server got the change. (It was done on a weekend)
- New mails from other SMTP servers where deferred or already delivered to the new server.
- After I made sure that the old mailboxes can’t be changed I started the script again and sync the differences to the server. This was now really fast as imapsync needed only to transfer a few mails.
- After the script was through I could switch the old server off.
I hope these steps help others – if you’ve an other/better way to migrate, tell me about it in the comments. Thx.
Simple way to secure a MySQL installation
May 27, 2013
I now know this script was there for years but I just found it some month ago, when I installed MySQL on a CentOS and it told me to use it. But I checked, it is also present on an old Ubuntu 8.04 LTS (released 5 years ago). The script is called:
/usr/bin/mysql_secure_installation
Here are the questions you get asked by it:
Change the root password? [Y/n]

Remove anonymous users? [Y/n]

Disallow root login remotely? [Y/n]

Remove test database and access to it? [Y/n]

Reload privilege tables now? [Y/n]
You really should run this program as it makes the basic securing of MySQL really easy.
Powered by WordPress
Entries and comments feeds.
Valid XHTML and CSS.
49 queries. 0.074 seconds.