Howto filter “No VR found on VLAN xxx with VR Id xxx” on Extreme XOS switches
May 25, 2014
If your Extreme Networks switches are using VRRP and other devices are using it also in the same VLAN, the Exterme XOS switches will complain loudly about that … one log line per broadcast. In my case it were two per second and as the switch stores only 1000 log lines .. the log soon contained only these entries:
05/22/2014 17:29:41.11 Slot-1: No VR found on VLAN xxx with VR Id xxx

05/22/2014 17:29:40.48 Slot-2: No VR found on VLAN xxx with VR Id xxx

05/22/2014 17:29:40.11 Slot-1: No VR found on VLAN xxx with VR Id xxx

05/22/2014 17:29:39.48 Slot-2: No VR found on VLAN xxx with VR Id xxx

05/22/2014 17:29:39.11 Slot-1: No VR found on VLAN xxx with VR Id xxx
The one pitfall with using the exclude match string variable is that the VRIDs must not be treated as string variable. This does not work because Extreme XOS does not treat the VRID as a string variable, but rather as a integer. To determine the valid variables available for the specific event you’ll need to type following:
Slot-1 xxxxxxx.1 # show log events "VRRP.UnkVR" details

Component   SubComponent Condition               Severity      Parameters

----------- ------------ ----------------------- ------------- ----------

VRRP                     UnkVR                   Warning        2 Total

0 - string

1 - number (32-bit unsigned int)

No VR found on VLAN %0% with VR Id %1%
This tells us that to filter on the VRRP.UnkVR messages, there is a string variable (%0%) equal to the VLAN name, and a integer (%1%) equal to the VRID itself. Because Extreme XOS interprets the VRID itself as a number and not a string, doing an exclude match string will not work. You must use the number variable as follows:
configure log filter "DefaultFilter" add exclude events "VRRP.UnkVR" match number xxx
From the Concept Guide:
The filter can be associated with one or more targets using the command to control the messages sent to those targets. The system has one built-in filter named DefaultFilter, which itself may be customized. Therefore, the if a filter other than DefaultFilter is desired. As its name implies, DefaultFilter initially contains the default level of logging in which every Extreme XOS component and subcomponent has a pre-assigned severity level.
PS: You can use this solution to filter out any other event, just check with show log events "xxxx" details
Why doesn’t the Ubiquiti Unifi DNS based controller location function work with Mikrotik RouterOS DNS? [Update]
May 18, 2014
Last week I ran into a problem with my Unifi UAPs after I switched the central router to Mikrotik RouterOS and also used the DNS server of the RouterOS. If the Unifi UAPs are in the same subnet as the controller, the UAPs find it via a broadcast but if there is no layer 2 connection they need a special DHCP Option or the DNS name unifi.xxxxx (xxx in this case is the domain name specified via DHCP) needs to resolve to the IP address of the controller. My setup was using the DNS variant but after I switched to the Mikrotik DNS server the UAPs stopped to connecting to the controller. I logged into the one of them via SSH and saw following in /var/log/messages.
ace_reporter.reporter_fail(): Unable to resolve (http://unifi:8080/inform)
I did at once a ping unifi, which worked so I started to sniff the traffic and saw following:
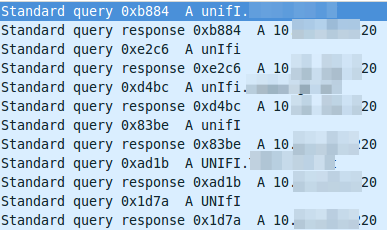
The DNS resolution is working at first glance but it seems to be funny that the requests are always different, as the case changes all the time. So I did a closer look into a requesting packet and the corresponding answer packet. The request looks this way:
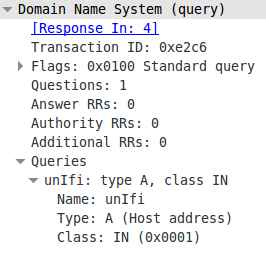
And the answer looks this way:
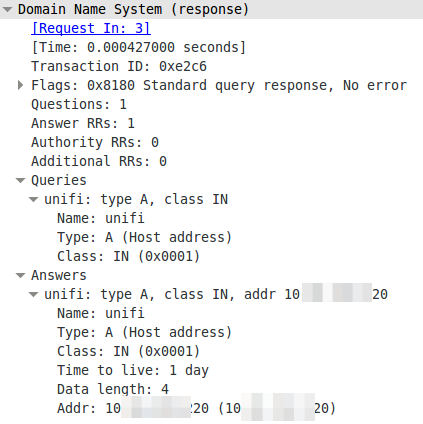
The DNS server is lower casing the answers. This seams to break it. So I searched more into the topic why the Unifi UAPs are using the case randomizing in the first place and where the blame lies for this not working. Unifi UAPs started to use randomize-case in the DNS lookup with Version 2.4.6 (the current stable version) as a security feature, which is named dns0x20 and described in this RFC draft (called Use of Bit 0x20 in DNS Labels to Improve Transaction Identity). From the abstract:
The small (16-bit) size of the DNS transaction ID has made it a frequent target for forgery, with the unhappy result of many cache pollution vulnerabilities demonstrated throughout Internet history. Even with perfectly and unpredictably random transaction ID’s, random and birthday attacks are still theoretically feasible. This document describes a method by which an initiator can improve transaction identity using the 0x20 bit in DNS labels.
The RFC draft states that further:
In practice, all question sections in responses are exact copies of question sections from requests, even if the zone data and answer section owner names differ in their uppercase/lowercase attributes from the question section. So while it is theoretically possible for a request’s question section to contain the name “www.ietf.org” and a response’s question section to contain the name “WWW.IETF.ORG”, this has not been observed, and might not even work reliably.
I guess we found one DNS server, which handles that differently. So Unifi UAPs are using a draft version of a RFC to make it more secure and Mikrotik RouterOS is one of the few it does not work with. It works with the Linux standard DNS server bind. So who to blame? its not that easy. Anyway I made a feature request to Mikrotik because returning the correct query does not break anything and more security with DNS is always good idea.
ps: I switched to the DHCP option for getting the UAPs to work with the RouterOS DNS.
Update:
Just got following back from the Mikrotik support:
Hello,
that will be possible in RouterOS v7
Regards,
Janis Krumins
How to configure SNMPv3 securely on Mikrotik RouterOS [Update]
May 11, 2014
In the last post I wrote on how to configure SNMPv3 for CentOS/RHEL/SL. I thought it might be a good idea to post the SNMPv3 configuration for various systems/devices – so this post is about Mikrotik RouterOS.
This time it is even easier than on Linux, just one line:
/snmp community set [ find default=yes ] name=snmpv3user security=private authentication-password=snmpv3authPass authentication-protocol=SHA1 encryption-password=snmpv3encPass encryption-protocol=DES read-access=yes write-access=no addresses=10.0.0.0/24
If you want to keep the default SNMP configuration and add just another, use this:
/snmp community add name=snmpv3user security=private authentication-password=snmpv3authPass authentication-protocol=SHA1 encryption-password=snmpv3encPass encryption-protocol=DES read-access=yes write-access=no addresses=10.0.0.0/24
But the RouterOS has also one weakness, it only supports DES and not AES. So the test command looks like this:
snmpwalk -u snmpv3user -A snmpv3authPass -a SHA -X snmpv3encPass -x DES -l authPriv 10.7.7.1 -v3
If you now look at the answer of a request in Wireshark you’ll only see encrypted text:
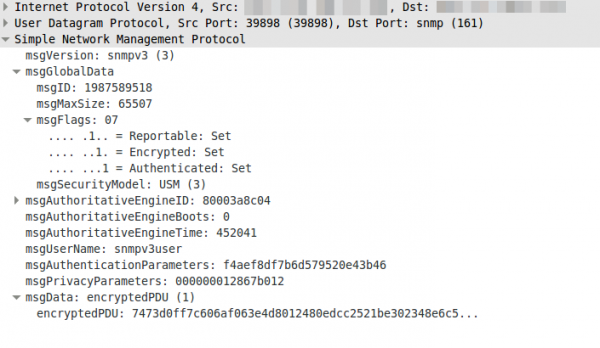
Update: Starting with RouterOS 6.16rc17 (2014-Jul-09 09:52) AES encryption (rfc3826) for SNMP is supported according to the changelog.
How to configure SNMPv3 securely in CentOS/RHEL/SL
May 4, 2014
Looking through the Internet I found more often than not insecure SNMP setups explained in Howtos, maybe the authors where happy to got running in the first place – don’t know. The Simple Network Management Protocol (SNMP) is used to monitor (and configure in the case of network equipment) systems via the network in a standardized way. There are 3 versions of it in the wild:
Version 1
The first version, it is really old and only uses community strings to “protect” access. If you look with Wireshark what the packet for the request contains you’ll see following:
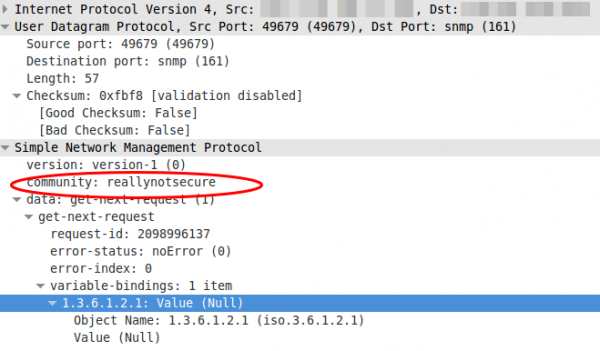
Yes, thats the community in clear text …. so don’t use it, if you must not. If you must (old devices which supports only this) use it on a secure network and make sure that the device only accepts quests from a given source IP address.
Version 2c
Not better in any security related way. The e.g. traffic counters are just bigger, as on fast interfaces it was possible with v1 that the counter rotated more than ones within the interval you queried so you didn’t know how many bytes really got transfered over the link.
Version 3
Now we’re talking. This versions supports authentication passwords, that get not transfered in the clear and it also supports encryption passwords so a attacker does not see what is transfered. I’ll show you now how you configure your CentOS/RHEL/SL to let it be queried via SNMPv3 in a secure way.
- We need to install the package we need:
yum install net-snmp - We create our user. SHA1 is used for the authentication and AES for the encryption of the traffic. And for security it is important to use two separated passwords.
service snmpd stop

net-snmp-create-v3-user -ro -A snmpv3authPass -a SHA -X snmpv3encPass -x AES snmpv3user

service snmpd start
This will print something like this
adding the following line to /var/lib/net-snmp/snmpd.conf:

createUser snmpv3user SHA "snmpv3authPass" AES snmpv3encPass

adding the following line to /etc/snmp/snmpd.conf:

rouser snmpv3user - Secure the SNMP daemon with a host firewall and only allow requests from source IP addresses you know and which need to query the system.
- Verify that everything works with following command:
snmpwalk -u snmpv3user -A snmpv3authPass -a SHA -X snmpv3encPass -x AES -l authPriv 127.0.0.1 -v3
So as you see it is quite easy, so there is now reason to use anything less secure!
If you want to delete the user, just edit the two files mentioned above. In /etc/snmp/snmpd.conf delete the line rouser snmpv3user and in /var/lib/net-snmp/snmpd.conf look for a line like this and remove it:
usmUser 1 3 0x80001f88801e15113fbf17bf5100000000 0x736e6d7076337573657200 0x736e6d7076337573657200 NULL .1.3.6.1.6.3.10.1.1.3 0xaaa3bc2aa941d932a581bbb11956699a7d807238 .1.3.6.1.6.3.10.1.2.4 0xcd6eed84f9d1aa903e92162f0e3fcb26 ""
restart the daemon with service snmpd restart and the user is gone.
Ubuntu 14.04 apt-get update –> Reading package lists… Error!
May 3, 2014
Today I just wanted to make an apt-get update but I got following:
Reading package lists... Error!

W: Encountered status field in a non-version description

W: Encountered status field in a non-version description

W: Encountered status field in a non-version description

E: Encountered a section with no Package: header

E: Problem with MergeList /var/lib/dpkg/status

E: The package lists or status file could not be parsed or opened.
And Synaptic and update manager would not start .. I just checked to make sure as I don’t use them normally. Anyway the solution is really simple. If you take a look into the above mentioned directory you see 2 status files:
$ ll /var/lib/dpkg/status*

-rw-r--r-- 1 root root 2752482 Mai  1 09:27 /var/lib/dpkg/status

-rw-r--r-- 1 root root 2753380 Mai  1 09:27 /var/lib/dpkg/status-old
I just did following:
$ sudo mv /var/lib/dpkg/status /var/lib/dpkg/status-new

$ sudo mv /var/lib/dpkg/status-old /var/lib/dpkg/status
And it worked again. Hope this helps others.
Powered by WordPress
Entries and comments feeds.
Valid XHTML and CSS.
30 queries. 0.058 seconds.


