modsecurity rule to filter CVE-2021-44228/LogJam/Log4Shell [update]
December 10, 2021
As a fast workaround, a friend of mine made a modsecurity rule to filter CVE-2021-44228/LogJam/Log4Shell, which he allowed me to share with you.
SecRule \

  ARGS|REQUEST_HEADERS|REQUEST_URI|REQUEST_BODY|REQUEST_COOKIES|REQUEST_LINE|QUERY_STRING "jndi:ldap:" \

  "phase:1, \

  id:751001, \

  t:none, \

  deny, \

  status:403, \

  log, \

  auditlog, \

  msg:'Block: CVE-2021-44228 - deny pattern \"jndi:ldap:\"', \

  severity:'5', \

  rev:1, \

  tag:'no_ar'"
New improved version:
SecRule \

  ARGS|REQUEST_HEADERS|REQUEST_URI|REQUEST_BODY|REQUEST_COOKIES|REQUEST_LINE|QUERY_STRING "jndi:ldap:|jndi:dns:|jndi:rmi:|jndi:rni:|\${jndi:" \

  "phase:1, \

  id:751001, \

  t:none, \

  deny, \

  status:403, \

  log, \

  auditlog, \

  msg:'DVT: CVE-2021-44228 - phase 1 - deny known \"jndi:\" pattern', \

  severity:'5', \

  rev:1, \

  tag:'no_ar'"


SecRule \

  ARGS|REQUEST_HEADERS|REQUEST_URI|REQUEST_BODY|REQUEST_COOKIES|REQUEST_LINE|QUERY_STRING "jndi:ldap:|jndi:dns:|jndi:rmi:|jndi:rni:|\${jndi:" \

  "phase:2, \

  id:751002, \

  t:none, \

  deny, \

  status:403, \

  log, \

  auditlog, \

  msg:'DVT: CVE-2021-44228 - phase 2 - deny known \"jndi:\" pattern', \

  severity:'5', \

  rev:1, \

  tag:'no_ar'
Jitsi Workaround for CVE-2021-44228/LogJam/Log4Shell
You surely heard of the LogJam / Log4Shell / CVE-2021-44228 – if not, take a look at this blog post. If you’re running Jitsi is most likely vulnerable and as there is no fix currently, you need a workaround which I provide here for you. You need to add -Dlog4j2.formatMsgNoLookups=True at the correct places in the file – the position is important.
/etc/jitsi/jicofo/config
/etc/jitsi/videobridge/config
And restart the processes or restart the server.
Proxmox Container with Debian 10 does not work after upgrade
September 8, 2019
I just did an apt update / upgrade of a Debian 10 container and restarted it afterwards and got following:
# pct start 105

Job for [email protected] failed because the control process exited with error code.

See "systemctl status [email protected]" and "journalctl -xe" for details.

command 'systemctl start pve-container@105' failed: exit code 1
with a more verbose startup I got following
# lxc-start -n 105 -F -l DEBUG -o /tmp/lxc-ID.log

lxc-start: 105: conf.c: run_buffer: 335 Script exited with status 25

lxc-start: 105: start.c: lxc_init: 861 Failed to run lxc.hook.pre-start for container "105"

lxc-start: 105: start.c: __lxc_start: 1944 Failed to initialize container "105"

lxc-start: 105: tools/lxc_start.c: main: 330 The container failed to start

lxc-start: 105: tools/lxc_start.c: main: 336 Additional information can be obtained by setting the --logfile and --logpriority options
and a look into /tmp/lxc-ID.log shows the problem:
lxc-start 105 20190908130857.595 DEBUG conf - conf.c:run_buffer:326 - Script exec /usr/share/lxc/hooks/lxc-pve-prestart-hook 105 lxc pre-start with output: unsupported debian version '10.1'

lxc-start 105 20190908130857.604 ERROR conf - conf.c:run_buffer:335 - Script exited with status 25

lxc-start 105 20190908130857.604 ERROR start - start.c:lxc_init:861 - Failed to run lxc.hook.pre-start for container "105"
The problem was that the Debian version, which changed from 10.0 to 10.1, was not recognized by the Proxmox script. The responsible code is in /usr/share/perl5/PVE/LXC/Setup/Debian.pm, but in this case I didn’t need to change anything as I just needed to update the Proxmox host to the newest minor version and it worked again, as the code in Debian.pm got changed by the developers. I just though to share this, as maybe others run into that problem, as the error reporting is not that good in that case. 🙂
Howto visualize your water meter and get alerted if too much water is used
May 1, 2019
In the village I live the water meter is replaced every 5 years and it was the fifth’s year this year. I took the opportunity to talk to the municipal office, if it was possible to get a water meter with impulse module, which I can integrate in my network. And they said yes 🙂 – Thx again!
So last week they came by and put the new one in, I was not at home, and when I came home I found following:
They also left the packaging, so I was able to guess the module. For me it looked like a “Ringkolben-Patronenzähler MODULARISRTK-OPX” from Wehrle as shown in this datasheet. I was not 100% sure if it was the S0 or M-Bus version, but a friend told me it must be the S0 Version as the M-Bus is much more expensive, so I went for it.
Getting the S0 connected
Basically the meter has an optocoupler (optoelectronic coupler) which is powered in my case by an internal battery. At every liter of water that runs through the meter, the two cables shown above get connected for a short period (e.g. 100ms). In the simplest case it would be possible to just use a pull-up resistor to 5V, but this may lead the problems. It is better to use 2 resistors and 2 capacitors stabilize the impulse and guard against unwanted effects such as electromagnetic interference. As my time when I learned that at school is too long ago, I asked a friend who does circuits all the time for help, which let to this drawing:
And he told me to use following resistors and capacitors:
- R1 – 4,7kOhm
- R2 – 470Ohm
- C1 – 100nF
- C2 – 10nF
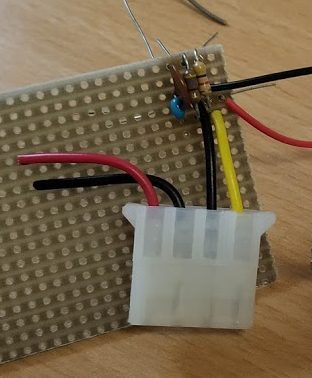
At home, I build that circuit (no fully done on the picture):
As you can see I used old PC power supply connectors to connect the water meter, so I can disconnect it easily. Hardware costs under 1 Euro so far – OK need some stuff at home already (e.g. soldering iron) 🙂
So, now back to areas I know better ….
Getting the signal onto my network
I’ve several Raspberry PIss at home and at first I thought about using one, but that would be overkill my case as I wanted to do visualization and alerting in a container on my home server anyway. I went with something Arduino like, but cheaper. 🙂
I went for a NodeMCU which has all I needed for that project:
- Digital Input with interrupt triggering –> no polling and missing an impulse
- WiFi support to connect to my IoT network
- Integration with the Arduino IDE
- It costs under 5 Euro
Lets take a look at my code – which you can download from here. In the first part of the code we import the needed libraries and define some variables:
- The WiFi SSID and password
- The host and port we will inform for every liter of water – We’ll use InfluxDB for that and you will see how easy that makes it.
- The PIN we connect the water meter to – make sure it supports interrupts.
And now the code which is executed once at startup, where we connect to the Wifi and attach the interrupt.
And at last we need the code that gets called by the interrupt – it just sends a UDP Message in the InfluxDB format for each Liter of water, the rest is down by the InfluxDB time series database.
As you see the code is really easy – the complicated stuff is done by the InfluxDB.
Visualization and Alerting
Sure I could write my own visualization and alerting and I have done so in the past but these times are gone. InfluxDB and some additional projects from the same guys do everything and better than I could for such a home project. You will see how easy it really is. I started with an empty LXC container on my Linux home server. I use Debian 9 in the container, but InfluxDB is packaged for all major distributions.
First we need to install curl and https support for apt – my contains are as small as possible.
# apt install curl apt-transport-https
Download the signing key for the InfluxDB repository.
# curl -sL https://repos.influxdata.com/influxdb.key | apt-key add -
This is followed by adding the repository to the list
# cat >> /etc/apt/sources.list

deb https://repos.influxdata.com/debian stretch stable
and installing the software.
# apt update

# apt-get install influxdb chronograf kapacitor
By default, the UDP interface on InfluxDB is disabled. You’ll want to modify the configuration file /etc/influxdb/influxdb.conf to look similar to this:
[[udp]]

enabled = true

bind-address = ":8888"

database = "db_iot"
Now we just need to enable the various services
# systemctl enable influxdb

# systemctl start influxdb

# systemctl enable kapacitor

# systemctl start kapacitor
If everything works you should see something like this
# netstat -lpn | grep 8888

tcp6 0 0 :::8888 :::* LISTEN 1505/chronograf

udp6 0 0 :::8888 :::* 1539/influxd
Now we just need to create the database, we configured to use for UDP:
# influx

Connected to http://localhost:8086 version 1.7.6

InfluxDB shell version: 1.7.6

Enter an InfluxQL query

> CREATE DATABASE db_iot

> exit
After this just open your browser and connect to http://<ipAddressOfServer>:8888 and fill out the form with the following details:
- Connection String: Enter the hostname or IP of the machine that InfluxDB is running on, and be sure to include InfluxDB’s default port 8086. In my/our case it is localhost / 127.0.0.1
- Connection Name: Enter a name for your connection string.
- Username and Password: These fields can remain blank unless you’ve enabled authorization in InfluxDB.
- Telegraf Database Name: Optionally, enter a name for your Telegraf database. The default name is Telegraf.
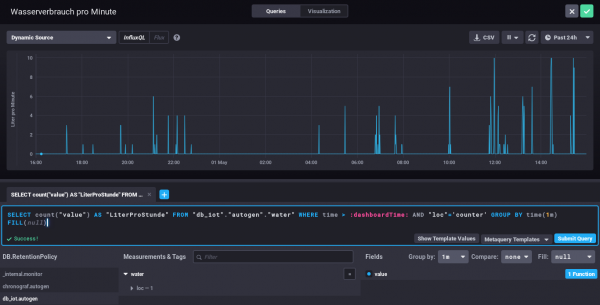
Everything else can be done via the browser – Just take a look at the configuration of one of my dashboard elements – the SQL code is written by clicking around :-).
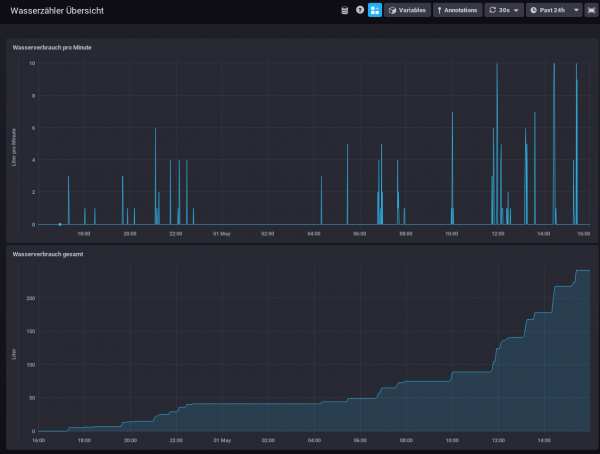
My water meter dashboard looks currently like this:
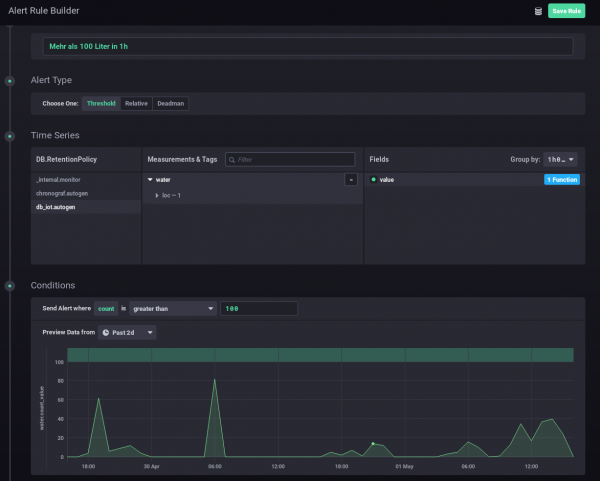
And you can also define alerts. In this case I wanted to get an alert message send, if more than 100 Liter of water is used in one hour – I should know if that happens and if it is OK.
I hope you see how easy visualizing and alerting a water meter can be. It is also really cheap – about 5 Euro for everything, if you’ve already a server otherwise let it run on a Raspberry PI (about 30 Euro), rent a virtual server for 1-2 Euro/month or use the container feature of your NAS.
Howto install Wireguard in an unprivileged container (Proxmox)
April 14, 2019
Wireguard is the new star on the block concerning VPNs – and yes it has some benefits to the old VPN technologies but I won’t talk about them as there is much information about that on the Internet. This blog post just explains how to set it up in an unprivileged container. In my case everything is done on a Proxmox server. Let’s start:
On the Proxmox host itself we need to get the kernel module running. As Proxmox is based on Debian we just pin the Wireguard package from unstable, which is the recommended way by the Debian project in this case.
echo "deb http://deb.debian.org/debian/ unstable main" > /etc/apt/sources.list.d/unstable-wireguard.list

printf 'Package: *\nPin: release a=unstable\nPin-Priority: 90\n' > /etc/apt/preferences.d/limit-unstable

apt update

apt install wireguard pve-headers
If you get following:
Loading new wireguard-0.0.20190406 DKMS files...

Building for 4.15.18-9-pve

Module build for kernel 4.15.18-9-pve was skipped since the

kernel headers for this kernel does not seem to be installed.

Setting up linux-headers-4.9.0-8-amd64 (4.9.144-3.1) ...
you need to make sure the pve-headers for your current kernel is installed. If you installed it later, then you need to call:
dkms autoinstall
In both cases we test it with:
modprobe wireguard
If this works, we auto-load the module at boot, as the host does not know that a container needs that module later.
echo "wireguard" >> /etc/modules-load.d/modules.conf
Now we create our unprivileged container (in my case also Debian 9) and then install the user space tools:
echo "deb http://deb.debian.org/debian/ unstable main" > /etc/apt/sources.list.d/unstable-wireguard.list

printf 'Package: *\nPin: release a=unstable\nPin-Priority: 90\n' > /etc/apt/preferences.d/limit-unstable

apt update
and now something special – we want only the user space tools nothing more.
apt-get install --no-install-recommends wireguard-tools
A simple test that everything works can be done by creating temporary a wg0 device.
ip link add wg0 type wireguard
No output means everything worked. And we’re done, everything else is the same as running Wireguard without container – just choose your howto for this.
Howto install Bitwarden in a LXC container (e.g. Proxmox)
January 13, 2019
As many of you know me, I’m quite serious about security and therefore a believer in the theory that a service which is not reachable (e.g. from the Internet) cannot be attacked as easily as one that it. Looking at password managers this makes choosing not that easy. Sure there is Keepass and the descendants, but they have the problem that the security is based solely on the master password and the end device security. Knowing friends that use Google Drive for syncing the password file between their devices, I looked at that option, but it was not right for me (e.g. Browser integration, 2FA, …).
Password managers like Lastpass or 1Password are also not the right solution for me. Yes, I believe that their crypto is good, and they never see the passwords of their users, but the 2FA is only as good as the lost password/2FA reset feature is. I’ve read and seen to many attacks on that to rely on it.
All of this leads to Bitwarden, it provides the same level of functionality as Lastpass or 1Password but is OpenSource and can be hosted on my own server. Not opening it up to Internet and using it from remote only via VPN (which I have anyway) make for a real small attack surface. This blog post shows how I installed it within a Proxmox LXC container, which I did to isolated it from other stuff and therefore there are no dependencies, if I need to upgrade something. I don’t like to install anything on the Proxmox host itself. As this is my first try, and I run into a problem with an unprivileged container and docker within it, this setup works currently only with a privileged container. I know this is not that good, but in this case it is a risk I can accept. If you find a solution to get it running in an unprivileged container please send me an email or write a comment.
LXC container
After creating the LXC container (2Gb RAM, >5GB HD) with Debian 9, don’t start the container at once. You need to add following to /etc/modules-load.d/modules.conf
aufs

overlay
And if you don’t want to boot load the modules with
modprobe aufs

modprobe overlay
If you don’t do this your installation will get gigantic (over 30gb). Now we just need to add following to /etc/pve/lxc/<vid>.conf
#insert docker part below

lxc.apparmor.profile: unconfined

lxc.cgroup.devices.allow: a

lxc.cap.drop:
Now you can start the container and enter it, we’ll check later if all was correct, but we need docker for this.
Docker and Docker Composer
Some requirements for docker
apt install apt-transport-https ca-certificates curl gnupg2 software-properties-common
and now we can add the repository for docker
curl -fsSL https://download.docker.com/linux/debian/gpg | apt-key add -

add-apt-repository "deb [arch=amd64] https://download.docker.com/linux/debian $(lsb_release -cs) stable"
and now we can install it with
apt-get update apt-get install docker-ce
The Docker Composer which is shipped with Debian is too old to work with this docker, so we need following:
curl -L "https://github.com/docker/compose/releases/download/1.23.1/docker-compose-$(uname -s)-$(uname -m)" -o /usr/local/bin/docker-compose

chmod +x /usr/local/bin/docker-compose
and add /usr/local/bin/ to the path variable by adding
PATH=/usr/local/bin:$PATH
to .bashrc and calling it directly in the bash to get it set without starting a new bash instance. I know that a package would be better, couldn’t find one, so this is a temporary solution. If someone finds a better one, leave it in the comments below.
Now we need to check if the overlay stuff is working by calling docker info and hopefully you get also overlay2 as storage driver:
Containers: 0

Running: 0

Paused: 0

Stopped: 0

Images: 0

Server Version: 18.06.1-ce

Storage Driver: overlay2

Backing Filesystem: extfs

Supports d_type: true

Native Overlay Diff: true

Logging Driver: json-file
Bitwarden
Now we just need following:
curl -s -o bitwarden.sh https://raw.githubusercontent.com/bitwarden/core/master/scripts/bitwarden.sh

chmod +x bitwarden.sh

./bitwarden.sh install

./bitwarden.sh start

./bitwarden.sh updatedb
And now you’re done, you’ve your own password manager server which also supports Google Authenticator (Time-based One-time Password Algorithm (TOTP) as second factor. Maybe I’ll write a blogpost how to setup a Yubikey as 2FA (desktop and mobile) later.
Howto setup a Debian 9 with Proxmox and containers using as few IPv4 and IPv6 addresses as possible
August 4, 2017
My current Linux Root-Server needs to be replaced with a newer Linux version and should also be much cheaper then the current one. So at first I did look what I don’t like about the current one:
- It is expensive with about 70 Euros / months. Following is responsible for that
- My own HPE hardware with 16GB RAM and a software RAID (hardware raid would be even more expensive) – iLo (or something like it) is a must for me 🙂
- 16 additional IPv4 addresses for the visualized container and servers
- Large enough backup space to get back some days.
- A base OS which makes it hard to run newer Linux versions in the container (sure old ones like CentOS6 still get updates, but that will change)
- Its time to move to newer Linux versions in the containers
- OpenVZ based containers which are not mainstream anymore
Then I looked what surrounding conditions changed since I did setup my current server.
- I’ve IPv6 at home and 70% of my traffic is IPv6 (thx to Google (specially Youtube) and Cloudflare)
- IPv4 addresses got even more expensive for Root-Servers
- I’m now using Cloudflare for most of the websites I host.
- Cloudflare is reachable via IPv4 and IPv6 and can connect back either with IPv4 or IPv6 to my servers
- With unprivileged containers the need to use KVM for security lessens
- Hosting providers offer now KVM servers for really cheap, which have dedicated reserved CPUs.
- KVM servers can host containers without a problem
This lead to the decision to try following setup:
- A KVM based Server for less than 10 Euro / month at Netcup to try the concept
- No additional IPv4 addresses, everything should work with only 1 IPv4 and a /64 IPv6 subnet
- Base OS should be Debian 9 (“Stretch”)
- For ease of configuration of the containers I will use the current Proxmox with LXC
- Don’t use my own HTTP reverse proxy, but use exclusively Cloudflare for all websites to translate from IPv4 to IPv6

After that decision was reached I search for Howtos which would allow me to just set it up without doing much research. Sadly that didn’t work out. Sure, there are multiple Howtos which explain you how to setup Debian and Proxmox, but if you get into the nifty parts e.g. using only minimal IP addresses, working around MAC address filters at the hosting providers (which is quite a important security function, BTW) and IPv6, they will tell you: You need more IP addresses, get a really complicated setup or just ignore that point at all.
As you can read that blog post you know that I found a way, so expect a complete documentation on how to setup such a server. I’ll concentrate on the relevant parts to allow you to setup a similar server. Of course I did also some security harding like making a secure ssh setup with only public keys, the right ciphers, …. which I won’t cover here.
Setting up the OS
I used the Debian 9 minimal install, which Netcup provides, and did change the password, hostname, changed the language to English (to be more exact to C) and moved the SSH Port a non standard port. The last one I did not so much for security but for the constant scans on port 22, which flood the logs.
passwd

vim /etc/hosts

vim /etc/hostname

dpkg-reconfigure locales

vim /etc/ssh/sshd_config

/etc/init.d/ssh restart
I followed that with making sure no firewall is active and installed the net-tools so I got netstat and ifconfig.
apt install net-tools
At last I did a check if any packages needs an update.
apt update

apt upgrade
Installing Proxmox
First I checked if the IP address returns the correct hostname, as otherwise the install fails and you need to start from scratch.
hostname --ip-address
Adding the Proxmox Repos to the system and installing the software:
echo "deb http://download.proxmox.com/debian/pve stretch pve-no-subscription" > /etc/apt/sources.list.d/pve-install-repo.list

wget http://download.proxmox.com/debian/proxmox-ve-release-5.x.gpg -O /etc/apt/trusted.gpg.d/proxmox-ve-release-5.x.gpg

apt update && apt dist-upgrade

apt install proxmox-ve postfix open-iscsi
After that I did a reboot and booted the Proxmox kernel, I removed some packages I didn’t need anymore
apt remove os-prober linux-image-amd64 linux-image-4.9.0-3-amd64
Now I did my first login to the admin GUI to https://<hostname>:8006/ and enabled the Proxmox firewall

Than set the firewall rules for protecting the host (I did that for the whole datacenter even if I only have one server at this moment). Ping is allowed, the Webgui and ssh.

I mate sure with
iptables -L -xvn
that the firewall was running.
BTW, if you don’t like the nagging windows at every login that you need a license and if this is only a testing machine as mine is currently, type following:
sed -i.bak 's/NotFound/Active/g' /usr/share/perl5/PVE/API2/Subscription.pm && systemctl restart pveproxy.service
Now we need to configure the network (vmbr0) for our virtual systems and this is the point where my Howto will go an other direction. Normally you’re told to configure the vmbr0 and put the physical interface into the bridge. This bridging mode is the easiest normally, but won’t work here.
Routing instead of bridging
Normally you are told that if you use public IPv4 and IPv6 addresses in containers you should bridge it. Yes thats true, but there is one problem. LXC containers have their own MAC addresses. So if they send traffic via the bridge to the datacenter switch, the switch sees the virtual MAC address. In a internal company network on a physical host that is normally not a problem. In a datacenter where different people rent their servers thats not good security practice. Most hosting providers will filter the MAC addresses on the switch (sometimes additional IPv4 addresses come with the right to use additional MAC addresses, but we want to save money here 🙂 ). As this server is a KVM guest OS the filtering is most likely part of the virtual switch (e.g. for VMware ESX this is the default even).
With ebtables it is possible to configure a SNAT for the MAC addresses, but that will get really complicated really fast – trust me with networking stuff – when I say complicated it is really complicated fast. 🙂
So, if we can’t use bridging we need to use routing. Yes the routing setup on the server is not so easy, but it is clean and easy to understand.
First we configure the physical interface in the admin GUI
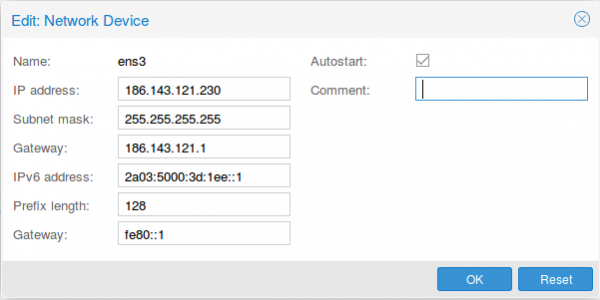
Two configurations are different than at normal setups. The provider gave you most likely a /23 or /24, but I use a subnet mask /32 (255.255.255.255), as I only want to talk to the default gateway and not the other servers from other customers. If the switch thinks traffic is ok, he can reroute it for me. The provider switch will defend its IP address against ARP spoofing, I’m quite sure as otherwise a incorrect configuration of a customer will break the network for all customer – the provider will make that mistake only once. For IPv6 we do basically the same with /128 but in this case we also want to reuse the /64 subnet on our second interface.
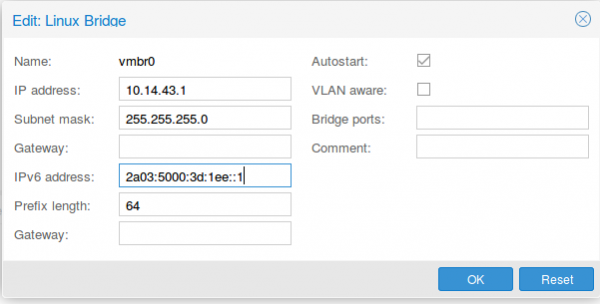
As I don’t have additional IPv4 addresses, I’ll use a local subnet to provide access to IPv4 addresses to the containers (via NAT), the IPv6 address gets configured a second time with the /64 subnet mask. This setup allows use to route with only one /64 – we’re cheap … no extra money needed.
Now we reboot the server so that the /etc/network/interfaces config gets written. We need to add some additional settings there, so it looks like this
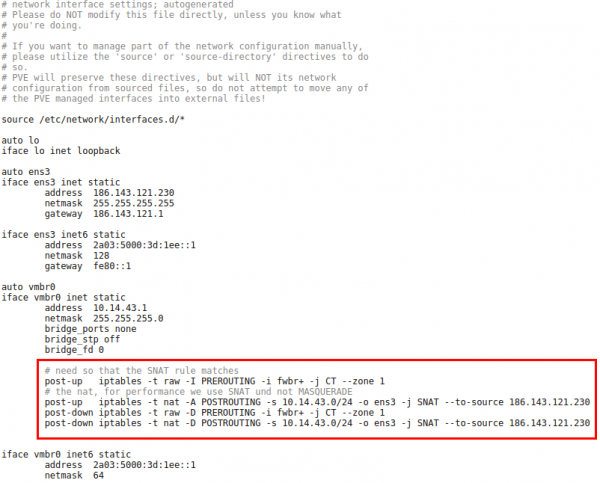
The first command in the red frame is needed to make sure that traffic from the containers pass the second rule. Its some kind lxc specialty. The second command is just a simple SNAT to your public IPv4 address. The last 2 are for making sure that the iptable rules get deleted if you stop the network.
Now we need to make sure that the container traffic gets routed so we put following lines into /etc/sysctl.conf

And we should also enable following lines
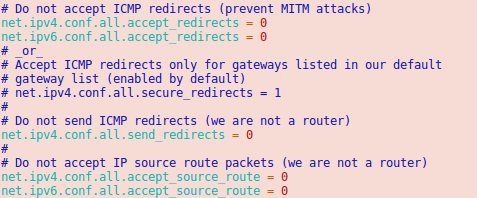
Now we’re almost done. One point remains. The switch/router which is our default gateway needs to be able to send packets to our containers. For this he does for IPv6 something similar to an ARP request. It is called neighbor discovery and as the network of the container is routed we need to answer the request on the host system.
Neighbor Discovery Protocol (NDP) Proxy
We could now do this by using proxy_ndp, the IPv6 variant of proxy_arp. First enable proxy_ndp by running:
sysctl -w net.ipv6.conf.all.proxy_ndp=1
You can enable this permanently by adding the following line to /etc/sysctl.conf:
net.ipv6.conf.all.proxy_ndp = 1
Then run:
ip -6 neigh add proxy 2a03:5000:3d:1ee::100 dev ens3
This means for the host Linux system to generate Neighbor Advertisement messages in response to Neighbor Solicitation messages for 2a03:5000:3d:1ee::100 (e.g. our container with ID 100) that enters through ens3.
While proxy_arp could be used to proxy a whole subnet, this appears not to be the case with proxy_ndp. To protect the memory of upstream routers, you can only proxy defined addresses. That’s not a simple solution, if we need to add an entry for every container. But we’re saved from that as Debian 9 ships with an daemon that can proxy a whole subnet, ndppd. Let’s install and configure it:
apt install ndppd

cp /usr/share/doc/ndppd/ndppd.conf-dist /etc/ndppd.conf
and write a config like this
route-ttl 30000

proxy ens3 {

router no

timeout 500

ttl 30000

rule 2a03:5000:3d:1ee::/64 {

auto

}

}
now enable it by default and start it
update-rc.d ndppd defaults

/etc/init.d/ndppd start
Now it is time to boot the system and create you first container.
Container setup
The container setup is easy, you just need to use the Proxmox host as default gateway.
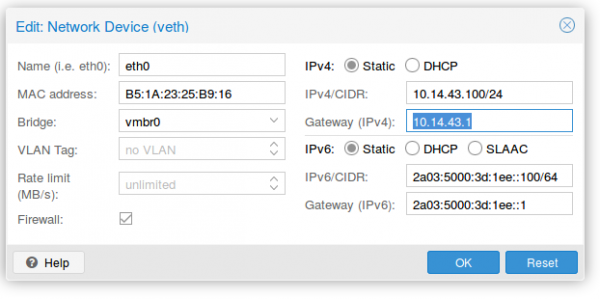
As you see the setup is quite cool and it allows you to create containers without thinking about it. A similar setup is also possible with IPv4 addresses. As I don’t need it I’ll just quickly describe it here.
Short info for doing the same for an additional IPv4 subnet
Following needs to be added to the /etc/network/interfaces:
iface ens3 inet static

pointopoint 186.143.121.1
iface vmbr0 inet static

address 186.143.121.230 # Our Host will be the Gateway for all container

netmask 255.255.255.255

# Add all single IP's from your /29 subnet

up route add -host 186.143.34.56 dev br0

up route add -host 186.143.34.57 dev br0

up route add -host 186.143.34.58 dev br0

up route add -host 186.143.34.59 dev br0

up route add -host 186.143.34.60 dev br0

up route add -host 186.143.34.61 dev br0

up route add -host 186.143.34.62 dev br0

up route add -host 186.143.34.63 dev br0

.......
We’re reusing the ens3 IP address. Normally we would add our additional IPv4 network e.g. a /29. The problem with this straight forward setup would be that we would lose 2 IP addresses (netbase and broadcast). Also the pointopoint directive is important and tells our host to send all requests to the datacenter IPv4 gateway – even if we want to talk to our neighbors later.
The for the container setup you just need to replace the IPv4 config with following
auto eth0

iface eth0 inet static

address 186.143.34.56 # Any IP of our /29 subnet

netmask 255.255.255.255

gateway 186.143.121.13 # Our Host machine will do the job!

pointopoint 186.143.121.1
How that saved you some time setting up you own system!
Accessing Mikrotik RouterOS via MAC Telnet from a Linux box
November 18, 2016
If you know Mikrotik Routers you know that you’re able to access them via MAC Telnet (see here for more details) via Layer2 with Winbox. But running Winbox via Wine on a Linux is not that great for using MAC Telnet, and there is a better way .. just use MAC-Telnet from Håkon Nessjøen. On Ubuntu/Debian you can just install the package with
sudo apt-get install mactelnet-client
and you see its feature like this:
$ mactelnet -h

MAC-Telnet 0.4.2

Usage: mactelnet <MAC|identity> [-h] [-n] [-a <path>] [-A] [-t <timeout>] [-u <user>] [-p <password>] [-U <user>] | -l [-B] [-t <timeout>]
Parameters:

MAC MAC-Address of the RouterOS/mactelnetd device. Use mndp to

discover it.

identity The identity/name of your destination device. Uses

MNDP protocol to find it.

-l List/Search for routers nearby (MNDP). You may use -t to set timeout.

-B Batch mode. Use computer readable output (CSV), for use with -l.

-n Do not use broadcast packets. Less insecure but requires

root privileges.

-a <path> Use specified path instead of the default: ~/.mactelnet for autologin config file.

-A Disable autologin feature.

-t <timeout> Amount of seconds to wait for a response on each interface.

-u <user> Specify username on command line.

-p <password> Specify password on command line.

-U <user> Drop privileges to this user. Used in conjunction with -n

for security.

-q Quiet mode.

-h This help.
So lets give it a try, first with searching for my home router
$ mactelnet -l

Searching for MikroTik routers... Abort with CTRL+C.

IP MAC-Address Identity (platform version hardware) uptime

10.x.x.x 0:xx:xx:xx:xx:xx jumpgate (MikroTik x.x.x. xxxx) up 139 days 5 hours XXXXX-XXXX vlanInternal
and then we’ll connect
$ mactelnet 0:xx:xx:xx:xx:xx
and we’re connected.
Howto live-sniffer traffic on a remote Linux system with Wireshark
October 2, 2016
You ask why you should need this at all? Easy, sometimes a tcpdump is not enough or not that easy to use:
- You want to check the TTL/hop count of BGP packets before activating TTL security
- You want to look at encrypted SNMPv3 packets (Wireshark is able to decrypt it, if provided the password)
- You want to look at DHCP packets and their content
Sure, it’s quite easy to sniffer on a remote Linux box with tcpdump into an file and copy that that over via scp to the local system and take a closer look at the traffic. But getting used to the feature of my Mikrotik routers to stream traffic live to my local Wireshark, I thought something similar must also be possible with normal Linux boxes. And sure it is.
We just use ssh to pipe the captured traffic through to the local Wireshark. Sure this is not the perfect method for GBytes of traffic but often you just need a few packets to check something or monitor some low volume traffic. Anyway first we need to make sure that Wireshark is able to execute the dumpcap command with our current user. So we need to check the permissions
ll /usr/bin/dumpcap

-rwxr-xr-- 1 root wireshark 88272 Apr 8 11:53 /usr/bin/dumpcap*
So on Ubuntu/Debian we need to add ourself to the wireshark group and check that it got applied with the id command (You need to logoff or start a new sesson with su - $user beforehand). Now you can simply call:
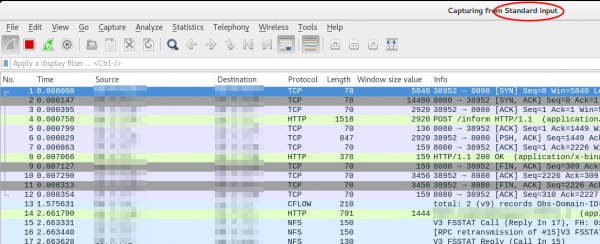
ssh [email protected] 'tcpdump -f -i eth0 -w - not port 22' | wireshark -k -i -
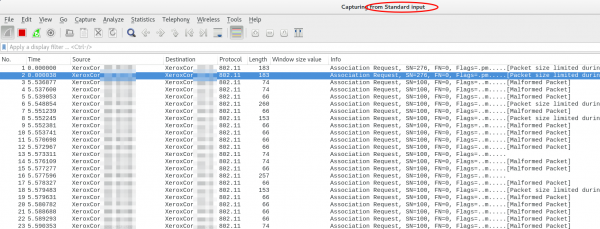
And now the really cool part comes. I’m using Ubiqity Unifi access points in multiple setups and I sometimes need to look at the traffic a station communicates with the access point on the wireless interface. With that commands I’m able to ssh into the access point and look at the live traffic of an access point and a station which is hundreds of kilometres way. You can ssh into the AP with your normal web GUI user (if not configured differently) and the bridge config looks like this
BZ.v3.7.8# brctl show

bridge name bridge id STP enabled interfaces

br0 ffff.00272250d9cf no ath0

ath1

ath2

eth0
You can choose one of that interfaces (or the bridge) for normal IP traffic or go one level deeper with wifi0, which looks like this
ssh [email protected] 'tcpdump -f -i wifi0 -w -' | wireshark -k -i -
That’s cool!?! 😉
Block Ransomware botnet C&C traffic with a Mikrotik router
March 14, 2016
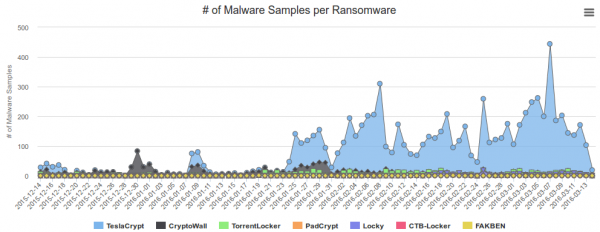
In my last blog post I wrote about blocking, detecting and mitigating the Locky Ransomware. I’ve referenced to a earlier blog post of mine which allows to block traffic to/from the Tor network. This blog post combines both – a way to block Ransomware botnet C&C traffic on a Mikrotik router. The base are the block lists from Abuse.ch, which also provide a nice statistic. Locky is not the most common Ransomware today.
Linux part
You need also a small Linux/Unix server to help. This server needs to be trustworthy one as the router executes a script this server generates. This is required as RouterOS is only able to parse text files up to 4096 by itself, and the IP address and domain list is longer.
So first we create the script /usr/local/sbin/generateMalwareBlockScripts.py on the Linux server by downloading following Python script. Open the file and change the paths to your liking. The filename path works on CentOS, on Ubuntu you need to remove the html directory. Now make the file executable
chmod 755 /usr/local/sbin/generateMalwareBlockScripts.py
and execute it
/usr/local/sbin/generateMalwareBlockScripts.py
No output is good. Make sure that the file is reachable via HTTP (e.g. install httpd on CentOS) from the router. If everything works make sure that the script is called once every hour to update the list. e.g. place a symlink in /etc/cron.hourly:
ln -s /usr/local/sbin/generateMalwareBlockScripts.py /etc/cron.hourly/generateMalwareBlockScripts.py
Mikrotik part
Copy and paste following to get the IP address script onto the router:
/system script

add name=scriptUpdateMalwareIPs owner=admin policy=ftp,reboot,read,write,policy,test,password,sniff,sensitive source="# Script which will download a script which adds the malware IP addresses to an address-list\

\n# Using a script to add this is required as RouterOS can only parse 4096 byte files, and the list is longer\

\n# Written by Robert Penz <[email protected]> \

\n# Released under GPL version 3\

\n\

\n# get the \"add script\"\

\n/tool fetch url=\"http://10.xxx.xxx.xxx/addMalwareIPs.rsc\" mode=http\

\n:log info \"Downloaded addMalwareIPs.rsc\"\

\n\

\n# remove the old entries\

\n/ip firewall address-list remove [/ip firewall address-list find list=addressListMalware]\

\n\

\n# import the new entries\

\n/import file-name=addMalwareIPs.rsc\

\n:log info \"Removed old IP addresses and added new ones\"\

\n"
and copy and paste following for the DNS filtering script – surely you can combine them … I let them separated as maybe someone needs only one part:
/system script

add name=scriptUpdateMalwareDomains owner=admin policy=ftp,reboot,read,write,policy,test,password,sniff,sensitive source="# Script which will download a script which adds the malware domains as static DNS entry\

\n# Using a script to add this is required as RouterOS can only parse 4096 byte files, and the list is longer\

\n# Written by Robert Penz <[email protected]> \

\n# Released under GPL version 3\

\n\

\n# get the \"add script\"\

\n/tool fetch url=\"http://10.xxx.xxx.xxx/addMalwareDomains.rsc\" mode=http\

\n:log info \"Downloaded addMalwareDomains.rsc\"\

\n\

\n# remove the old entries\

\n/ip dns static remove [/ip dns static find comment~\"addMalwareDomains\"]\

\n\

\n# import the new entries\

\n/import file-name=addMalwareDomains.rsc\

\n:log info \"Removed old domains and added new ones\"\

\n"
To make the first try run use following command
/system script run scriptUpdateMalwareIPs
and
/system script run scriptUpdateMalwareDomains
if you didn’t get an error
/ip firewall address-list print
and
/ip dns static print
should show many entries. Now you only need to run the script once a hour which following command does:
/system scheduler add interval=1h name=schedulerUpdateMalwareIPs on-event=scriptUpdateMalwareIPs start-date=nov/30/2014 start-time=00:05:00
and
/system scheduler add interval=1h name=schedulerUpdateMalwareDomains on-event=scriptUpdateMalwareDomains start-date=nov/30/2014 start-time=00:10:00
You can use the address list and DNS blacklist now in various ways .. the simplest is following
/ip firewall filter

add chain=forward comment="just the answer packets --> pass" connection-state=established

add chain=forward comment="just the answer packets --> pass" connection-state=related

add action=reject chain=forward comment="no Traffic to malware IP addresses" dst-address-list=addressListMalware log=yes log-prefix=malwareIP out-interface=pppoeDslInternet

add action=reject chain=forward comment="report Traffic to DNS fake IP address" dst-address=10.255.255.255 log=yes log-prefix=malwareDNS out-interface=pppoeDslInternet

add chain=forward comment="everything from internal is ok --> pass" in-interface=InternalInterface
If a clients generates traffic to such DNS names or IP address you’ll get following in your log (and the traffic gets blocked):
20:07:16 firewall,info malwareIP forward: in:xxx out:pppoeDslInternet, src-mac xx:xx:xx:xx:xx:xx, proto ICMP (type 8, code 0), 10.xxx.xxx.xxx->104.xxx.xxx.xxx, len 84
or
20:09:34 firewall,info malwareDNS forward: in:xxx out:pppoeDslInternet, src-mac xx:xx:xx:xx:xx:xx, proto ICMP (type 8, code 0), 10.xxx.xxx.xxx ->10.255.255.255, len 84
ps: The Python script is done in a way that it easily allows you to add also other block lists … e.g. I added the Feodo blocklist from Abuse.ch.
Powered by WordPress
Entries and comments feeds.
Valid XHTML and CSS.
43 queries. 0.094 seconds.


