
-

-

-

- Austria (27)
- General (16)
- HowTo (126)
- IT Security (130)
- Linux (130)
- Networking (68)
- Other (4)
-

- CDemu - a free, gpl cd/dvd-rom device emulator for linux
- heatpumpMonitor - Monitoring a Stiebel Eltron LWZ
- ignis backup tool - the heat-strengthened backup tool
-

- July 2026 (5)
- May 2026 (1)
- December 2021 (2)
- September 2019 (1)
- May 2019 (1)
- April 2019 (1)
- January 2019 (1)
- October 2018 (1)
- August 2018 (1)
- February 2018 (1)
- September 2017 (1)
- August 2017 (2)
- May 2017 (1)
- April 2017 (1)
- February 2017 (1)
- January 2017 (2)
- December 2016 (1)
- November 2016 (2)
- October 2016 (1)
- September 2016 (1)
- August 2016 (1)
- July 2016 (2)
- April 2016 (1)
- March 2016 (3)
- February 2016 (4)
- January 2016 (2)
- December 2015 (2)
- November 2015 (2)
- September 2015 (2)
- July 2015 (5)
- June 2015 (4)
- May 2015 (2)
- February 2015 (1)
- January 2015 (4)
- December 2014 (1)
- November 2014 (5)
- October 2014 (4)
- September 2014 (1)
- August 2014 (4)
- July 2014 (3)
- June 2014 (5)
- May 2014 (5)
- April 2014 (1)
- March 2014 (2)
- February 2014 (3)
- January 2014 (5)
- December 2013 (2)
- November 2013 (3)
- September 2013 (3)
- August 2013 (2)
- May 2013 (4)
- April 2013 (1)
- March 2013 (1)
- February 2013 (3)
- December 2012 (3)
- November 2012 (3)
- October 2012 (1)
- September 2012 (2)
- June 2012 (1)
- May 2012 (1)
- April 2012 (1)
- March 2012 (1)
- February 2012 (1)
- January 2012 (1)
- December 2011 (4)
- November 2011 (1)
- August 2011 (1)
- March 2011 (1)
- October 2010 (1)
- May 2010 (3)
- January 2010 (1)
- September 2009 (1)
- August 2009 (5)
- July 2009 (5)
- June 2009 (4)
- May 2009 (1)
- April 2009 (1)
- January 2009 (1)
- December 2008 (6)
- November 2008 (6)
- October 2008 (2)
- September 2008 (11)
- August 2008 (4)
- July 2008 (7)
- June 2008 (2)
- May 2008 (7)
- April 2008 (5)
- March 2008 (9)
- February 2008 (15)
- January 2008 (11)
- December 2007 (3)
Quick Tip: How to Completely Reset Podman Storage
July 23, 2026
If your container storage (like /var/lib/containers/storage/overlay or ~/.local/share/containers/storage/) is unexpectedly full and podman system prune doesn’t clear enough space, there is a simple “nuke” command built into Podman:
podman system reset
(Use sudo podman system reset for root-level Podman storage)
What does it do?
It returns Podman’s storage engine back to its initial post-installation state. It wipes:
- All local images
- All containers (running or stopped)
- All volumes and networks
- All orphaned overlay storage layers
Warning: This command deletes everything in your Podman storage. Use it when you want a completely fresh start!
S10/125 vs. E9/125 Fiber – Can You Connect Them?
July 22, 2026
Ran into a legacy S10/125 fiber line and wondering if it will play nicely with standard E9/125 patch cables? Short answer: Yes, absolutely. Don’t Let the “S10” Label Fool You
If you’ve been working with standard IT infrastructure, terms like E9/125, OS1, or OS2 are second nature. Coming across an S10/125 cable can stop you in your tracks—mostly because “S10” isn’t a standard term in modern enterprise networking. It often pops up in telecom installations, carrier networks, or regional cabling specs (especially across parts of Europe). But despite the different naming convention, S10/125 and E9/125 are fundamentally the same type of fiber.
The Breakdown: Why They Are Compatible
Both designations describe a standard Singlemode fiber:
- Core Size (~9µm to 10µm): The E9 stands for an Einmode (Singlemode) core with a ~9µm mode field diameter. The S10 stands for a Singlemode core rounded to ~10µm. In practice, the mode field diameter difference is negligible and fully compliant with ITU-T G.652 standards.
- Cladding Size (125µm): Both fibers share the exact same 125µm outer glass cladding diameter.
Because the core profile and outer cladding dimensions match, light travels seamlessly between them without significant attenuation or signal degradation.
The Bottom Line
If you need to bridge an S10/125 run into an E9/125 network, go right ahead. Treat the entire link as standard Singlemode fiber (G.652), pair it with your usual Singlemode transceivers (1310nm / 1550nm), and you’re good to go.
The Vikunja Email Pitfall: Why CLI Password Resets Claim Success But Fail (And How to Fix It)
July 19, 2026
Vikunja is a fantastic self-hosted to-do and task management app. However, if you are setting up email notifications or password recovery, you might run into a highly confusing quirk: Your email configuration works perfectly for test emails, claims success on CLI password resets, but never actually sends the reset mail unless you use the web interface.
If you are currently looking at your mail server logs and seeing absolute silence during a CLI reset, here is exactly what is happening and how to deal with it. Vikunja supports a variety of environment variables to hook up your mail server. Depending on your infrastructure, you usually choose one of two main approaches:
The Internal Plaintext Relay (Port 25)
If your mail server (like Postfix) runs in the same local network or on the same host, you often don’t need authentication or TLS encryption. To force a standard internal plaintext connection, use this strict setup:
VIKUNJA_MAILER_ENABLED: "true"

VIKUNJA_MAILER_HOST: 10.x.x.x # Your mailserver IP

VIKUNJA_MAILER_PORT: "25"

VIKUNJA_MAILER_AUTHTYPE: none

VIKUNJA_MAILER_SKIPTLSVERIFY: "true"

VIKUNJA_MAILER_FROMEMAIL: [email protected]
Authenticated SMTP (Port 587 / 465)
If you are using an external provider (like Mailgun, SendGrid, or Gmail), you will need to provide credentials:
VIKUNJA_MAILER_ENABLED: "true"

VIKUNJA_MAILER_HOST: smtp.provider.com

VIKUNJA_MAILER_PORT: "587"

VIKUNJA_MAILER_USERNAME: your_username

VIKUNJA_MAILER_PASSWORD: your_password

VIKUNJA_MAILER_FROMEMAIL: [email protected]
Crucial Side Note: Make sure your VIKUNJA_SERVICE_PUBLICURL does not have a trailing slash (e.g., use [https://vikunja.domain.com](https://vikunja.domain.com), NOT [https://vikunja.domain.com/](https://vikunja.domain.com/)). A trailing slash breaks the password link generation, causing resets to fail silently – at least in my setup/version.
Verification via the testmail Command
Before testing password resets, you should verify that Vikunja can actually talk to your mail server. Vikunja has a built-in CLI command specifically for this.Run it inside your Docker environment like this:
docker compose exec -it vikunja /app/vikunja/vikunja testmail [email protected]
Why this works: The testmail command sends the email immediately. If your configuration is correct and the mail server is reachable, the mail will accept the connection and the email will arrive in your inbox right away.
The Quirk: user reset-password via CLI Claims Success But Does Nothing
Once your testmail arrives safely, you would expect the password reset command to work the same way. You run:
docker compose exec -it vikunja /app/vikunja/vikunja user reset-password username
The terminal output proudly states:
Password reset email sent successfully.
However, looking at your mail server logs, there is absolute silence. No connection attempt, no traffic, nothing. The CLI command closes immediately after printing the message, but no bytes ever leave the container.
The Solution: Trigger it via the Homepage
To successfully trigger a password reset email, do not use the CLI. Instead, use the active web application:
- Go to your Vikunja login page (e.g., in an Incognito window).
- Click “Forgot Password”.
- Enter the username or email address.
When triggered via the web interface, the mail server logs will immediately show the connection attempt, and the password reset link will be sent successfully.
Troubleshooting Checklist
If the testmail works but the web UI reset still doesn’t send anything, ensure that the affected user actually has a valid email address stored in the database. If they signed up without one, you can update it via the CLI first:
docker compose exec -it vikunja /app/vikunja/vikunja user update --email [email protected] username
Locking Down DNS on MikroTik: How to Force Local DNS and Block Bypass Attempts
July 17, 2026
When you set up a filtering DNS server—whether it’s a self-hosted Pi-hole, AdGuard Home, or a secure upstream provider like Cloudflare Families or NextDNS—you quickly run into a frustrating problem: smart clients bypass it. Many modern devices, web browsers, and apps come hardcoded with their own DNS servers (like Google’s 8.8.8.8). Even worse, modern protocols like DoT (DNS-over-TLS) and DoH (DNS-over-HTTPS) encrypt DNS queries, allowing devices to completely slip past your network policies. If you want your DNS filters to actually work, you have to force everyone onto your MikroTik router’s DNS. Here is exactly how to do it using RouterOS.
The Blueprint: Our 3-Step Strategy
To successfully lock down DNS on a network, we need a multi-layered approach:
- Intercept traditional unencrypted DNS (Port 53) and force-redirect it to the MikroTik.
- Block DoT (Port 853) at the firewall level to force clients to fall back to standard DNS.
- Address DoH (Port 443) using your upstream filter, since it cannot be cleanly blocked by a standard port firewall.
Step 1: Force-Redirect Traditional DNS (Port 53)
First, we need to ensure the MikroTik itself is ready to handle queries by enabling allow-remote-requests=yes.
Next, we create a destination NAT (dst-nat) rule. Instead of blocking rogue DNS requests, we redirect them. If a device tries to query 8.8.8.8, the MikroTik intercepts the packet, answers it locally, and sends it back. The client thinks it talked to Google, but it actually got your filtered local response. Run these commands in your MikroTik terminal (replace LAN with your specific interface list):
# 1. Enable the local DNS cache

/ip/dns/set allow-remote-requests=yes
# 2. Redirect UDP and TCP DNS traffic from the LAN to the router itself

/ip/firewall/nat

add chain=dstnat action=redirect to-ports=53 protocol=udp in-interface-list=LAN dst-port=53 comment="Force Local DNS (UDP)"

add chain=dstnat action=redirect to-ports=53 protocol=tcp in-interface-list=LAN dst-port=53 comment="Force Local DNS (TCP)"
Step 2: Slam the Door on DNS-over-TLS (DoT)
DNS-over-TLS is smart, but it has an architectural flaw which allows easy blocking: it uses a dedicated port (Port 853). Because it has its own lane, we can easily block it entirely for our LAN interface list. When devices realize they cannot establish a secure DoT handshake, 99% of them will gracefully fall back to traditional port 53 DNS—right into the trap we set up in Step 1.
/ip/firewall/filter

add chain=forward action=drop protocol=tcp in-interface-list=LAN dst-port=853 comment="Block DoT - Force fallback to local DNS"

add chain=forward action=drop protocol=udp in-interface-list=LAN dst-port=853 comment="Block DoT - Force fallback to local DNS"
⚠️ Important: Make sure to drag these rules near the top of your Filter Rules list in WinBox, securely above any general “Allow LAN to Internet” rules.
Step 3: Dealing with the Boss Fight: DNS-over-HTTPS (DoH)
This is where things get tricky. DNS-over-HTTPS wraps encrypted DNS queries inside normal HTTPS traffic on Port 443. If you try to block port 443 on your MikroTik, you will break the entire internet, because normal web browsing uses the exact same port. You cannot differentiate a DoH query from a regular website visit just by looking at the port or IP header.
The Solution: Handle DoH at the Upstream Server
Because the router cannot easily peek inside encrypted HTTPS traffic, DoH must be managed directly at your upstream DNS server level. If you use a filtering upstream provider (like NextDNS, AdGuard, or a local Pi-hole), you need to look for two features in their dashboard configuration:
- Enable “Block Bypass Methods”: Most professional filtering DNS providers have a single-click toggle that blocks known DoH bootstrap endpoints and common DoH provider domains.
- Rely on Canary Domains: Major browsers (like Firefox and Chrome) check specific “canary domains” (such as use-application-dns.net) before turning on DoH automatically. Your upstream filtering server can be configured to return a “NXDOMAIN” (does not exist) response for these queries, telling the browser: “Hey, this network has custom policies active. Turn off automatic DoH.”
Summary
By combining MikroTik’s NAT redirection for traditional traffic, Port blocking for DoT, and Upstream domain filtering for DoH, you create a seamless, inescapable net for your network traffic. Your network devices stay fast, secure, and—most importantly—properly filtered.
Why Adding DHCP Option 121 Breaks Your Default Gateway (and How to Fix It)
If you’ve ever configured custom static routes on your router via DHCP, you might have run into a baffling issue: some devices pick up the new route perfectly, but suddenly lose their connection to the internet entirely. They simply ignore the standard default gateway.
This isn’t a bug in your router or your devices. It’s actually standard behavior defined by the internet protocol specifications.
Here is why it happens and exactly how to fix it—using MikroTik’s RouterOS as an example.
The Scenario
Imagine you have a standard network setup:
- Local Subnet: 192.168.88.0/24
- Default Gateway (Router): 192.168.88.1
- Target Subnet (VPN or another internal network): 10.10.0.0/16
You want all clients to automatically know that traffic destined for 10.10.0.0/16 should go through a specific internal gateway (let’s say your main router at 192.168.88.1). Instead of configuring this on every single PC, you use DHCP Option 121 (Classless Static Routes).
You convert the route to Hex format and apply it to your DHCP server:
Code snippet
/ip dhcp-server option

add code=121 name=static_route_10.10 value=0x100a0a192a85801
/ip dhcp-server network
add address=192.168.88.0/24 dhcp-option=static_route_10.10 gateway=192.168.88.1 dns-server=192.168.88.1
You reboot your clients. Some devices work perfectly. But suddenly, your Windows machines can access the 10.10.0.0/16 network but cannot open any websites on the internet. Their default gateway has completely vanished.
The “Why”: Strict RFC 3442 Compliance
The culprit behind this behavior is RFC 3442, the official standards document that defines DHCP Option 121. The specification explicitly states:
“If the DHCP server returns both a Classless Static Routes option and a Router option, the DHCP client MUST ignore the Router option.”
In plain English: Option 121 completely overrides Option 3 (the standard Gateway field).
Operating systems like Microsoft Windows adhere strictly to this rule. The moment Windows sees Option 121 in the DHCP offer, it deletes the standard gateway you defined in the DHCP network settings and only applies the routes found inside Option 121. Other operating systems (like macOS or certain Linux distros) are more forgiving and keep both, which is why the bug doesn’t happen everywhere.
The Solution: Include the Default Route in Option 121
To fix this, you cannot rely on the standard DHCP gateway field anymore. You must explicitly include the default route (0.0.0.0/0) inside your Option 121 hex string alongside your custom route.
1. Breaking down the Hex string
- Let’s look at how the Hex value for Option 121 is built:
- Custom Route (10.10.0.0/16 via 192.168.88.1):
100a0a192a85801 10= Subnet mask /16 in Hex0a 0a= The network portion 10.10c0 a8 58 01= The gateway IP 192.168.88.1
- Custom Route (10.10.0.0/16 via 192.168.88.1):
- Default Route (0.0.0.0/0 via 192.168.88.1):
00c0a8580100= Subnet mask /0 in Hex (requires 0 bytes for the network destination)c0 a8 58 01= The gateway IP 192.168.88.1
2. Combining them
Simply append the default route Hex string to the end of your custom route Hex string:
0x100a0a192a85801+00c0a85801=0x100a0a192a8580100c0a85801
3. Applying the fix in RouterOS
Update your DHCP option with the combined string:
Code snippet
/ip dhcp-server option

set [find name=static_route_10.10] value=0x100a0a192a8580100c0a85801
(Note: Keep your standard gateway=192.168.88.1 configured in the DHCP network settings anyway, as older devices that don’t support Option 121 at all will still need it.)
Conclusion
Once the DHCP lease renews (or you unplug and replug the network cable), the affected clients will receive the new, combined Option 121. They will successfully implement your specific internal route and regain their default path to the outside world.
If you are deploying advanced routing via DHCP, always remember: If you touch Option 121, you become fully responsible for defining the default gateway!
Evolution of the LWZ Monitoring: From Python to ESPHome
May 29, 2026
It’s been over a decade since I first poked around the serial interface of my Stiebel Eltron LWZ 403 SOL. What started as a “cable investigation” with a technician’s notebook has grown into a long-running community project. Today, I am happy to announce a major update to the project’s documentation and architecture!
I have moved away from the dedicated Linux server and Python daemon in favor of a modern ESPHome and Home Assistant integration. This transition makes the setup much leaner, more robust, and natively integrated into a modern smart home ecosystem.
Key highlights of the update:
- New ESPHome Integration: I’ve replaced the long serial cables with a small ESP8266 (NodeMCU) Wi-Fi bridge installed directly inside the heat pump.
- Custom C++ Protocol Handler: A new DLE protocol implementation that handles modern firmware quirks, including a fix for the elusive “0x18 ghost byte” found in versions like v4.39.
- Modern Visualization: Complete Home Assistant dashboard configuration using the ApexCharts card to replicate (and improve upon) the classic RRDTool look.
- Full Technical Deep-Dive: I’ve added detailed data block mappings and offset tables to the main page for those who want to build their own implementation.
You can find the updated guide, technical tables, and the new source code for download on the main project page:
Read the updated LWZ Monitoring Guide
A big thank you to the community for the feedback over the years. I hope this new direction helps you keep your heating systems running efficiently!
modsecurity rule to filter CVE-2021-44228/LogJam/Log4Shell [update]
December 10, 2021
As a fast workaround, a friend of mine made a modsecurity rule to filter CVE-2021-44228/LogJam/Log4Shell, which he allowed me to share with you.
SecRule \

  ARGS|REQUEST_HEADERS|REQUEST_URI|REQUEST_BODY|REQUEST_COOKIES|REQUEST_LINE|QUERY_STRING "jndi:ldap:" \

  "phase:1, \

  id:751001, \

  t:none, \

  deny, \

  status:403, \

  log, \

  auditlog, \

  msg:'Block: CVE-2021-44228 - deny pattern \"jndi:ldap:\"', \

  severity:'5', \

  rev:1, \

  tag:'no_ar'"
New improved version:
SecRule \

  ARGS|REQUEST_HEADERS|REQUEST_URI|REQUEST_BODY|REQUEST_COOKIES|REQUEST_LINE|QUERY_STRING "jndi:ldap:|jndi:dns:|jndi:rmi:|jndi:rni:|\${jndi:" \

  "phase:1, \

  id:751001, \

  t:none, \

  deny, \

  status:403, \

  log, \

  auditlog, \

  msg:'DVT: CVE-2021-44228 - phase 1 - deny known \"jndi:\" pattern', \

  severity:'5', \

  rev:1, \

  tag:'no_ar'"


SecRule \

  ARGS|REQUEST_HEADERS|REQUEST_URI|REQUEST_BODY|REQUEST_COOKIES|REQUEST_LINE|QUERY_STRING "jndi:ldap:|jndi:dns:|jndi:rmi:|jndi:rni:|\${jndi:" \

  "phase:2, \

  id:751002, \

  t:none, \

  deny, \

  status:403, \

  log, \

  auditlog, \

  msg:'DVT: CVE-2021-44228 - phase 2 - deny known \"jndi:\" pattern', \

  severity:'5', \

  rev:1, \

  tag:'no_ar'
Jitsi Workaround for CVE-2021-44228/LogJam/Log4Shell
You surely heard of the LogJam / Log4Shell / CVE-2021-44228 – if not, take a look at this blog post. If you’re running Jitsi is most likely vulnerable and as there is no fix currently, you need a workaround which I provide here for you. You need to add -Dlog4j2.formatMsgNoLookups=True at the correct places in the file – the position is important.
/etc/jitsi/jicofo/config

/etc/jitsi/videobridge/config

And restart the processes or restart the server.
Proxmox Container with Debian 10 does not work after upgrade
September 8, 2019
I just did an apt update / upgrade of a Debian 10 container and restarted it afterwards and got following:
# pct start 105

Job for [email protected] failed because the control process exited with error code.

See "systemctl status [email protected]" and "journalctl -xe" for details.

command 'systemctl start pve-container@105' failed: exit code 1
with a more verbose startup I got following
# lxc-start -n 105 -F -l DEBUG -o /tmp/lxc-ID.log

lxc-start: 105: conf.c: run_buffer: 335 Script exited with status 25

lxc-start: 105: start.c: lxc_init: 861 Failed to run lxc.hook.pre-start for container "105"

lxc-start: 105: start.c: __lxc_start: 1944 Failed to initialize container "105"

lxc-start: 105: tools/lxc_start.c: main: 330 The container failed to start

lxc-start: 105: tools/lxc_start.c: main: 336 Additional information can be obtained by setting the --logfile and --logpriority options
and a look into /tmp/lxc-ID.log shows the problem:
lxc-start 105 20190908130857.595 DEBUG conf - conf.c:run_buffer:326 - Script exec /usr/share/lxc/hooks/lxc-pve-prestart-hook 105 lxc pre-start with output: unsupported debian version '10.1'

lxc-start 105 20190908130857.604 ERROR conf - conf.c:run_buffer:335 - Script exited with status 25

lxc-start 105 20190908130857.604 ERROR start - start.c:lxc_init:861 - Failed to run lxc.hook.pre-start for container "105"
The problem was that the Debian version, which changed from 10.0 to 10.1, was not recognized by the Proxmox script. The responsible code is in /usr/share/perl5/PVE/LXC/Setup/Debian.pm, but in this case I didn’t need to change anything as I just needed to update the Proxmox host to the newest minor version and it worked again, as the code in Debian.pm got changed by the developers. I just though to share this, as maybe others run into that problem, as the error reporting is not that good in that case. 🙂
Howto visualize your water meter and get alerted if too much water is used
May 1, 2019
In the village I live the water meter is replaced every 5 years and it was the fifth’s year this year. I took the opportunity to talk to the municipal office, if it was possible to get a water meter with impulse module, which I can integrate in my network. And they said yes 🙂 – Thx again!
So last week they came by and put the new one in, I was not at home, and when I came home I found following:
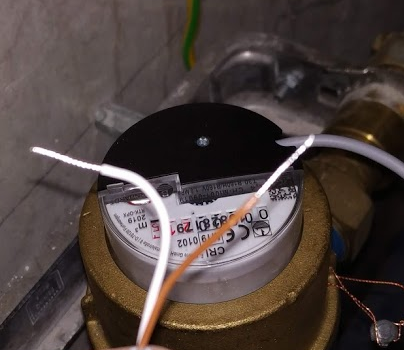
They also left the packaging, so I was able to guess the module. For me it looked like a “Ringkolben-Patronenzähler MODULARISRTK-OPX” from Wehrle as shown in this datasheet. I was not 100% sure if it was the S0 or M-Bus version, but a friend told me it must be the S0 Version as the M-Bus is much more expensive, so I went for it.
Getting the S0 connected
Basically the meter has an optocoupler (optoelectronic coupler) which is powered in my case by an internal battery. At every liter of water that runs through the meter, the two cables shown above get connected for a short period (e.g. 100ms). In the simplest case it would be possible to just use a pull-up resistor to 5V, but this may lead the problems. It is better to use 2 resistors and 2 capacitors stabilize the impulse and guard against unwanted effects such as electromagnetic interference. As my time when I learned that at school is too long ago, I asked a friend who does circuits all the time for help, which let to this drawing:

And he told me to use following resistors and capacitors:
- R1 – 4,7kOhm
- R2 – 470Ohm
- C1 – 100nF
- C2 – 10nF
At home, I build that circuit (no fully done on the picture):
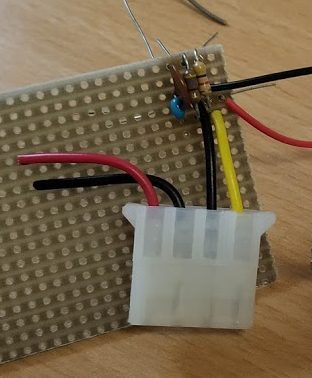
As you can see I used old PC power supply connectors to connect the water meter, so I can disconnect it easily. Hardware costs under 1 Euro so far – OK need some stuff at home already (e.g. soldering iron) 🙂
So, now back to areas I know better ….
Getting the signal onto my network
I’ve several Raspberry PIss at home and at first I thought about using one, but that would be overkill my case as I wanted to do visualization and alerting in a container on my home server anyway. I went with something Arduino like, but cheaper. 🙂
I went for a NodeMCU which has all I needed for that project:
- Digital Input with interrupt triggering –> no polling and missing an impulse
- WiFi support to connect to my IoT network
- Integration with the Arduino IDE
- It costs under 5 Euro

Lets take a look at my code – which you can download from here. In the first part of the code we import the needed libraries and define some variables:
- The WiFi SSID and password
- The host and port we will inform for every liter of water – We’ll use InfluxDB for that and you will see how easy that makes it.
- The PIN we connect the water meter to – make sure it supports interrupts.
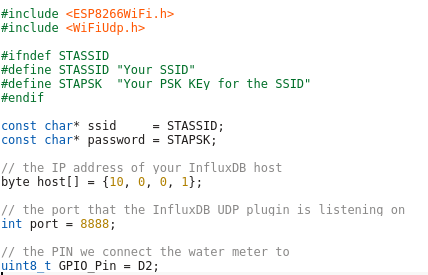
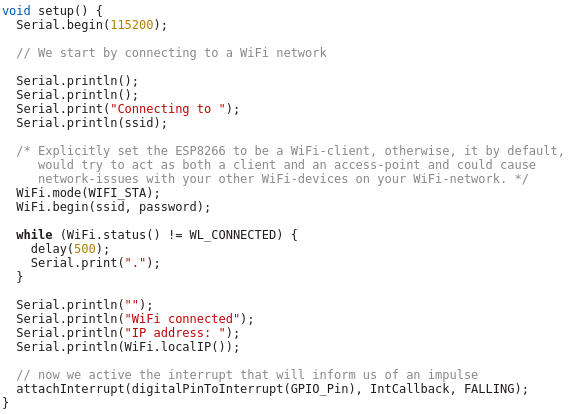
And now the code which is executed once at startup, where we connect to the Wifi and attach the interrupt.
And at last we need the code that gets called by the interrupt – it just sends a UDP Message in the InfluxDB format for each Liter of water, the rest is down by the InfluxDB time series database.
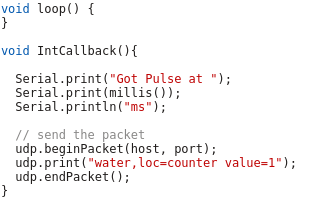
As you see the code is really easy – the complicated stuff is done by the InfluxDB.
Visualization and Alerting
Sure I could write my own visualization and alerting and I have done so in the past but these times are gone. InfluxDB and some additional projects from the same guys do everything and better than I could for such a home project. You will see how easy it really is. I started with an empty LXC container on my Linux home server. I use Debian 9 in the container, but InfluxDB is packaged for all major distributions.
First we need to install curl and https support for apt – my contains are as small as possible.
# apt install curl apt-transport-https
Download the signing key for the InfluxDB repository.
# curl -sL https://repos.influxdata.com/influxdb.key | apt-key add -
This is followed by adding the repository to the list
# cat >> /etc/apt/sources.list

deb https://repos.influxdata.com/debian stretch stable
and installing the software.
# apt update

# apt-get install influxdb chronograf kapacitor
By default, the UDP interface on InfluxDB is disabled. You’ll want to modify the configuration file /etc/influxdb/influxdb.conf to look similar to this:
[[udp]]

enabled = true

bind-address = ":8888"

database = "db_iot"
Now we just need to enable the various services
# systemctl enable influxdb

# systemctl start influxdb

# systemctl enable kapacitor

# systemctl start kapacitor
If everything works you should see something like this
# netstat -lpn | grep 8888

tcp6 0 0 :::8888 :::* LISTEN 1505/chronograf

udp6 0 0 :::8888 :::* 1539/influxd
Now we just need to create the database, we configured to use for UDP:
# influx

Connected to http://localhost:8086 version 1.7.6

InfluxDB shell version: 1.7.6

Enter an InfluxQL query

> CREATE DATABASE db_iot

> exit
After this just open your browser and connect to http://<ipAddressOfServer>:8888 and fill out the form with the following details:
- Connection String: Enter the hostname or IP of the machine that InfluxDB is running on, and be sure to include InfluxDB’s default port 8086. In my/our case it is localhost / 127.0.0.1
- Connection Name: Enter a name for your connection string.
- Username and Password: These fields can remain blank unless you’ve enabled authorization in InfluxDB.
- Telegraf Database Name: Optionally, enter a name for your Telegraf database. The default name is Telegraf.
Everything else can be done via the browser – Just take a look at the configuration of one of my dashboard elements – the SQL code is written by clicking around :-).
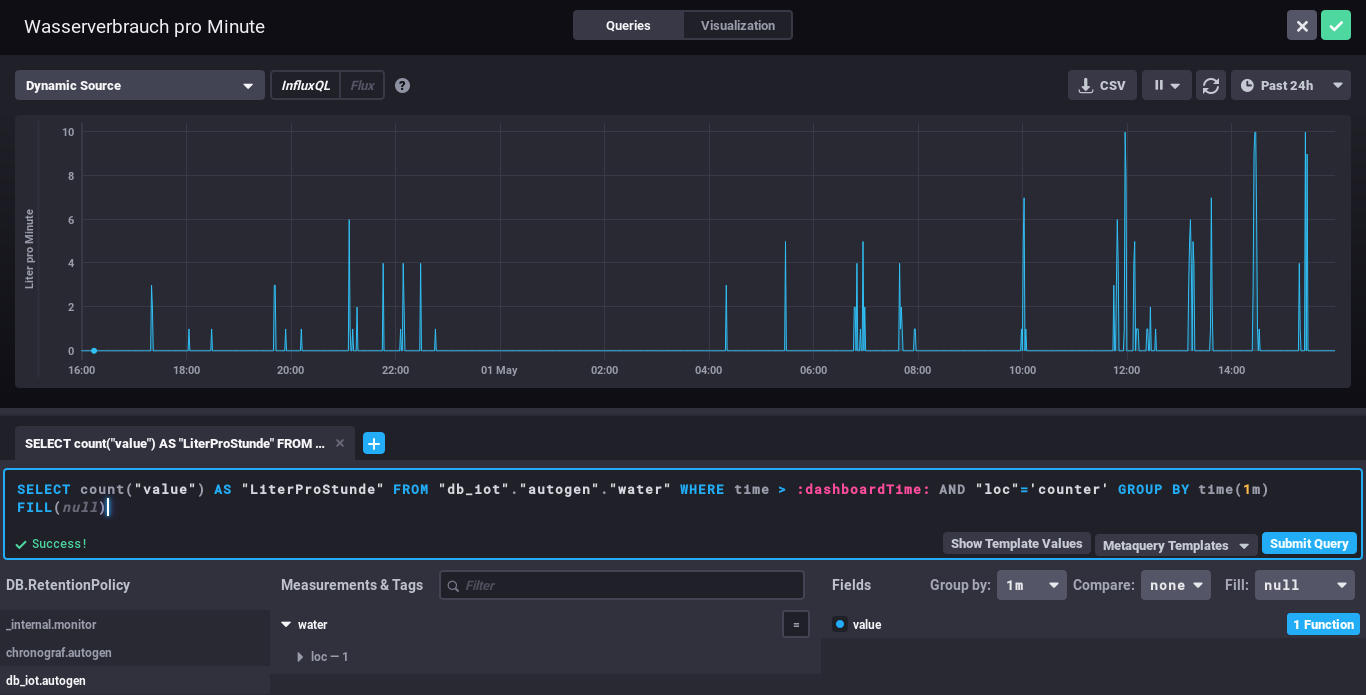
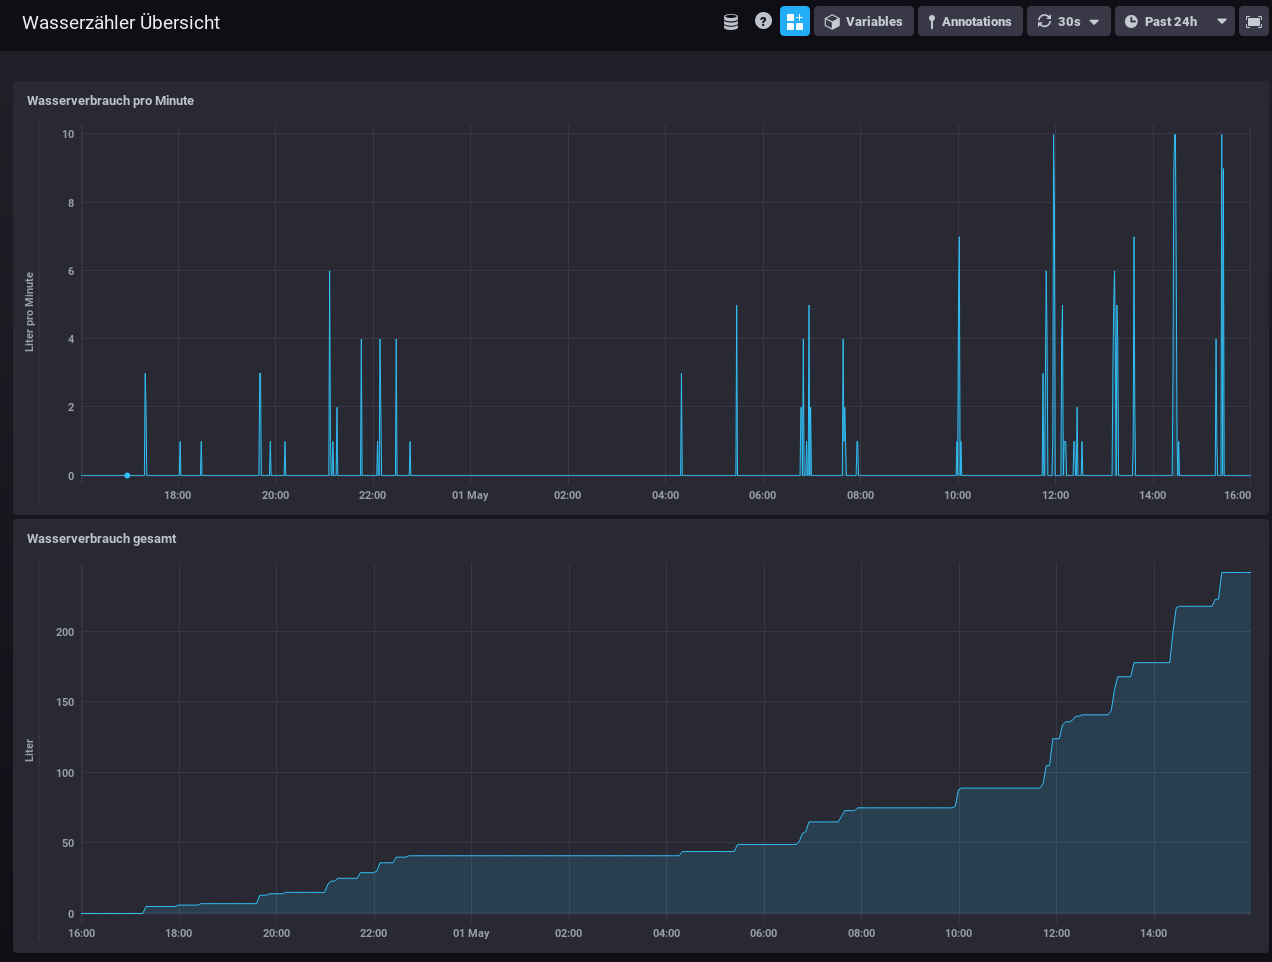
My water meter dashboard looks currently like this:
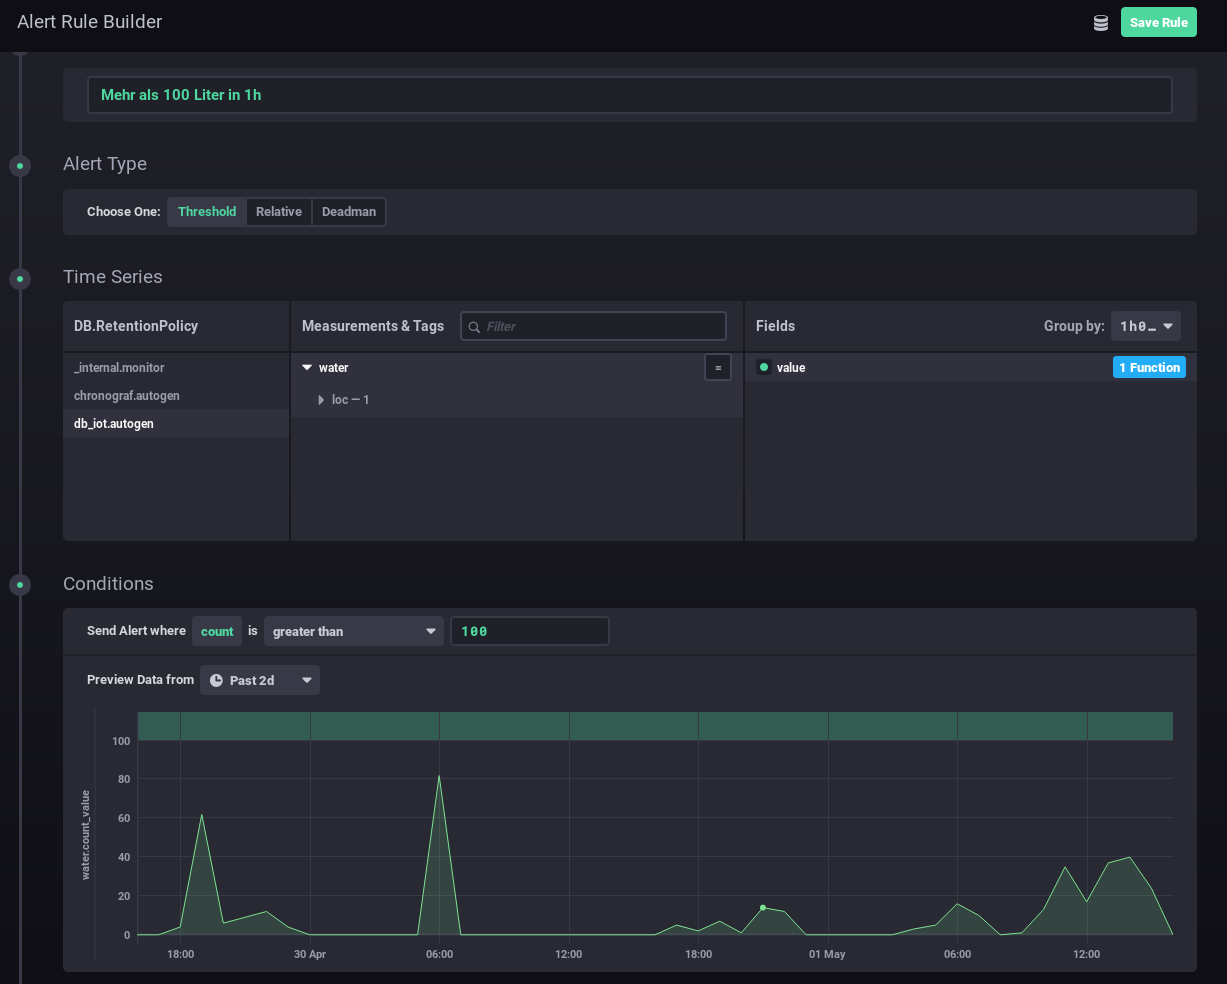
And you can also define alerts. In this case I wanted to get an alert message send, if more than 100 Liter of water is used in one hour – I should know if that happens and if it is OK.
I hope you see how easy visualizing and alerting a water meter can be. It is also really cheap – about 5 Euro for everything, if you’ve already a server otherwise let it run on a Raspberry PI (about 30 Euro), rent a virtual server for 1-2 Euro/month or use the container feature of your NAS.
Powered by WordPress
Entries and comments feeds.
Valid XHTML and CSS.
43 queries. 0.064 seconds.