
-

-

-

- Austria (27)
- General (16)
- HowTo (122)
- IT Security (129)
- Linux (128)
- Networking (65)
- Other (4)
-

- CDemu - a free, gpl cd/dvd-rom device emulator for linux
- heatpumpMonitor - Monitoring a Stiebel Eltron LWZ
- ignis backup tool - the heat-strengthened backup tool
-

- May 2026 (1)
- December 2021 (2)
- September 2019 (1)
- May 2019 (1)
- April 2019 (1)
- January 2019 (1)
- October 2018 (1)
- August 2018 (1)
- February 2018 (1)
- September 2017 (1)
- August 2017 (2)
- May 2017 (1)
- April 2017 (1)
- February 2017 (1)
- January 2017 (2)
- December 2016 (1)
- November 2016 (2)
- October 2016 (1)
- September 2016 (1)
- August 2016 (1)
- July 2016 (2)
- April 2016 (1)
- March 2016 (3)
- February 2016 (4)
- January 2016 (2)
- December 2015 (2)
- November 2015 (2)
- September 2015 (2)
- July 2015 (5)
- June 2015 (4)
- May 2015 (2)
- February 2015 (1)
- January 2015 (4)
- December 2014 (1)
- November 2014 (5)
- October 2014 (4)
- September 2014 (1)
- August 2014 (4)
- July 2014 (3)
- June 2014 (5)
- May 2014 (5)
- April 2014 (1)
- March 2014 (2)
- February 2014 (3)
- January 2014 (5)
- December 2013 (2)
- November 2013 (3)
- September 2013 (3)
- August 2013 (2)
- May 2013 (4)
- April 2013 (1)
- March 2013 (1)
- February 2013 (3)
- December 2012 (3)
- November 2012 (3)
- October 2012 (1)
- September 2012 (2)
- June 2012 (1)
- May 2012 (1)
- April 2012 (1)
- March 2012 (1)
- February 2012 (1)
- January 2012 (1)
- December 2011 (4)
- November 2011 (1)
- August 2011 (1)
- March 2011 (1)
- October 2010 (1)
- May 2010 (3)
- January 2010 (1)
- September 2009 (1)
- August 2009 (5)
- July 2009 (5)
- June 2009 (4)
- May 2009 (1)
- April 2009 (1)
- January 2009 (1)
- December 2008 (6)
- November 2008 (6)
- October 2008 (2)
- September 2008 (11)
- August 2008 (4)
- July 2008 (7)
- June 2008 (2)
- May 2008 (7)
- April 2008 (5)
- March 2008 (9)
- February 2008 (15)
- January 2008 (11)
- December 2007 (3)
Tips / Solutions for settings up OpenVPN on Debian 9 within Proxmox / LCX containers
September 21, 2017
When I tried to migrate my OpenVPN setup to a container on my new Proxmox server I run into multiple problems, where searching through the Internet provided solutions that did not work or were out of date. So I thought I put everything one needs to setup OpenVPN on Debian 9 within a Proxmox / LXC container together in one blog post.
Getting a TUN device into the unprivileged container
As you really should run container in unprivileged mode the typical solutions with adding/allowing
lxc.cgroup.devices.allow: c 10:200 rwm
won’t work. And running a container in privileged mode is a bad bad idea, but gladly there is a native LXC solution.
Stop the container with
pct stop <containerid>
Add following line to /etc/pve/lxc/<containerid>.conf
lxc.mount.entry = /dev/net/tun dev/net/tun none bind,create=file
start the container with
pct start <containerid>
OpenVPN will now be able to create a tun device. Just do a test run with
openvpn --config /etc/openvpn/blabla.conf
Add OpenVPN config files to the “autostart”
You need to put the OpenVPN files into /etc/openvpn/ with the extension .conf. And if you add a new file you need to run
systemctl daemon-reload
before doing a service openvpn restart.
Changes in existing config files don’t need the systemd reload.
Getting systemd to start openvpn within a unprivileged container
So OpenVPN works now manually but not with the “init” script. You see following error message in the log file
daemon() failed or unsupported: Resource temporarily unavailable (errno=11)
To solve this edit
/lib/systemd/system/[email protected]
and but a # in front of
LimitNPROC=10
now reload systemd with
systemctl daemon-reload
and it should work.
Hope that info/tips helped you to solve the problems faster than I did. 🙂 If you know some other tips / solutions for running OpenVPN in a Debian 9 container withing LXC / Proxmox write a comment! Thx!
Howto setup a Debian 9 with Proxmox and containers using as few IPv4 and IPv6 addresses as possible
August 4, 2017
My current Linux Root-Server needs to be replaced with a newer Linux version and should also be much cheaper then the current one. So at first I did look what I don’t like about the current one:
- It is expensive with about 70 Euros / months. Following is responsible for that
- My own HPE hardware with 16GB RAM and a software RAID (hardware raid would be even more expensive) – iLo (or something like it) is a must for me 🙂
- 16 additional IPv4 addresses for the visualized container and servers
- Large enough backup space to get back some days.
- A base OS which makes it hard to run newer Linux versions in the container (sure old ones like CentOS6 still get updates, but that will change)
- Its time to move to newer Linux versions in the containers
- OpenVZ based containers which are not mainstream anymore
Then I looked what surrounding conditions changed since I did setup my current server.
- I’ve IPv6 at home and 70% of my traffic is IPv6 (thx to Google (specially Youtube) and Cloudflare)
- IPv4 addresses got even more expensive for Root-Servers
- I’m now using Cloudflare for most of the websites I host.
- Cloudflare is reachable via IPv4 and IPv6 and can connect back either with IPv4 or IPv6 to my servers
- With unprivileged containers the need to use KVM for security lessens
- Hosting providers offer now KVM servers for really cheap, which have dedicated reserved CPUs.
- KVM servers can host containers without a problem
This lead to the decision to try following setup:
- A KVM based Server for less than 10 Euro / month at Netcup to try the concept
- No additional IPv4 addresses, everything should work with only 1 IPv4 and a /64 IPv6 subnet
- Base OS should be Debian 9 (“Stretch”)
- For ease of configuration of the containers I will use the current Proxmox with LXC
- Don’t use my own HTTP reverse proxy, but use exclusively Cloudflare for all websites to translate from IPv4 to IPv6
![]()
After that decision was reached I search for Howtos which would allow me to just set it up without doing much research. Sadly that didn’t work out. Sure, there are multiple Howtos which explain you how to setup Debian and Proxmox, but if you get into the nifty parts e.g. using only minimal IP addresses, working around MAC address filters at the hosting providers (which is quite a important security function, BTW) and IPv6, they will tell you: You need more IP addresses, get a really complicated setup or just ignore that point at all.
As you can read that blog post you know that I found a way, so expect a complete documentation on how to setup such a server. I’ll concentrate on the relevant parts to allow you to setup a similar server. Of course I did also some security harding like making a secure ssh setup with only public keys, the right ciphers, …. which I won’t cover here.
Setting up the OS
I used the Debian 9 minimal install, which Netcup provides, and did change the password, hostname, changed the language to English (to be more exact to C) and moved the SSH Port a non standard port. The last one I did not so much for security but for the constant scans on port 22, which flood the logs.
passwd

vim /etc/hosts

vim /etc/hostname

dpkg-reconfigure locales

vim /etc/ssh/sshd_config

/etc/init.d/ssh restart
I followed that with making sure no firewall is active and installed the net-tools so I got netstat and ifconfig.
apt install net-tools
At last I did a check if any packages needs an update.
apt update

apt upgrade
Installing Proxmox
First I checked if the IP address returns the correct hostname, as otherwise the install fails and you need to start from scratch.
hostname --ip-address
Adding the Proxmox Repos to the system and installing the software:
echo "deb http://download.proxmox.com/debian/pve stretch pve-no-subscription" > /etc/apt/sources.list.d/pve-install-repo.list

wget http://download.proxmox.com/debian/proxmox-ve-release-5.x.gpg -O /etc/apt/trusted.gpg.d/proxmox-ve-release-5.x.gpg

apt update && apt dist-upgrade

apt install proxmox-ve postfix open-iscsi
After that I did a reboot and booted the Proxmox kernel, I removed some packages I didn’t need anymore
apt remove os-prober linux-image-amd64 linux-image-4.9.0-3-amd64
Now I did my first login to the admin GUI to https://<hostname>:8006/ and enabled the Proxmox firewall
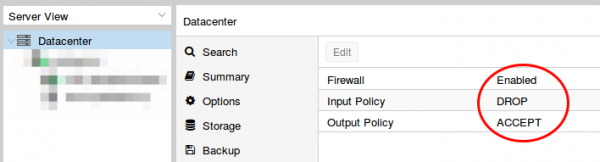
Than set the firewall rules for protecting the host (I did that for the whole datacenter even if I only have one server at this moment). Ping is allowed, the Webgui and ssh.

I mate sure with
iptables -L -xvn
that the firewall was running.
BTW, if you don’t like the nagging windows at every login that you need a license and if this is only a testing machine as mine is currently, type following:
sed -i.bak 's/NotFound/Active/g' /usr/share/perl5/PVE/API2/Subscription.pm && systemctl restart pveproxy.service
Now we need to configure the network (vmbr0) for our virtual systems and this is the point where my Howto will go an other direction. Normally you’re told to configure the vmbr0 and put the physical interface into the bridge. This bridging mode is the easiest normally, but won’t work here.
Routing instead of bridging
Normally you are told that if you use public IPv4 and IPv6 addresses in containers you should bridge it. Yes thats true, but there is one problem. LXC containers have their own MAC addresses. So if they send traffic via the bridge to the datacenter switch, the switch sees the virtual MAC address. In a internal company network on a physical host that is normally not a problem. In a datacenter where different people rent their servers thats not good security practice. Most hosting providers will filter the MAC addresses on the switch (sometimes additional IPv4 addresses come with the right to use additional MAC addresses, but we want to save money here 🙂 ). As this server is a KVM guest OS the filtering is most likely part of the virtual switch (e.g. for VMware ESX this is the default even).
With ebtables it is possible to configure a SNAT for the MAC addresses, but that will get really complicated really fast – trust me with networking stuff – when I say complicated it is really complicated fast. 🙂
So, if we can’t use bridging we need to use routing. Yes the routing setup on the server is not so easy, but it is clean and easy to understand.
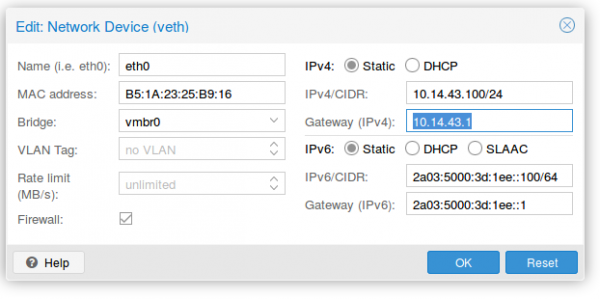
First we configure the physical interface in the admin GUI
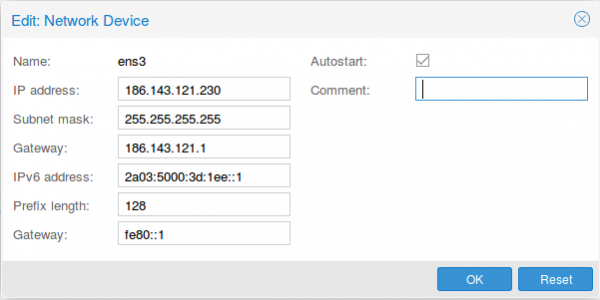
Two configurations are different than at normal setups. The provider gave you most likely a /23 or /24, but I use a subnet mask /32 (255.255.255.255), as I only want to talk to the default gateway and not the other servers from other customers. If the switch thinks traffic is ok, he can reroute it for me. The provider switch will defend its IP address against ARP spoofing, I’m quite sure as otherwise a incorrect configuration of a customer will break the network for all customer – the provider will make that mistake only once. For IPv6 we do basically the same with /128 but in this case we also want to reuse the /64 subnet on our second interface.

As I don’t have additional IPv4 addresses, I’ll use a local subnet to provide access to IPv4 addresses to the containers (via NAT), the IPv6 address gets configured a second time with the /64 subnet mask. This setup allows use to route with only one /64 – we’re cheap … no extra money needed.
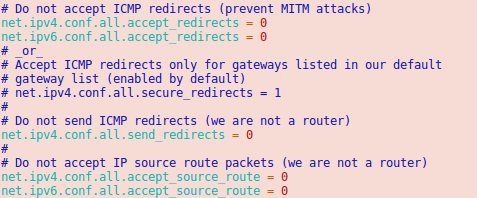
Now we reboot the server so that the /etc/network/interfaces config gets written. We need to add some additional settings there, so it looks like this
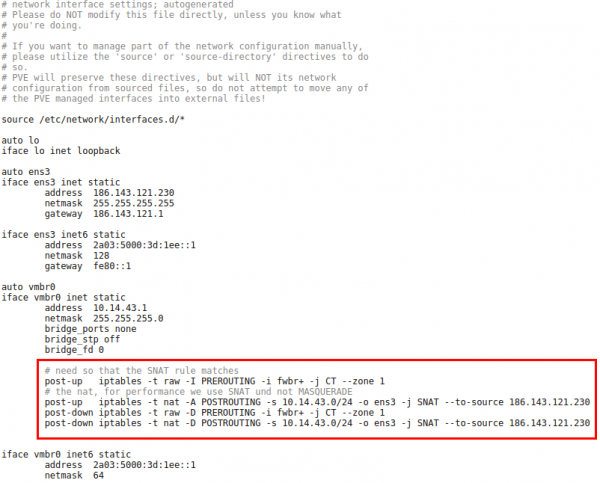
The first command in the red frame is needed to make sure that traffic from the containers pass the second rule. Its some kind lxc specialty. The second command is just a simple SNAT to your public IPv4 address. The last 2 are for making sure that the iptable rules get deleted if you stop the network.
Now we need to make sure that the container traffic gets routed so we put following lines into /etc/sysctl.conf
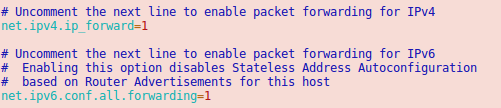
And we should also enable following lines
Now we’re almost done. One point remains. The switch/router which is our default gateway needs to be able to send packets to our containers. For this he does for IPv6 something similar to an ARP request. It is called neighbor discovery and as the network of the container is routed we need to answer the request on the host system.
Neighbor Discovery Protocol (NDP) Proxy
We could now do this by using proxy_ndp, the IPv6 variant of proxy_arp. First enable proxy_ndp by running:
sysctl -w net.ipv6.conf.all.proxy_ndp=1
You can enable this permanently by adding the following line to /etc/sysctl.conf:
net.ipv6.conf.all.proxy_ndp = 1
Then run:
ip -6 neigh add proxy 2a03:5000:3d:1ee::100 dev ens3
This means for the host Linux system to generate Neighbor Advertisement messages in response to Neighbor Solicitation messages for 2a03:5000:3d:1ee::100 (e.g. our container with ID 100) that enters through ens3.
While proxy_arp could be used to proxy a whole subnet, this appears not to be the case with proxy_ndp. To protect the memory of upstream routers, you can only proxy defined addresses. That’s not a simple solution, if we need to add an entry for every container. But we’re saved from that as Debian 9 ships with an daemon that can proxy a whole subnet, ndppd. Let’s install and configure it:
apt install ndppd

cp /usr/share/doc/ndppd/ndppd.conf-dist /etc/ndppd.conf
and write a config like this
route-ttl 30000

proxy ens3 {

router no

timeout 500

ttl 30000

rule 2a03:5000:3d:1ee::/64 {

auto

}

}
now enable it by default and start it
update-rc.d ndppd defaults

/etc/init.d/ndppd start
Now it is time to boot the system and create you first container.
Container setup
The container setup is easy, you just need to use the Proxmox host as default gateway.
As you see the setup is quite cool and it allows you to create containers without thinking about it. A similar setup is also possible with IPv4 addresses. As I don’t need it I’ll just quickly describe it here.
Short info for doing the same for an additional IPv4 subnet
Following needs to be added to the /etc/network/interfaces:
iface ens3 inet static

pointopoint 186.143.121.1
iface vmbr0 inet static

address 186.143.121.230 # Our Host will be the Gateway for all container

netmask 255.255.255.255

# Add all single IP's from your /29 subnet

up route add -host 186.143.34.56 dev br0

up route add -host 186.143.34.57 dev br0

up route add -host 186.143.34.58 dev br0

up route add -host 186.143.34.59 dev br0

up route add -host 186.143.34.60 dev br0

up route add -host 186.143.34.61 dev br0

up route add -host 186.143.34.62 dev br0

up route add -host 186.143.34.63 dev br0

.......
We’re reusing the ens3 IP address. Normally we would add our additional IPv4 network e.g. a /29. The problem with this straight forward setup would be that we would lose 2 IP addresses (netbase and broadcast). Also the pointopoint directive is important and tells our host to send all requests to the datacenter IPv4 gateway – even if we want to talk to our neighbors later.
The for the container setup you just need to replace the IPv4 config with following
auto eth0

iface eth0 inet static

address 186.143.34.56 # Any IP of our /29 subnet

netmask 255.255.255.255

gateway 186.143.121.13 # Our Host machine will do the job!

pointopoint 186.143.121.1
How that saved you some time setting up you own system!
A security minded guy forced to buy a Wifi enabled cleaning robot
August 1, 2017
First I want to tell you all that I wanted a vacuum cleaning robot without Internet connection, but I couldn’t find one which fulfilled the requirements. At first I thought the DEEBOT M81 from ECOVACS would be such a device (vacuum and mop combo and possible to carry between rooms as it works randomly), but don’t buy it if you’ve stairs. On the first day alone at home it went 2 floors down, somehow it did look okay and still worked after the kamikaze. We just needed to search for it through the whole house. After that I did some tests, I found out that it stops 6 times at the stairs and falls down the 7 or 8 time. Searching through the Internet showed me that I’m not the only one. The second problem was that configuring the timer differently for some days (like not cleaning on weekends) was not possible. After loosing my last chance for a non Internet connected device I went for the DEEBOT M81 Pro which needs an Android or IPhone app and WiFi, if you want to configure the timer for not cleaning on weekends. This is my story about that – I guess – a typical IoT device.

The App – ECOVACS
After unpacking and charging of the robot, I went and installed the App on my test mobile. Why not on my real mobile? Take a look at the required permissions:
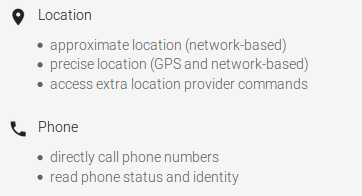
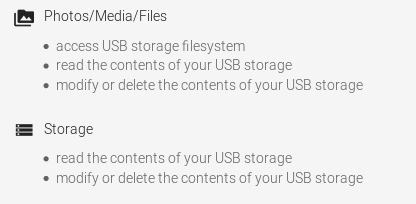
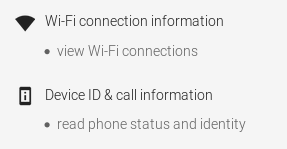
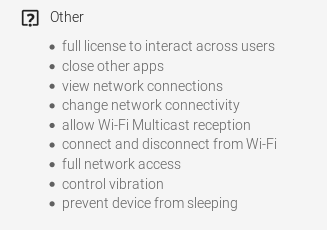
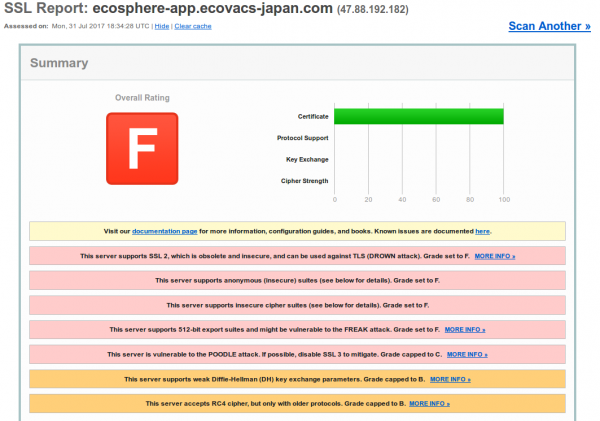
I though that is just an App to control my vacuum robot …. guess not. Anyway I installed it on my test system and created a dummy user. Of course I took a look at the traffic. First it connects to ecosphere-app.ecovacs-japan.com,
![]()
where it does an HTTPS connect. Hm, maybe thats better than I thought, but the TLS config of the server is bad, but at least it encrypted – so there is still hope.
Looking at the other traffic I saw a XMPP / jabber connection (lbat.ecouser.net / 47.91.78.247), which was encrypted, but sadly with a self signed certificate. I’ll thought I’ll take a look at the traffic via MitM later, lets get it to work before.
Getting it to work
It looks like the robot is creating a SSID for the App on the mobile to connect to, after you pressed the WiFi button >3 sec. So the exchange of the WiFi password seems to secure enough. But it took me almost 1h to get the robot to connect to my IoT network and I didn’t find any information or tips online. I changed following on my side to get it to work, maybe that helps somebody else:
- I enabled the location stuff (which I’ve disabled by default) on the mobile as I remembered the WiFi Analyser App always tells me to enabled that to sees WiFi networks.
- I needed to change my IoT network to support legacy WiFi modes. My normal setup is:

I needed to change it to following in order for the robot to be able to connect:
Robot traffic
The first request from the robot after getting an IP address is to request a HTTP connection to lbo.ecouser.net (47.91.78.247) on Port 8007
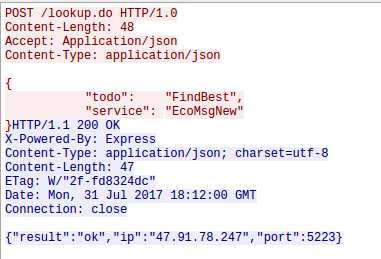
Hey we know the IP address and port – that’s the Jabber server the App also connects to. But before the robot connects to the Jabber server he does a second HTTP request, this time to an IP address (47.88.193.19:8005) and not a DNS name. Thats interesting:
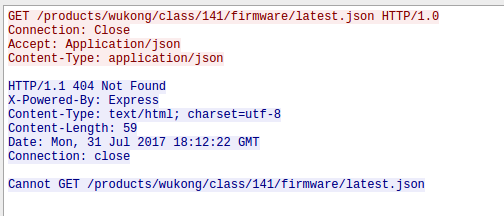
That looks like a check for newer firmware …. firmware updates unencrypted .. what can possible go wrong here. As the request currently returns no new firmware I can’t look at that more closely – something for the future. Checking Shodan Info on that IP address is interesting. It runs a portmapper and ntp server reachable from the internet … someone already using that as DDOS amplifier? I’m not talking about the not configured nginx which also leaks IP addresses in the certificate: IP Address:120.26.244.107, IP Address:121.41.41.198, IP Address:47.88.193.19
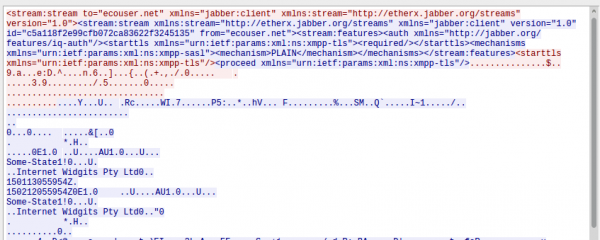
Let’s go back to the Jabber server the robot connect to. The App uses a self signed certificate “protected” channel but the robot does connect completely in the clear – thats nice so I don’t need to do a MitM attack. The wireshark trace is so full on information that I’m really not sure what I can show you without making it too easy for you to control my robot.
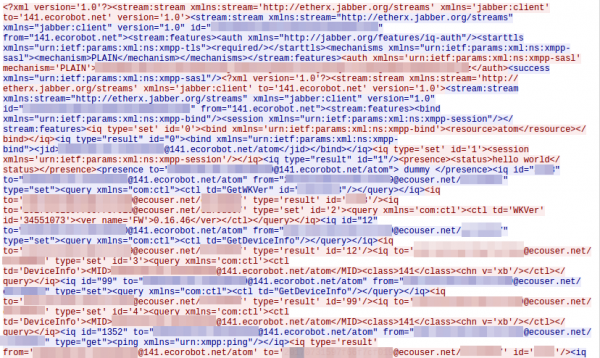
Following is shown in the screenshot (which shows only a a part of the communication):
- The logon to the server via PLAIN authentication, which is comprised of
- username: Is the serial number of the device, which is also printed onto the box the device is sold in.

- password: Looks like a MD5 hash of something, as its 32 hex chars – something to investigate
- username: Is the serial number of the device, which is also printed onto the box the device is sold in.
- It shares its online (presence status in jabber terms) with the app
- It gets asked for a version, I guess the firmware version which it returns as 0.16.46 – hope a thats already stable
Looking at later traffic following requests issued by the app:
- GetDeviceInfo
- SetTime
- GetChargeState
- GetBatteryInfo
- GetWKVer
- GetError
- GetOnOff
- GetSched
- GetLifeSpan
I didn’t control the device via the App otherwise there should be much more commands.
Questions and thoughts
I don’t really see a peering which makes sure that only the right App can control a robot, so it is maybe possible to control other robots. As the user ID used on the Jabber server is just the serial number with @141.ecorobot.net/atom added, it should be ease to guess additional user IDs. There is no need to know the password of the robot. On the other side it should be possible to create your own Jabber server and redirect traffic to it. Also writing a DIY App without all that App permissions should be possible and not to hard. The robot I bought is not so interesting for an attacker as it cannot provide room layouts as the more expensive ones provide. The screenshots of the App show what is possible:
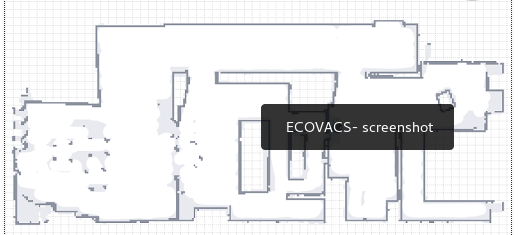
I guess I wait for the next versions of the robots that provide a microphone and/or a camera – than it gets really interesting.
As I was able to configure the schedules via the App and set the time, I’ll try if that still works if the robot is not able to connect to the Internet. If so I’ll got that route and enable the Internet connection only if I need to change the schedules.
Ps: you should really have a separate IoT network.
WannaCry happened and nobody called me during my vacation – I tell you why
May 18, 2017
I was since last Wednesday on a biking trip through Austria and Bavaria, when on Friday reading main stream media the world broke down with WannaCry. Ok, I thought sensationalism by the main media but now as I’m at home, I cannot believe what I read in tech blogs and the IT media. I won’t link all of them here, just the one I plainly can’t understand and to which I disagree in the strongest way possible – telling plainly patching is hard and we can’t do anything.
Lets start with how a WannaCry infection spreads through a company.
- The malware needed to get into the company network – be it via open SMB ports (445 TCP) to the Internet and via Email. As I read through the articles its not 100% clear how the infection – lets assume both methods have been used for this post
- In the second case a user clicks onto the attachment and the malware gets executed
- Than it searches through the company network and tries with a RCE (remote code execution) to infect other PCs
- It encrypted the local hard drive
Now lets talk why this should not have been any problem in your organization
- Port 445 TCP reachable from the Internet? Really? If you’re unsure, quickly go to Shodan and type into the search field
net:"xxx.xxx.xxx.xxx/yy"withxxx.xxx.xxx.xxxyou IP address range followed by theyysubnet mask and take a look if you know about open ports and services. - And now lets take a look at all the stuff I wrote over a year ago, what you should have done before the Locky malware happened (yes this is not the first ransomware making big waves), to be not affected:Stop panicking about the Locky ransomware [Update 2]
- For the Email infection vector:
- Block EXE attachments in emails
- Remove active code from Word, Excel and Powerpoint files by default
- Block EXE downloads on the Proxy
- For both infection vectors:
- Use application white-listing – we moved to whitelisting for firewall rules a long time ago, its past time to do that for applications. Guess why there is not so much iPhone malware – Apple is effectively white-listing software.
- Block client 2 client traffic – Even if that is not possible on a day2day basis, it should be prepared to be enabled in a case of emergency.
With one of the last two alone an widespread infection would not have been possible.
- For the Email infection vector:
- Microsoft provided a patch on March 14 and called the vulnerability critical. Lets take a look when Microsoft calls some vulnerabilities critical and when important. The difference is that with important the user gets asked and than infected, with critical there is nothing, just infection. So important is remote code execute and critical is wormable remote code execution.
And at last take a look at following text from Microsoft: “Mitigating Factors: Microsoft has not identified any mitigating factors for this vulnerability.” To make it short if you read about such a vulnerability in Windows and know that an exploit is in the wild, drop everything and start patching that hole at once.
Looking at the above ways the malware/worm could have easily been blocked. Anyway at last I really want now to take a look at the post linked above from the SMBlog by Steven M. Bellovin.
- Because patching is very hard and very risk, and the more complex your systems are, the harder and riskier it is.
Thats not true in this case.- Port 445 open to the Internet, no real network separation, deactivated local Windows Firewall and still have SMB1 activated on Windows Client Systems (see Microsoft recommendation from 2016) – thats not at patching problem, thats a security policy failure (e.g. base hardening of operating systems)
- standard client PCs (for the normal employee) not patched – not talking about special systems – we patch thousand PCs every month after the Windows patches are released without any problems in years. The special systems needed to get infected after all by something.
- If non company managed client PCs got connected to the network and infected special systems, its a failure in network access control – plane and simple
- no mitigation prepared for a case like a worm breakout – Just to make a point, we prepared a client2client block ACLs for all edge switches, which could be activated within a few minutes, in 2011 – as you newer can know. This is a missing emergency plan like required in ISO 27001.
- 2 month window for patching an remote code execution wormable vulnerability. If it was not possible in 2 month to patch something like that, than the company has a high technical/security debt. This is a management failure.
- still running non supported software – that is a management failure, by not making correct contracts with the vendor or ignoring the problem like a Ostrich.
- So—if you’re the CIO, what do you do? Break the company, or risk an attack? (Again, this is an imaginary conversation.)
Thats the wrong question – if the CIO is at the questing he has done a bad job before:- All your critical software should have a maintenance contract which specially handles security updates (and specially the timeline) of the underlaying operating system and the software itself and there must be contractual penalty in it. Done that for year now with “call for bids” – Big IT companies provide that security handling without you asking for it – so this is mainly for special software.
- If the IT department has not the time to patch everything a Triage needs to be done. The vulnerabilities with the highest probability and potential for damage need to be patched first – this vulnerability must have been on the top of any list.
- The systems are not as in German is called “Stand der Technik” which can be translated as “state of the art” – an Windows XP system is not state of the art, no meaningful network separation is not state of the art, …..
- That patching is so hard is very unfortunate. Solving it is a research question. Vendors are doing what they can to improve the reliability of patches, but it’s a really, really difficult problem.
- Ok patching might be not a easy as it could be but
- A big institution that got caught by this malware did leave the back door open and is now complaining that a herd of wild boars went through the house and did damage.
- the security and IT department just failed at their job – just do a postmortem without finger pointing and fix the problems. I’m quite sure the affected IT departments got caught also by the Locky malware and didn’t learn a thing.
- Vendors doing not enough, sure in this case Microsoft did patch it but specially with IoT devices vendor to nothing.
- Searching through Google for problems after installing MS17-010 reviles only a few post after billions of updated PCs –> there are no problems with this patch –> no reason to not install it
- Ok patching might be not a easy as it could be but
So thats my view onto the WannaCry stuff after being on vacation ….. tell me your views – did I miss something?
Mitigating application layer (HTTP(S)) DDOS attacks
April 23, 2017
DDOS attacks seem to be new norm on the Internet. Years before only big websites and web applications got attacked but nowadays also rather small and medium companies or institutions get attacked. This makes it necessary for administrators of smaller sites to plan for the time they get attacked. This blog post shows you what you can do yourself and for what stuff you need external help. As you’ll see later you most likely can only mitigate DDOS attacks against the application layer by yourself and need help for all other attacks. One important part of a successful defense against a DDOS attack, which I won’t explain here in detail, is a good media strategy. e.g. If you can convince the media that the attack is no big deal, they may not report sensational about it and make the attack appear bigger and more problematic than it was. A classic example is a DDOS against a website that shows only information and has no impact on the day to day operation. But there are better blogs for this non technical topic, so lets get into the technical part.
different DDOS attacks
From the point of an administrator of a small website or web application there are basically 3 types of attacks:
- An Attack that saturates your Internet or your providers Internet connection. (bandwidth and traffic attack)
- Attacks against your website or web application itself. (application attack)
saturation attacks
Lets take a closer look at the first type of attack. There are many different variations of this connection saturation attacks and it does not matter for the SME administrator. You can’t do anything against it by yourself. Why? You can’t do anything on your server as the good traffic can’t reach your server as your Internet connection or a connection/router of your Internet Service Provider (ISP) is already saturated with attack traffic. The mitigation needs to take place on a system which is before the part that is saturated. There are different methods to mitigate such attacks.
Depending on the type of website it is possible to use a Content Delivery Networks (CDN). A CDN basically caches the data of your website in multiple geographical distributed locations. This way each location gets only attacked by a part of the attacking systems. This is a nice way to also guard against many application layer attacks but does not work (or not easily) if the content of your site is not the same for every client / user. e.g. an information website with some downloads and videos is easily changed to use a CDN but a application like a Webmail system or an accounting system will be hard to adapt and will not gain 100% protection even than. An other problem with CDNs is that you must protect each website separately, thats ok if you’ve only one big website that is the core of your business, but will be a problem if attacker can choose from multiple sites/applications. An classic example is that a company does protect its homepage with an CDN but the attacker finds via Google the Webmail of the companies Exchange Server. Instead of attacking the CDN, he attacks the Internet connection in front of the Qebmail. The problem will now most likely be that the VPN site-2-site connections to the remote offices of the company are down and working with the central systems is not possible anymore for the employees in the remote locations.
So let assume for the rest of the document that using a CDN is not possible or not feasible. In that case you need to talk to your ISPs. Following are possible mitigations a provider can deploy for you:
- Using a dedicated DDOS mitigation tool. These tools take all traffic and will filter most of the bad traffic out. For this to work the mitigation tool needs to know your normal traffic patterns and the DDOS needs to be small enough that the Internet connections of the provider are able to handle it. Some companies sell on on-premise mitigation tools, don’t buy it, its wasting money.
- If the DDOS attack is against an IP address, which is not mission critical (e.g. attack is against the website, but the web application is the critical system) let the provider block all traffic to that IP address. If the provider as an agreement with its upstream provider it is even possible to filter that traffic before it reaches the provider and so this works also if the ISPs Internet connection can not handle the attack.
- If you have your own IP space it is possible for your provider(s) to stop announcing your IP addresses/subnet to every router in the world and e.g. only announce it to local providers. This helps to minimize the traffic to an amount which can be handled by a mitigation tool or by your Internet connection. This is specially a good mitigation method, if you’re main audience is local. e.g. 90% of your customers/clients are from the same region or country as you’re – you don’t care during an attack about IP address from x (x= foreign far away country).
- A special technique of the last topic is to connect to a local Internet exchange which maybe also helps to reduce your Internet costs but in any case raises your resilience against DDOS attacks.
This covers the basics which allows you to understand and talk with your providers eye to eye. There is also a subsection of saturation attacks which does not saturate the connection but the server or firewall (e.g. syn floods) but as most small and medium companies will have only up to a one Gbit Internet connection it is unlikely that a descend server (and its operating system) or firewall is the limiting factor, most likely its the application on top of it.
application layer attacks
Which is a perfect transition to this chapter about application layer DDOS. Lets start with an example to describe this kind of attacks. Some years ago a common attack was to use the ping back feature of WordPress installations to flood a given URL with requests. I’ve seen such an attack which requests on a special URL on an target system, which did something CPU and memory intensive, which let to a successful DDOS against the application with less than 10Mbit traffic. All requests were valid requests and as the URL was an HTTPS one (which is more likely than not today) a mitigation in the network was not possible. The solution was quite easy in this case as the HTTP User Agent was WordPress which was easy to filter on the web server and had no side effects.
But this was a specific mitigation which would be easy to bypassed if the attacker sees it and changes his requests on his botnet. Which also leads to the main problem with this kind of attacks. You need to be able to block the bad traffic and let the good traffic through. Persistent attackers commonly change the attack mode – an attack is done in method 1 until you’re able to filter it out, than the attacker changes to the next method. This can go on for days. Do make it harder for an attacker it is a good idea to implement some kind of human vs bot detection method.
I’m human
The “I’m human” button from Google is quite well known and the technique behind it is that it rates the connection (source IP address, cookies (from login sessions to Google, …) and with that information it decides if the request is from a human or not. If the system is sure the request is from a human you won’t see anything. In case its sightly unsure a simple green check-mark will be shown, if its more unsure or thinks the request is by a bot it will show a CAPTCHA. So the question is can we implement something similar by ourself. Sure we can, lets dive into it.
peace time
Set an special DDOS cookie if an user is authenticated correctly, during peace time. I’ll describe the data in the cookie later in detail.
war time
So lets say, we detected an attack manually or automatically by checking the number of requests eg. against the login page. In that case the bot/human detection gets activated. Now the web server checks for each request the presence of the DDOS cookie and if the cookie can be decoded correctly. All requests which don’t contain a valid DDOS cookie get redirected temporary to a separate host e.g. https://iamhuman.example.org. The referrer is the original requested URL. This host runs on a different server (so if it gets overloaded it does not effect the normal users). This host shows a CAPTCHA and if the user solves it correctly the DDOS cookie will be set for example.org and a redirect to the original URL will be send.
Info: If you’ve requests from some trusted IP ranges e.g. internal IP address or IP ranges from partner organizations you can exclude them from the redirect to the CAPTCHA page.
sophistication ideas and cookie
An attacker could obtain a cookie and use it for his bots. To guard against it write the IP address of the client encrypted into the cookie. Also put the timestamp of the creation of the cookie encrypted into it. Also storing the username, if the cookie got created by the login process, is a good idea to check which user got compromised.
Encrypt the cookie with an authenticated encryption algorithm (e.g. AES128 GCM) and put following into it:
- NONCE
- typ
- L for Login cookie
- C for Captcha cookie
- username
- Only if login cookie
- client IP address
- timestamp
The key for the encryption/decryption of the cookie is static and does not leave the servers. The cookie should be set for the whole domain to be able to protected multiple websites/applications. Also make it HttpOnly to make stealing it harder.
implementation
On the normal web server which checks the cookie following implementations are possible:
- The apache web server provides a module called mod_session_* which provides some functionality but not all
- The apache module rewriteMap (https://httpd.apache.org/docs/2.4/rewrite/rewritemap.html) and using „prg: External Rewriting Program“ should allow everything. Performance may be an issue.
- Your own Apache module
If you know about any other method, please write a comment!
The CAPTCHA issuing host is quite simple.
- Use any minimalistic website with PHP/Java/Python to create cookie
- Create your own CAPTCHA or integrate a solution like Recaptcha
pro and cons
- Pro
- Users than accessed authenticated within the last weeks won’t see the DDOS mitigation. Most likely these are your power users / biggest clients.
- Its possible to step up the protection gradually. e.g. the IP address binding is only needed when the attacker is using valid cookies.
- The primary web server does not need any database or external system to check for the cookie.
- The most likely case of an attack is that the cookie is not set at all which does take really few CPU resources to check.
- Sending an 302 to the bot does create only a few bytes of traffic and if the bot requests the redirected URL it on an other server and there no load on the server we want to protect.
- No change to the applications is necessary
- The operations team does not to be experts in mitigating attacks against the application layer. Simple activation is enough.
- Traffic stats local and is not send to external provider (which may be a problem for a bank or with data protections laws in Europe)
- Cons
- How to handle automatic requests (API)? Make exceptions for these or block them in case of an attack?
- Problem with non browser Clients like ActiveSync clients.
- Multiple domains need multiple cookies
All in all I see it as a good mitigation method for application layer attacks and I hope the blog post did help you and your business. Please leave feedback in the comments. Thx!
Implementing IoT securely in your company – Part 3
February 2, 2017
This is Part 3 of the series implementing IoT securely in your company, click here for part 1 and here for part 2. As it is quite common that new IoT devices are ordered and also maintained by the appropriate department and not by the IT department, it is important that there is a policy in place.
This policy is specially important in this case as most non IT departments don’t think about IT security and maintaining the system. They are often used to think about buying a device and it will run for years and often even longer, without doing much. We on the other hand in the IT know that the buying part is the easy part, maintaining it is the hard one.
Extend existing security policies
Most companies won’t need to start from scratch, as they most likely have policies for common stuff like passwords, patching and monitoring. The problem here is the scope of the policies and that you’re current able to technically enforce many of them:
- Most passwords are typically maintained by an identity management system and the password policy is therefore enforced for the whole company. The service/admin passwords are typically configured and used by members of the IT department. For IoT devices that maybe not true as the devices are managed by the using department and technically enforcing it may not be possible.
- Patching of the software is typically centrally done by the IT department, be it the client or server team. But who is responsible for updating the IoT devices? Who monitors that updates are really done? How does he monitor that? What happens if a department does not update their devices? What happens if a vendor stops providing security updates for a given device?
- Centrally by the IT department provided services are generally monitored by the IT department. Is the IT department responsible for monitoring the IoT devices? Who is responsible for looking into the problem?
You should look at this and write it down as a policy which is accepted by the other departments before deploying IoT devices. In the beginning they will say yes sure we’ll update the devices regularly and replace the devices before the vendors stops providing security updates – and often can’t remember it some years later.
Typical IoT device problems
Beside extending the policies to cover IoT devices it’s also important to check the policies if the fit the IoT space and cover typical problems. I’ll list some of them here, which I’ve seen done wrong in the past. Sure some of them also apply for normal IT server/services but are maybe consider so basically that everyone just does it right, that it is maybe not covered by your policy.
- No Update is possible
Yes, there are devices out in the wild that can’t be updated. What does your policy say? - Default Logins
Many IoT devices come with a default login and as the management of the devices is done via a central (cloud) management system, it is often forgotten that the devices may have also a administration interface.What does your policy say? - Recover from IoT device loss
Let’s assume that an attacker is able to get into one IoT device or that the IoT device gets stole. Is the same password used on the server? Do all devices use the same password? Will the IT department get informed at all? What does your policy say? - Naming and organizing things
For IT devices it’s clear that we use the DNS structure – works for servers, switches, pc’s. Make sure that the same gets used for IoT device. What does your policy say? - Replacing IoT devices
Think about > 100 IoT devices running for 4 years and now some break down, and the the devices are end of sales. Can you connect new models to the old ones? does someone keep spare parts? What does your policy say? - Self signed certificates
If the system/devices uses TLS (e.g. HTTPS) it needs to be able to use your internal PKI certificates. Self signed certificates are basically the same as unencrypted traffic. What does your policy say? - Disable unused services
IoT enable often all services by default, like I had a device providing a FTP and telnet server – but for administration only HTTP was ever used. What does your policy say?
I hope that article series helps you to implement IoT devices somewhat securely.
Implementing IoT securely in your company – Part 2
January 12, 2017
After Part 1 which focused on setting up your network for IoT this post focus on making sure that the devices are the right ones and that they work in your network. The first can be accomplished by asking basic security questions and talking only with the more secure vendors further. In my experience that also leads to the better vendors which know IT and whom will make your life easier in the long run. There are plenty of vendors out there for whom the whole IT part is new as they are an old vendor in a given field which now needs to do the “network thing” and don’t have the employees for it. Johannes B. Ullrich at SANS ISC InfoSec came up with the idea to preselect IoT vendors with 5 questions. (You can read more on his reasoning behind each question in his post):
5 preselect questions
- For how long, after I purchase a device, should I expect security updates?
This time frame will show us how long we can plan to use the device in our network, as using devices which get no security updates will be a compliance violation in most companies. - How will I learn about security updates?
Responsible vendors will add you to a security mailing list where you will get informed on all security related stuff via email. - Can you share a pentest report for your device?
If the vendor cares at all at security he let an external expert make a pentest, which will at least find the worst and stupid security holes. If the vendor is able to show you such an report, you should really take that vendor in consideration. - How can I report vulnerabilities?
We often found security holes in programs or devices and sometimes it is really hard to report that to the vendor in a way he accepts it and fixes the hole in a reasonable time frame. Sometimes we needed to go via our local Austrian CERT and sometimes that even was not enough as the vendor was in the US and only did something after their CERT asked them pointed questions. So a direct connection the guy(s) responsible for the security of device is important. - If you use encryption, then disclose what algorithms you use and how it is implemented
If the vendor tells you something about “Proprietary” run away from the product! If you read that they use MD5 or RC4, the software on the device seems a little bit dated.
After selecting the best vendors ranked by the preselect questions you should make sure that the devices will run in your network. If you’re new to this kind of work you will not believe what garbage some vendors deliver. Some points are connected to your network and how it will look in the future.
- The device needs to support DHCP!
- Use DHCP reservations to provide fixed IP addresses
- Special case in a secure network is to disable ARP learning on the Layer 3 switches (makes MitM attack a lot harder). In this case DHCP is used for filling the ARP table.
- Check if the device will work with MAC oder 802.1x authentication flawlessly
- Some devices only send a packet if queried, which won’t work if the device got de-authenticated e.g. idle timeout or network problem. The device needs to send a packet ever so often so the switch sees the MAC address and can make a RADIUS request.
- The devices needs to support routing
- We had devices that where only able to talk within the subnet. In some cases we were not sure if the product really didn’t support it or just the technician was unable to configure it.
- As the PCs and servers need to be separated via a Firewall (see Part 1), this feature is a deal breaker
- It should be possible to configure a local NTP Server
- If not, the device time runs off or you need to allow the device to connect to the Internet, which can get complicated or insecure if you’ve different devices each using an other NTP server
- The devices needs to support automatic restart of services after power or network outage
- We had some devices which needed manual interventions to reconnect to the servers again after a network problem
- Embedding of external resources should be looked at. e.g. If a device needs jquery for its web GUI and lets the browser load that via jquery.org it will not work it your Internet is down. In some cases that does not matter, in some thats a deal breaker.
- support of 1Gbit Ethernet connection
- Sure I know that IoT devices do not need 1Gibt, but the devices will maybe run 10 years and you’ll have 10Gbit switches by than. It is not sure that 100Mbit will be supported or work flawlessly. e.g. Some current Broadcom 10Gbit chipsets don’t support 100Mbit half duplex anymore. You need an other chipset which is a little bit more expensive .. and you know what switch vendors will pick? 😉
So so far for part 2 of this series … the next part will be on some policy stuff you need to agree with department wanting that devices.
Implementing IoT securely in your company – Part 1
January 6, 2017
The last articles in this blog about IoT (often called Internet of Targets 😉 ) where about a specific cam or about IoT at home. This article series will be different, it will focus on the IoT in companies. Part one will talk about what you need to in order to prepare your network for IoT.
Prepare your network for IoT
There are 2 kinds of IoT devices/setups:
- ones that are directly connected to your network (e.g. house automation, access systems, …)
- ones that are connected via a mobile operator via GPRS, LTE, …. (e.g. car traffic counter, weather stations, webcam at remote places, …)
For the first ones it is a good idea to implement a separate virtual network, which means the traffic from and to the IoT devices always goes over a firewall before going to your servers or PCs. A normal company network should have following separate virtual networks outside the data centers.
- PC
- VoIP
- printer/scanner/MFD
- external Clients / visitors
- services = IoT
All those networks are connected to each other via a firewall and only required ports are opened. This separation is not arbitrary as it runs along some important differentiating factors:
- You’re PCs are normally centrally managed (monthly software updates, no administrator privileges for the users, …) and are allowed to access many and critical servers and services. Also there is normally no communication needed between 2 PCs, so you can block that to make an attacker the lateral movement harder/impossible.
- The VoIP phones need QoS and talk directly which each other, as only SIP runs to the server, the (S)RTP media streams run between the phones – peer to peer.
- Let’s face it, nobody installs software updates on their printers, but they are full computers often with Windows CE or Linux. So like IoT devices we need to contain them. Also one printer does not need to talk to an other printer – block printer to printer traffic.
So lets talk about the IoT network:
- Put the servers of IoT devices (if they are not fully cloud based) into you’re data centers in the proper DMZ.
- IoT normally don’t talk directly which each other as the don’t require that the different devices are in the same network at all. So I highly recommend to block client 2 client traffic also in the IoT network. This blocking is important as if an attacker got his hand on one device, he cannot exploit wholes in other IoT devices by simply leap frogging from the first.
After you got your internal IoT network set up we take a look at the devices you need to connect via a mobile operator. First it is never a good idea to put IoT devices directly onto the Internet. Sure you can can use a VPN router for each IoT device to connect back to your data centers, but there is an easier way if you’ve more than a few devices. Most mobile operators provide a service that contains following:
- separate APN (access point name in GSM/UMTS/LTE speech) which allows authorized SIM cards to connect to a private non Internet network
- you can choose the IP range of this special mad-for-you network
- Each SIM card gets assigned a fixed IP address in this network
- IPsec tunnel which connects the private network to you data center(s)
Here in Austria you pay a setup fee and monthly for the private network but the SIM cards and the cost for bandwidth are basically the same as for normal SIM cards which connect to the Internet. I recommend to choose 2 providers for this kind of setup as it will happen that one as a bad coverage at a given spot. With this network and the fixed IP addresses it is quite easy to configure the firewall securely.
The next part will take a look at the policy for implementing new IoT devices, on making sure that the devices are the right ones and that they work in your network.
How to brute force a MySQL DB
December 29, 2016
There are many articles on how to use Metasploit or some other mighty stuff that is fine if you work with it all day. But if you just found a MySQL server on an appliance listening in your network and need to do a fast small security check there is something easier. First find the MySQL server and check the version – maybe there is a exploit available and you don’t need to try passwords. The first choice for this is nmap, just install it with sudo apt-get install nmap and call it like this:
# nmap -sV -O <IP>
Starting Nmap 7.01 ( https://nmap.org ) at 2016-xx-xx xx:xx CET

Nmap scan report for hostname (<IP>)

Host is up (0.020s latency).

Not shown: 986 closed ports

PORT STATE SERVICE VERSION

....

3306/tcp open mysql MySQL 5.6.33-79.0-log

....

Device type: general purpose

Running: Linux 3.X|4.X

OS CPE: cpe:/o:linux:linux_kernel:3 cpe:/o:linux:linux_kernel:4

OS details: Linux 3.2 - 4.0

Network Distance: x hops
You need to call it as root with these options. The -sV shows the versions of the listening services and -O guesses the operating system. For brute forcing we need 3 things
- a list of usernames to try
- a list of passwords to try
- a software that does the trying
The first is for one thing quite easy as the default users are known and you maybe know something about the system .. like software name or vendor name or the online download-able manual shows the username. So lets write the file:
$ cat > usernames.txt

admin

root

mysql

db

test

user
Now we need a list of likely passwords .. sure we could think about some by our own, but it is easier to download them. A good source is Skull Security. Choose your list and download it and extract it with bunzip2 xxxxx.txt.bz2. Now we only need the software … we’ll use THC Hydra, but you don’t need to download it there and compile it, as Ubuntu ships with it. Just type sudo apt-get install hydra. Now we just need to call it.
$ hydra -L usernames.txt -P xxxxx.txt <ip> mysql

Hydra v8.1 (c) 2014 by van Hauser/THC - Please do not use in military or secret service organizations, or for illegal purposes.

Hydra (http://www.thc.org/thc-hydra) starting at 2016-12-29 14:19:38

[INFO] Reduced number of tasks to 4 (mysql does not like many parallel connections)

[DATA] max 4 tasks per 1 server, overall 64 tasks, 86066388 login tries (l:6/p:14344398), ~336196 tries per task

[DATA] attacking service mysql on port 3306

[STATUS] 833.00 tries/min, 833 tries in 00:01h, 86065555 todo in 1721:60h, 4 active

.....
I think this password list is too long 😉 Choose a shorter one 😉
Accessing Mikrotik RouterOS via MAC Telnet from a Linux box
November 18, 2016
If you know Mikrotik Routers you know that you’re able to access them via MAC Telnet (see here for more details) via Layer2 with Winbox. But running Winbox via Wine on a Linux is not that great for using MAC Telnet, and there is a better way .. just use MAC-Telnet from Håkon Nessjøen. On Ubuntu/Debian you can just install the package with
sudo apt-get install mactelnet-client
and you see its feature like this:
$ mactelnet -h

MAC-Telnet 0.4.2

Usage: mactelnet <MAC|identity> [-h] [-n] [-a <path>] [-A] [-t <timeout>] [-u <user>] [-p <password>] [-U <user>] | -l [-B] [-t <timeout>]
Parameters:

MAC MAC-Address of the RouterOS/mactelnetd device. Use mndp to

discover it.

identity The identity/name of your destination device. Uses

MNDP protocol to find it.

-l List/Search for routers nearby (MNDP). You may use -t to set timeout.

-B Batch mode. Use computer readable output (CSV), for use with -l.

-n Do not use broadcast packets. Less insecure but requires

root privileges.

-a <path> Use specified path instead of the default: ~/.mactelnet for autologin config file.

-A Disable autologin feature.

-t <timeout> Amount of seconds to wait for a response on each interface.

-u <user> Specify username on command line.

-p <password> Specify password on command line.

-U <user> Drop privileges to this user. Used in conjunction with -n

for security.

-q Quiet mode.

-h This help.
So lets give it a try, first with searching for my home router
$ mactelnet -l

Searching for MikroTik routers... Abort with CTRL+C.

IP MAC-Address Identity (platform version hardware) uptime

10.x.x.x 0:xx:xx:xx:xx:xx jumpgate (MikroTik x.x.x. xxxx) up 139 days 5 hours XXXXX-XXXX vlanInternal
and then we’ll connect
$ mactelnet 0:xx:xx:xx:xx:xx
and we’re connected.
Powered by WordPress
Entries and comments feeds.
Valid XHTML and CSS.
43 queries. 0.070 seconds.