
-

-

-

- Austria (27)
- General (16)
- HowTo (122)
- IT Security (129)
- Linux (128)
- Networking (65)
- Other (4)
-

- CDemu - a free, gpl cd/dvd-rom device emulator for linux
- heatpumpMonitor - Monitoring a Stiebel Eltron LWZ
- ignis backup tool - the heat-strengthened backup tool
-

- May 2026 (1)
- December 2021 (2)
- September 2019 (1)
- May 2019 (1)
- April 2019 (1)
- January 2019 (1)
- October 2018 (1)
- August 2018 (1)
- February 2018 (1)
- September 2017 (1)
- August 2017 (2)
- May 2017 (1)
- April 2017 (1)
- February 2017 (1)
- January 2017 (2)
- December 2016 (1)
- November 2016 (2)
- October 2016 (1)
- September 2016 (1)
- August 2016 (1)
- July 2016 (2)
- April 2016 (1)
- March 2016 (3)
- February 2016 (4)
- January 2016 (2)
- December 2015 (2)
- November 2015 (2)
- September 2015 (2)
- July 2015 (5)
- June 2015 (4)
- May 2015 (2)
- February 2015 (1)
- January 2015 (4)
- December 2014 (1)
- November 2014 (5)
- October 2014 (4)
- September 2014 (1)
- August 2014 (4)
- July 2014 (3)
- June 2014 (5)
- May 2014 (5)
- April 2014 (1)
- March 2014 (2)
- February 2014 (3)
- January 2014 (5)
- December 2013 (2)
- November 2013 (3)
- September 2013 (3)
- August 2013 (2)
- May 2013 (4)
- April 2013 (1)
- March 2013 (1)
- February 2013 (3)
- December 2012 (3)
- November 2012 (3)
- October 2012 (1)
- September 2012 (2)
- June 2012 (1)
- May 2012 (1)
- April 2012 (1)
- March 2012 (1)
- February 2012 (1)
- January 2012 (1)
- December 2011 (4)
- November 2011 (1)
- August 2011 (1)
- March 2011 (1)
- October 2010 (1)
- May 2010 (3)
- January 2010 (1)
- September 2009 (1)
- August 2009 (5)
- July 2009 (5)
- June 2009 (4)
- May 2009 (1)
- April 2009 (1)
- January 2009 (1)
- December 2008 (6)
- November 2008 (6)
- October 2008 (2)
- September 2008 (11)
- August 2008 (4)
- July 2008 (7)
- June 2008 (2)
- May 2008 (7)
- April 2008 (5)
- March 2008 (9)
- February 2008 (15)
- January 2008 (11)
- December 2007 (3)
How to get Tiny Tiny RSS running on a half-way secure PHP setup
May 20, 2013
As Google is discontinuing their Google Reader I needed to look for alternatives and after some looking I went for Tiny Tiny RSS, which I can run on one of my web servers. At least this was the theory :-). The problems I faced were that Tiny Tiny RSS seems to have problems with a half-way secure PHP setup, and I needed therefore to make some changes to get it working. As I didn’t find that much documentation on this topic and it seams the Tiny Tiny RSS developers are not really security affine.
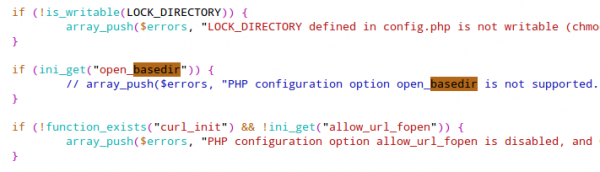
1. open_basedir is not supported
I did as described in the Install Notes and went to the http://your.site.com/tt-rss/install/ URL to use the installer to configure my Tiny Tiny RSS, but I was prompted with this error message:
PHP configuration option open_basedir is not supported. Please disable this in PHP settings file (php.ini).
I searched through the Internet and it seams that some obscure errors can occur if you use open_basedir. But to me it seem more like: I (=developer) don’t have the problem and the user has it and he has open_basedir activated so this must be the problem. Anyway, open_basedir is an imported security measure for PHP hosting, do not ever disabled it, specially if you have more than one vhost. I running with enabled open_basedir for 2 weeks now without getting any obscure errors (or any errors at all). At the time of writing this blog post I was running PHP 5.3.23 and 5.3.25 on this server.
After these preliminary words – how did I get rid of this error messages? Simple I just commented raising of the exceptions out. For this open the install/index.php in a text editor and search for the line containing “option open_basedir is not supported“, comment it out like this:
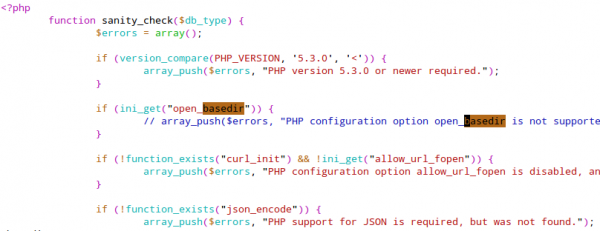
And you need to do the same in the include/sanity_check.php file:
2. passthru disabled
I wanted to call the ./update.php --daemon command from the command line but I got following error message:
PHP Warning: passthru() has been disabled for security reasons in /var/www/xxxx/html/update.php on line 150
This is because a secure configured default php.ini has following set:
disable_functions = exec, passthru, shell_exec, system, proc_open, popen, curl_exec, curl_multi_exec, parse_ini_file, show_source
I remove disabled functions per vhost so I don’t have the least common denominator for security. In this case needed to make sure that the update.php called via the command line uses a custom made php.ini. I therefore created this bash script.
#!/bin/bash

export PHPRC="/var/www/php/xxxx/"

./update.php --daemon
In this directory a special php.ini is located which has passthru enabled.
3. undefined function posix_getpid
I wanted to use the update_daemon2.php script as it is recommended but I got following error message:
[09:48:30] [MASTER] installing shutdown handlers

PHP Fatal error:  Call to undefined function posix_getpid() in /var/www/xxxx/html/update_daemon2.php on line 223

PHP Fatal error:  Call to undefined function posix_getpid() in /var/www/xxxx/html/update_daemon2.php on line 236

PHP Fatal error:  Call to undefined function posix_getpid() in /var/www/xxxx/html/update_daemon2.php on line 99
The solution on Centos/RHEL/SL is easy, just install the posix package for php:
yum install php-posix
I hope this post helps others which move to Tiny Tiny RSS and still want a reasonably secure PHP setup.
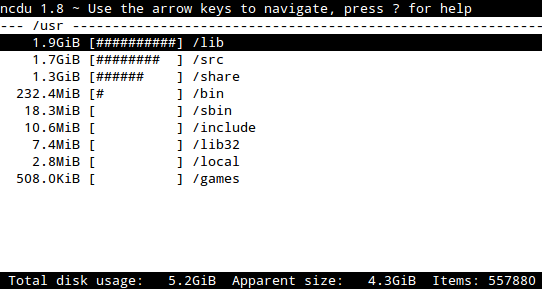
ncdu is better than calling “du -hs *” multiple times :-)
May 12, 2013
I was searching again for some directories or files on one of my servers, which were filling the hard disk. Normally I used du -hs * starting via / and going downwards in the directory structure …. but not this time … I went on the search for a command line program which makes that easier … and I found it: Welcome NCurses Disk Usage.
On CentOS/RHEL/SL you need the EPEL repository and than just type yum install ncdu. On Ubuntu just type sudo apt-get install ncdu.
If you use it via SSH it is recommended to use the option -q which does according to the manual:
-q Quiet mode. While calculating disk space, ncdu will update the screen .10 times a second by default, this will be decreased to once every 2 seconds in quiet mode. Use this feature to save bandwidth over remote connections.
And as I normally know on which partition I want to look (df -h tells me which hard disk is getting full 🙂 ), I use following option too:
-x Only count files and directories on the same filesystem as the specified dir.
which leads to this output after starting it:
Retrieve remote FTP or SMTP TLS server certificate
February 26, 2013
With SSL protected resources it is easy to find a command line to retrieve the certificate. Following is documented at many places:
openssl s_client -connect www.google.com:443
But if you use use this with a TLS server, be it SMTP or FTP you’ll get
CONNECTED(00000003)

527654:error:140770FC:SSL routines:SSL23_GET_SERVER_HELLO:unknown protocol:s23_clnt.c:607:
The solution ins quite easy (if you know it) .. use following command line:
openssl s_client -connect ftp.xxxx.at:21 -starttls ftp
or
openssl s_client -connect smtp.xxxx.at:25 -starttls smtp
IPv6 OpenVZ VEs and Debian/Proxmox as host system
February 24, 2013
A friend of mine got a new root server and asked me to help him set it up. And of course I helped and as he got a free IPv6 subnet I thought lets configure it. He is running Proxmox as his host system, which is based on Debian.So this guide is also true for Debian systems which have OpenVZ installed.
- You want to use IPv6 for the host system, you need to add at least following to
/etc/network/interfaces

iface vmbr0 inet6 static

address 2001:xxxx:xxxx:xxx::1

netmask 64

  up ip -6 route add default via 2001:xxxxx:beef::1 dev vmbr0

  down ip -6 route del default via 2001:xxxxx:beef::1 dev vmbr0
Replace
vmbr0witheth0if you’re not using Proxmox and only OpenVZ on Debian. - The ISP my friend has the server located at uses a default gateway, which is not in his IPv6 subnet, you need therefore add a host route. Which is done be following 2 lines
  up ip -6 route add 2001:4ba0:fff7:1:beef::1 dev vmbr0

down ip -6 route del 2001:4ba0:fff7:1:beef::1 dev vmbr0 - Restart the networking with:
/etc/init.d/networking restart - Test it with following:
ping6 yourOwnIPping6 defaultGWping6 2001:4860:4860::8888(Google IPv6 DNS Server)
- Add following to
/etc/sysctl.confand make sure it is not defined two times
# IPv6 Packet Forwarding and Proxy NDP

net.ipv6.conf.default.forwarding = 1

net.ipv6.conf.all.forwarding = 1

net.ipv6.conf.default.proxy_ndp = 1

net.ipv6.conf.all.proxy_ndp = 1 - Call
sysctl -pto activate it at once (so no reboot is required) - Go to
/etc/vz/vz.confand make sure following is in there
IPV6="yes" - You currently can’t add an IPv6 address through the web GUI of Proxmox – so you need to use the CLI (replace with a IP adresse from your IPv6 range
vzctl set <VEID> --ipadd 2001:xxx:xxx::xxx --save - restart the VE, and try the ping stuff from step 4 in the VE. (ps: It can take up to 5 pings before you get a response the first time.)
More is not needed … its quite easy!
ps: don’t forget to add an IPv6 DNS server, if it is a IPv6 only VE. This can currently not be done via Proxmox web GUI.
pps: iptables does not filter IPv6 .. you need ip6tables for this. don’t think that you’re secure, if you didn’t open anything with iptables.
Mapping a serial device to a KVM guest may lead to communication problems
December 16, 2012
I’m monitoring my heat pump from my server at home. Last week I moved the monitoring part into a KVM VM and mapped the serial interface (serial to USB adapter) to the virtual machine. Basically it worked, but some queries never worked, but they did before the move and nothing else has been changed. After hours of searching rewriting parts of my software and searching for an error in the heap pump controller, I got the idea to map the serial to USB adapter into the VM and not only the ttyUSB0 device …. and at once it worked again. So this post is basically a hint for others who run into the same problem. I’m talking with following settings to my heatpump 57600, 8, N, 1, and I’m running up to date Centos/SL 6 as host and guest.
ps: Before moving the software into a KVM VM, I had it running withing a openvz container without problems for years, but I needed a custom kernel for it and that doesn’t play that well with a cutting edge BTRFS kernel. 😉
A howto for using a Canon PIXMA MG4250 under Ubuntu
December 7, 2012
We’ve bought a new multi functions printer at home, a Canon PIXMA MG4250 and as we’re a Linux shop (PCs and notebooks under Linux, mobiles and tablets under Android) I needed to make the printer work under Ubuntu, in our case Ubuntu 12.04, but the solution should work also under newer versions. We’ve connected the printer via WiFi and therefore need both printing and scanning to work via WiFi.
At least at the time of writing this blog post, searching for a driver or howto was not that easy, specially if you search on the US or European Canon Site …. you need to got the Asian site. You wont find the MG4250 listed there but the MG4270. Take it. I should lead you to a driver site where you can choose “Linux” and than 2 links are interesting for you
- MG4200 series ScanGear MP Ver. 2.00 for Linux (debian …
- MG4200 series IJ Printer Driver Ver. 3.80 for Linux (debian …
I provided direct links to the drivers above but the version may change or the URLs themselves – so maybe the links are broken at the time you’re reading it – in this case you need to click through the site to the new pages.
As you see the drivers are generic for the whole MG4200 series so we’re good. Download the tar.gz files and open a console (e.g. CTRL-ALT-T) and change to that directory.
Printing Part
Lets start with the printing part by extracting the tar.gz and changing into the newly created directory.
$ tar xzf cnijfilter-mg4200series-3.80-1-deb.tar.gz

$ cd cnijfilter-mg4200series-3.80-1-deb/
And let the installation process begin with (if prompted for a password use your user password )
$ ./install.sh
After installing the packages you will be asked some questions. The first one is to connect your printer and switch it on. This is followed by the connection method you’re using (USB vs network). In the case of network it will broadcast within the same subnet, so it only works if the PC and the printer are on the same subnet. After it detected the printer you need knowledge that and choose if it should be the default printer.
After all this just go to the most top right icon and click onto it to the following menu, choose printers …

…. and it should show you following with your printer:

Ok, printing is working … lets go to scanning
Scanning Part
As with the printing part extract the tar.gz and change into the newly created directory.
$ tar xzf scangearmp-mg4200series-2.00-1-deb.tar.gz

$ cd scangearmp-mg4200series-2.00-1-deb/
And again we’re using the install script (if prompted for a password use your user password ).
$ ./install.sh
You’ll be asked no questions and after the installation just start the scanning program with following command
$ scangearmp
It will show you an error message that no configured scanner has been detected, click Ok. Now following window is shown:

In the case of the first start the list is empty, you need to click onto “Update Scanner List”, after this you should see the same window with your printer. Click onto Ok and you get following:

And we’re done.
Update for Ubuntu 13.10 (and possible other versions) users:
If you get following error message:
Unpacking cnijfilter-mg4200series (from .../cnijfilter-mg4200series_3.80-1_amd64.deb) ...

dpkg: dependency problems prevent configuration of cnijfilter-mg4200series:

cnijfilter-mg4200series depends on libtiff4; however:

Package libtiff4 is not installed.
dpkg: error processing cnijfilter-mg4200series (--install):

dependency problems - leaving unconfigured

Errors were encountered while processing:

cnijfilter-mg4200series
Just install the library with
$ sudo apt-get install libtiff4
and the call the install.sh again and it will work.
Howto flush the DNS cache in Ubuntu 12.04?
November 18, 2012
I guess most of you know how to flush the DNS cache on Windows
ipconfig /flushdns
but how to you do it with Ubuntu? Just open with CTR-ALT-T the terminal and type following
sudo /etc/init.d/dns-clean
Solution for “perl: warning: Setting locale failed”
September 6, 2012
Sometimes I come across Debian or Ubuntu Systems which report following error e.g. during installing new packages:
perl: warning: Setting locale failed.

perl: warning: Please check that your locale settings:

        LANGUAGE = (unset),

        LC_ALL = (unset),

        LC_PAPER = "de_AT.UTF-8",

        LC_ADDRESS = "de_AT.UTF-8",

        LC_MONETARY = "de_AT.UTF-8",

        LC_NUMERIC = "de_AT.UTF-8",

        LC_TELEPHONE = "de_AT.UTF-8",

        LC_MEASUREMENT = "de_AT.UTF-8",

        LC_TIME = "de_AT.UTF-8",

        LC_NAME = "de_AT.UTF-8",

        LANG = "en_US.UTF-8"

    are supported and installed on your system.

perl: warning: Falling back to the standard locale ("C").

locale: Cannot set LC_ALL to default locale: No such file or directory
In this special case it is complaining about de_AT.UTF-8, as the system is setup with German / Austria. To solve this you need to do following:
# locale-gen en_US en_US.UTF-8 de_AT.UTF-8

Generating locales...

  de_AT.UTF-8... done

  en_US.ISO-8859-1... done

  en_US.UTF-8... up-to-date

Generation complete.
Important: Replace de_AT.UTF-8 with the language it is complaining about. If you just copy’n’past it will not work, if you’re not from Austria. 😉
After this call:
# dpkg-reconfigure locales

Generating locales...

  de_AT.UTF-8... up-to-date

  en_US.ISO-8859-1... up-to-date

  en_US.UTF-8... up-to-date

Generation complete.
and it should work again.
Howto install Adobe Digital Editions on Ubuntu 12.04 and use it with an e-book reader
June 3, 2012
A local public library here in Tirol/Austria allows you to rent e-books, you only need to have Windows PC or Mac to run Adobe Digital Editions – at least that is stated on their homepage, but it is quite easy to get the software running on an Ubuntu 12.04.
This is a short description on how to install the software and than integrate a generic e-book reader so you can read the rented e-books on your e-book reader. The e-book reader just needs to presents itself a USB mass storage device. I’ve tried it with an Iriver Story HD and an old Sony PRS-505 – both work. I guess the e-book reader needs to be Adobe Digital Editions ready as both of mine show that during boot up.
Anyway lets start. First you need to start the Ubuntu Software Center and search for the meta package “wine” and install it.

Than you need to download the Adobe Digital Editions Installer for Windows. I provide here a direct link (hope it stays valid for a long time) as on the Adobe homepage you don’t get the download link as it “verifies” with Flash if your OS is supported which it is not in this case. So here is the link.

Start now your file browser (Nautilus) press the right mouse bottom on the installer and select than “Open With Wine Windows Program Loader”.

After some seconds you are within the installer. I would say just press “Next” as the software is installed anyway within the .wine subdirectory in your home directory.


Now the Adobe Digital Editions got started and greets you with following window.

And after a next click you need to select “Authorize Computer” if you want later to connect an e-book reader.

Just click on “get an Adobe ID online” and your default browser is launched and you can create one.

The Adobe Digital Editions is running but it does not see the e-book reader. For this we need to start the program “Wine Configuration” (Just type “wine” in the “Dash Home”), which looks like this:

Go to the Drives tab where you need to add a new drive letter for your e-book reader (even if it shows it already with an other drive letter).


After choosing the drive letter select “Show Advanced” and choose the path of the mount point for your e-book reader (plug it into your computer and a directory within /media should be created automatically) and now the important setting: Change the type from automatic to “Floppy disk”.

Save the changes, and restart “Adobe Digital Editions” (Just close it and than type “adobe” in the “Dash Home” and select it). If your e-book reader is mounted in the specified directory, the e-book reader should be detected and its content shown or if you connected it the first time you will be asked to peer it.
The End!
FreeRADIUS and CRLs – Done the right way [Update]
May 28, 2012
Update: I changed the FreeRADIUS in-line CRL verification to an external program – running it now for several month at it works without restart of FreeRADIUS.
While I was implementing 802.1x EAP-TLS with FreeRADIUS I googled for documentation on how to implement Certificate Revocation Lists (CRL) in FreeRADIUS. The first text was in the eap.conf:
# Check the Certificate Revocation List

#

# 1) Copy CA certificates and CRLs to same directory.

# 2) Execute 'c_rehash '.

# 'c_rehash' is OpenSSL's command.

# 3) uncomment the line below.

# 5) Restart radiusd

check_crl = yes

CA_path = /etc/freeradius/certs/CA/
Which is basically correct, but it is so short on information that I googled on and found following posts:
- A solution where you need to combine the CA and the CRL in one File (and you need to restart FreeRADIUS to reload the CRL)
- Also ignoring the c_rehash stuff and using a variable crl_file (and I guess, as in this case as didn’t try it, restart FreeRADIUS to reload the CRL)
Both where not the solution I needed as I didn’t want to restart FreeRADIUS all the time and I have multiple sub CAs. I than started googling for more information on c_rehash, as the version on RHEL5/CentOS5/SL5 don’t need to have a man page. Take a look at this online man page.
And just as info as it is not that clear which package has c_rehash: yum provides "*/c_rehash" --> yum install openssl-perl. Basically c_rehash needs to be provided a directory with .pem files in it (also the CRLs need to be name .pem) and it than creates symlinks with the hashes of the files as names. After I got a prototype working but before I wrote this blog, Erik Inge Bolso wrote this blog post describing the same thing.
You need at least FreeRADIUS 2.1.10 (shipped with Centos/RHEL 5 (inc. updates) and later) for this solution to work.
After I got the prototype working I wrote a script which does download multiple CRLs, converts them from DER (e.g. used by Windows CAs) to PEM, verifies them and than uses c_rehash to hash them for FreeRadius. You need to do following steps to get it working for you.
- Create some directories
mkdir /var/tmp/cacheCRLs

mdir /etc/pki/crl/
- download this script cacheCRLs4FreeRadius.py to /usr/local/sbin/
cd /usr/local/sbin/

wget http://robert.penz.name/wp-content/uploads/2012/05/cacheCRLs4FreeRadius.py
- edit
/usr/local/sbin/cacheCRLs4FreeRadius.pyand change the URLs and names to your CAs - run
/usr/local/sbin/cacheCRLs4FreeRadius.py, no output means no error and check the content of/etc/pki/crl/ - check that your radius config contains following and restart FreeRADIUS after the change
# we're using our own code for checking the CRL

# check_crl = yes

CA_path = /etc/pki/crl/

....

tls {

....

verify {

tmpdir = /var/tmp/radiusd

client = "/usr/local/sbin/checkcert.sh ${..CA_path} %{TLS-Client-Cert-Filename}"

}

}
/usr/local/sbin/checkcert.sh should contain following
#!/bin/sh
output=`/usr/bin/openssl verify -CApath $1 -crl_check $2`if [ -n "`echo $output | /bin/grep error`" ]; then
RC=1
else
RC=0
fi
echo $output
exit $RC
- If you need more performance replace the shell script a C program, as this program is started at every authentication request.
- Try to authenticate with an revoked certificate and you should get following. If you’re running FreeRADIUS with -X you should see following (this log looks a little bit different when using the external program, which is the method I’m using now) :
[eap] Request found, released from the list

[eap] EAP/tls

[eap] processing type tls

[tls] Authenticate

[tls] processing EAP-TLS

[tls] eaptls_verify returned 7

[tls] Done initial handshake

[tls] < << TLS 1.0 Handshake [length 05f8], Certificate --> verify error:num=23:certificate revoked

[tls] >>> TLS 1.0 Alert [length 0002], fatal certificate_revoked

TLS Alert write:fatal:certificate revoked

TLS_accept: error in SSLv3 read client certificate B

rlm_eap: SSL error error:140890B2:SSL routines:SSL3_GET_CLIENT_CERTIFICATE:no certificate returned

SSL: SSL_read failed in a system call (-1), TLS session fails.

TLS receive handshake failed during operation

[tls] eaptls_process returned 4

[eap] Handler failed in EAP/tls

[eap] Failed in EAP select
- run the script via cron in intervals that are required in your setup. e.g. once a day or once every hour
Powered by WordPress
Entries and comments feeds.
Valid XHTML and CSS.
51 queries. 0.070 seconds.