
-

-

-

- Austria (27)
- General (16)
- HowTo (122)
- IT Security (129)
- Linux (128)
- Networking (65)
- Other (4)
-

- CDemu - a free, gpl cd/dvd-rom device emulator for linux
- heatpumpMonitor - Monitoring a Stiebel Eltron LWZ
- ignis backup tool - the heat-strengthened backup tool
-

- May 2026 (1)
- December 2021 (2)
- September 2019 (1)
- May 2019 (1)
- April 2019 (1)
- January 2019 (1)
- October 2018 (1)
- August 2018 (1)
- February 2018 (1)
- September 2017 (1)
- August 2017 (2)
- May 2017 (1)
- April 2017 (1)
- February 2017 (1)
- January 2017 (2)
- December 2016 (1)
- November 2016 (2)
- October 2016 (1)
- September 2016 (1)
- August 2016 (1)
- July 2016 (2)
- April 2016 (1)
- March 2016 (3)
- February 2016 (4)
- January 2016 (2)
- December 2015 (2)
- November 2015 (2)
- September 2015 (2)
- July 2015 (5)
- June 2015 (4)
- May 2015 (2)
- February 2015 (1)
- January 2015 (4)
- December 2014 (1)
- November 2014 (5)
- October 2014 (4)
- September 2014 (1)
- August 2014 (4)
- July 2014 (3)
- June 2014 (5)
- May 2014 (5)
- April 2014 (1)
- March 2014 (2)
- February 2014 (3)
- January 2014 (5)
- December 2013 (2)
- November 2013 (3)
- September 2013 (3)
- August 2013 (2)
- May 2013 (4)
- April 2013 (1)
- March 2013 (1)
- February 2013 (3)
- December 2012 (3)
- November 2012 (3)
- October 2012 (1)
- September 2012 (2)
- June 2012 (1)
- May 2012 (1)
- April 2012 (1)
- March 2012 (1)
- February 2012 (1)
- January 2012 (1)
- December 2011 (4)
- November 2011 (1)
- August 2011 (1)
- March 2011 (1)
- October 2010 (1)
- May 2010 (3)
- January 2010 (1)
- September 2009 (1)
- August 2009 (5)
- July 2009 (5)
- June 2009 (4)
- May 2009 (1)
- April 2009 (1)
- January 2009 (1)
- December 2008 (6)
- November 2008 (6)
- October 2008 (2)
- September 2008 (11)
- August 2008 (4)
- July 2008 (7)
- June 2008 (2)
- May 2008 (7)
- April 2008 (5)
- March 2008 (9)
- February 2008 (15)
- January 2008 (11)
- December 2007 (3)
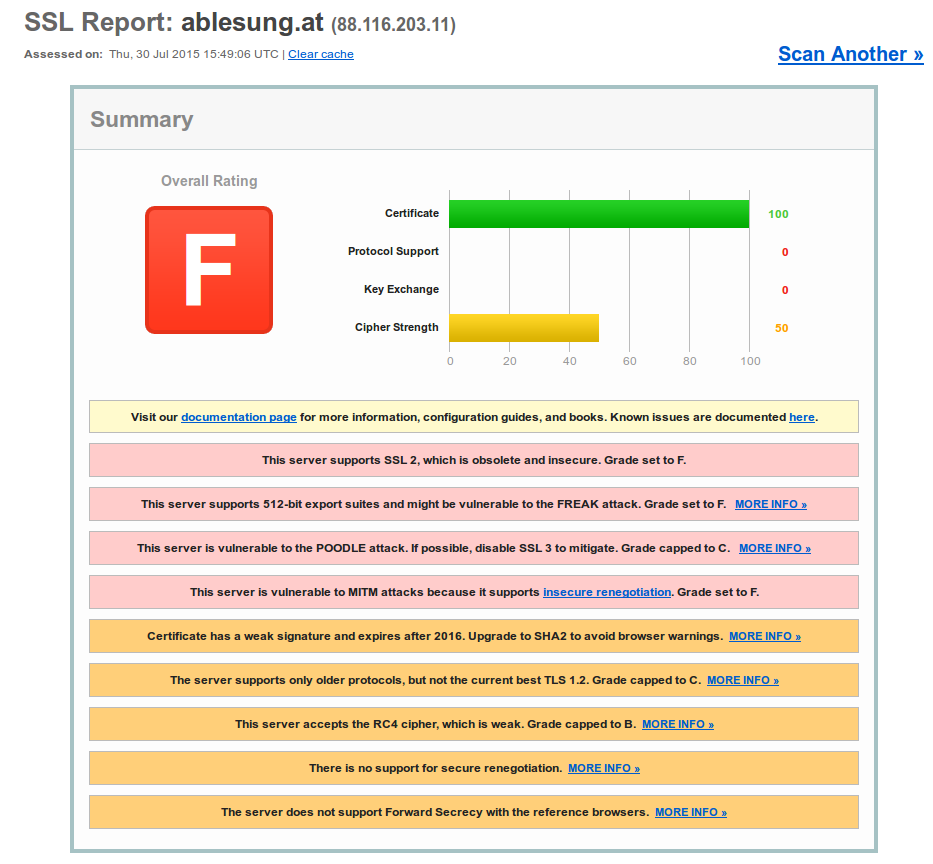
My heart misgives me, if I think about them implementing smart meters
July 30, 2015
Update: The site is used by TINETZ but not operated by it – so their IT department is not responsible. The Whois entries shows this also.
I got today a letter that requests me to enter my electric meter counter reading into the web website of the electric supply company. After getting a warning in my browser I checked the site – and oh my god … they can’t even implement TLS correctly and they want to deploy smart meters with a remote kill switch? Opt-Out if you can 😉
ps: I heard they are ISO 27001 certified – guess not for the website. 😉
Beware: Extreme Networks EXOS ships with hidden SNMPv3 default admin user
July 28, 2015
Update:
Jan reported in the comments that the problem exists also with SNMPv2 – and that’s correct – Just didn’t see that as we’re using only SNMPv3
show configuration "snmp" detail
shows following
configure snmpv3 add community private name private user v1v2c_rw

configure snmpv3 add community public name public user v1v2c_ro
You need to delete that with:
configure snmpv3 del community private

configure snmpv3 del community public
Original article:
A college of mine just found something by performing security hardening on our Extreme Network switches (Thx for this!). We’ve moved away from SNMPv2 sometime ago and are using only SNMPv3. So as we did
disable snmp access snmp-v1v2c
and configured our own SNMPv3 users and we thoughed we’re safe. But that is not true even if typing
show configuration "snmp"
shows only your own users. Typing
show configuration "snmp" detail (detail = display all configuration data including default, otherwise default would not be displayed)
shows following
configure snmpv3 engine-id xxxxx

configure snmpv3 add user admin authentication md5 auth-encrypted hex 35:dc:03:fb:58:13:d3:54:92:0e:1d:fd:ab:3f:b5:9a privacy privacy-encrypted hex 35:dc:03:fb:58:13:d3:54:92:0e:1d:fd:ab:3f:b5:9a

configure snmpv3 add user initial

configure snmpv3 add user initialmd5 authentication md5 auth-encrypted hex 72:e7:51:a0:6b:37:81:a1:26:a5:f0:a1:b8:25:e6:b6

configure snmpv3 add user initialsha authentication sha auth-encrypted hex e9:9d:30:c1:6a:bf:21:45:7e:20:e4:ff:14:2e:28:5f:9c:2e:f3:30

configure snmpv3 add user initialmd5Priv authentication md5 auth-encrypted hex d1:67:eb:88:85:19:4d:7b:c7:09:a4:d4:d5:ba:21:eb privacy privacy-encrypted hex d1:67:eb:88:85:19:4d:7b:c7:09:a4:d4:d5:ba:21:eb

configure snmpv3 add user initialshaPriv authentication sha auth-encrypted hex 34:1d:66:c1:a2:ba:4d:26:8a:da:f5:f6:00:2a:e6:04:88:47:f0:4c privacy privacy-encrypted hex 34:1d:66:c1:a2:ba:4d:26:8a:da:f5:f6:00:2a:e6:04:88:47:f0:4c

configure snmpv3 add group v1v2c_ro user v1v2c_ro sec-model snmpv1

configure snmpv3 add group v1v2c_rw user v1v2c_rw sec-model snmpv1

configure snmpv3 add group v1v2c_ro user v1v2c_ro sec-model snmpv2c

configure snmpv3 add group v1v2c_rw user v1v2c_rw sec-model snmpv2c

configure snmpv3 add group v1v2cNotifyGroup user v1v2cNotifyUser1 sec-model snmpv2c

configure snmpv3 add group v1v2cNotifyGroup user v1v2cNotifyUser2 sec-model snmpv2c

configure snmpv3 add group admin user admin sec-model usm

configure snmpv3 add group initial user initial sec-model usm

configure snmpv3 add group initial user initialmd5 sec-model usm

configure snmpv3 add group initial user initialsha sec-model usm

configure snmpv3 add group initial user initialmd5Priv sec-model usm

configure snmpv3 add group initial user initialshaPriv sec-model usm

configure snmpv3 add access admin sec-model usm sec-level priv read-view defaultAdminView write-view defaultAdminView notify-view defaultNotifyView

configure snmpv3 add access initial sec-model usm sec-level noauth read-view defaultUserView notify-view defaultNotifyView

configure snmpv3 add access initial sec-model usm sec-level authnopriv read-view defaultUserView write-view defaultUserView notify-view defaultNotifyView

configure snmpv3 add access v1v2c_ro sec-model snmpv1 sec-level noauth read-view defaultUserView notify-view defaultNotifyView

configure snmpv3 add access v1v2c_ro sec-model snmpv2c sec-level noauth read-view defaultUserView notify-view defaultNotifyView

configure snmpv3 add access v1v2c_rw sec-model snmpv1 sec-level noauth read-view defaultUserView write-view defaultUserView notify-view defaultNotifyView

configure snmpv3 add access v1v2c_rw sec-model snmpv2c sec-level noauth read-view defaultUserView write-view defaultUserView notify-view defaultNotifyView

configure snmpv3 add access snmpv3group sec-model usm sec-level priv read-view defaultAdminView write-view None notify-view None

configure snmpv3 add access v1v2cNotifyGroup sec-model snmpv1 sec-level noauth notify-view defaultNotifyView

configure snmpv3 add access v1v2cNotifyGroup sec-model snmpv2c sec-level noauth notify-view defaultNotifyView

....

enable snmp access

disable snmp access snmp-v1v2c

enable snmp access snmpv3

enable snmpv3 default-group

enable snmpv3 default-user

enable snmp traps

configure snmp compatibility ip-fragmentation disallow

enable snmp access vr VR-Default

enable snmp access vr VR-Mgmt
Oh my god what are these users? A check into the manual (one of 1732 pages) shows following:

Yes, these are all default users, with published passwords – and sure it works as following shows:
$ snmpwalk -u admin -A password -a MD5 -X password -x DES -l authPriv switchIpAddress -v3

iso.3.6.1.2.1.1.1.0 = STRING: "ExtremeXOS (X450e-48p) version 15.3.4.6 v1534b6-patch1-8 by release-manager on Thu Oct 30 13:07:09 EDT 2014"

iso.3.6.1.2.1.1.2.0 = OID: iso.xxxxxxxxxxxxxx

.....
I really don’t know what the engineers smoked when they put default SNMPv3 users into the switch configuration! Whats the purpose? And then hiding them from show configuration! What do you need to do to fix this?
disable snmpv3 default-group

disable snmpv3 default-user
Now you get:
$ snmpwalk -u admin -A password -a MD5 -X password -x DES -l authPriv switchIpAddress -v3

Error in packet.

Reason: authorizationError (access denied to that object)
If you delete the users additionally with following commands:
configure snmpv3 delete user admin

configure snmpv3 delete user initial

configure snmpv3 delete user initialmd5

configure snmpv3 delete user initialsha

configure snmpv3 delete user initialmd5Priv

configure snmpv3 delete user initialshaPriv
You’ll get:
$ snmpwalk -u admin -A password -a MD5 -X password -x DES -l authPriv switchIpAddress -v3

snmpwalk: Unknown user name
I recommend deleting every configuration line (be it user or group) you don’t need. Only 2 lines protect you otherwise from a completely open switch …. some firmware did make the switch to forget a config line (e.g. when the syntax changed) … so lets be more save by also removing the users.
Looking for a way to change an email address and found clear text admin password
July 9, 2015
Today I wanted to change the email address of my admin User in the Unifi management software. As I couldn’t find anything in the GUI I started to look into the mongodb, which I’m already familiar with as I needed it for the last fix described here. So the part of changing the email was quite simple .. I just did that:
# /usr/bin/mongo --port 27117

MongoDB shell version: 2.6.10

connecting to: 127.0.0.1:27117/test

> use ace

switched to db ace

> db.admin.find()

{ "_id" : ObjectId("YYYYYYYYYYYYY"), "name" : "admin", "lang" : "en_US", "x_password" : "XXXXXXXXX", "email_alert_enabled" : true, "email" : "[email protected]" }

> db.admin.update({"_id" : ObjectId("YYYYYYYYYYYYY")}, { $set: {"email" : "[email protected]"}})

WriteResult({ "nMatched" : 1, "nUpserted" : 0, "nModified" : 1 })

> db.admin.find()

{ "_id" : ObjectId("YYYYYYYYYYYYY"), "name" : "admin", "lang" : "en_US", "x_password" : "XXXXXXX", "email_alert_enabled" : true, "email" : "[email protected]" }

>
But as you see there is a field x_password with the admin password in the clear. What the heck? Why that, this is only needed for login on, the device password can be set per site. So I searched in the internet that someone else found it – and yes, this was reported to the vendor over a year ago.
Austrian consumer organization Konsument.at slips on web security
June 26, 2015
Today I just surfed on the web site www.konsument.at of the Verein für Konsumenteninformation (VKI), which is a consumer organization in Austria. So you would think that the security of user data (=consumers) is high on their list – but it is not. Just looking at the homepage for 5 minutes shows you that they don’t really care. Lets take a look:
1. Login data not encrypted
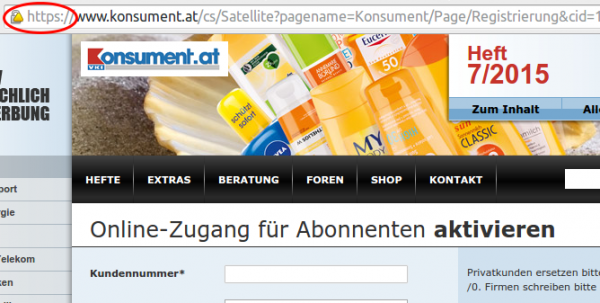
On their start page customers of them are able to login:

Ok, the page itself, which shows the login mask, is not HTTPS, thats not good as an attacker can change it. But when you click on the logon button it gets worse.

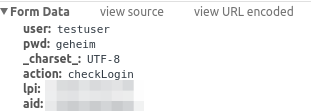
Yes, it is also not encrypted and surely the login data is in clear text as form data:
So you would think that they just don’t have any HTTPS, but that’s not correct. If you go the create account page you get HTTPS.
And if you look at the form sent button you’ll see:

WTF? That’s the same URL – just different parameter and of course this time with HTTPS. So they just have forgotten that HTTPS the first time?
2 TLS at its worst
After the first fiasco I thought – let’s check the HTTPS config, and it is a F grade (=that is bad).
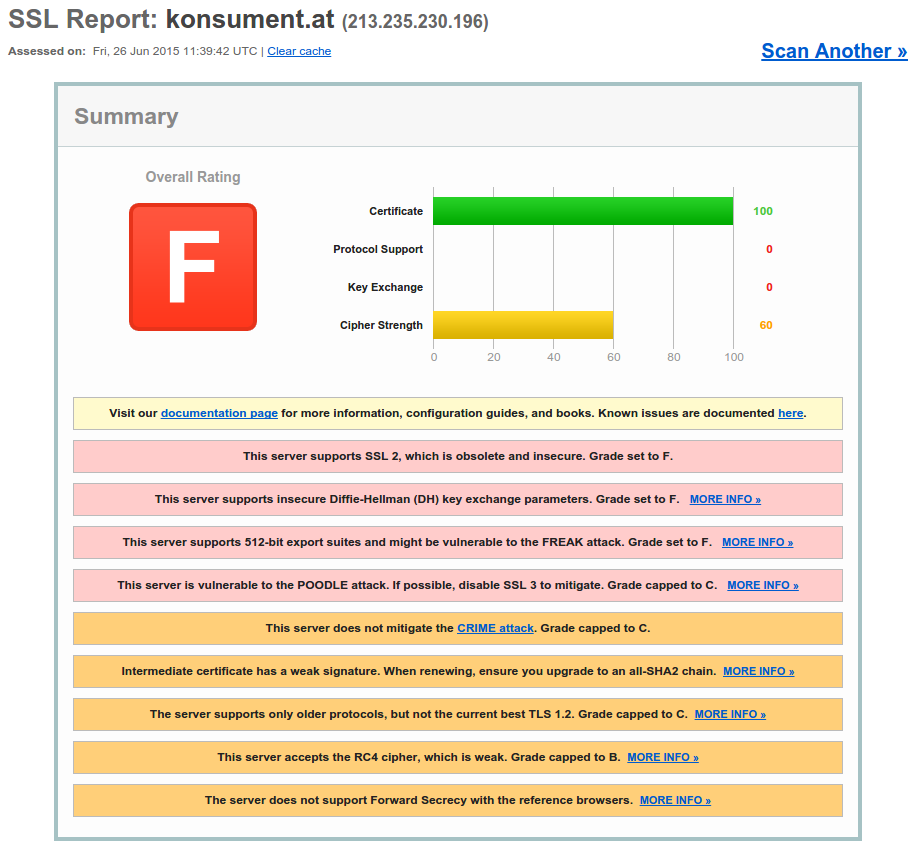
Everything you possible could forget to secure was forgotten here.
Howto filter rogue DHCP servers on Ubiquiti Networks UniFi access points
June 25, 2015
This short post shows how to filter rogue DHCP servers, which are connected via the WiFi to the network. The UniFi management software allows you to block traffic between 2 clients connected to the same access point. This feature is often called “client isolation”. But for seamless handover to an other access point, all need to be in the same layer 2 network. So an rogue DHCP server can serve clients on an other access point. This setup filters that traffic.
For this you need to put following lines into a file called config.properties (most likely you need to create the file).
config.system_cfg.1=ebtables.1.cmd=-A FORWARD -i ath* --protocol ipv4 --ip-protocol udp --ip-destination-port 68 -j DROP

config.system_cfg.2=ebtables.2.cmd=-A FORWARD -i ath* --protocol ipv4 --ip-protocol udp --ip-source-port 67 -j DROP

config.system_cfg.3=ebtables.3.cmd=-A FORWARD -i eth0 --protocol ipv4 --ip-protocol udp --ip-destination-port 67 -j DROP
The location of the file depends on the version of your UniFi management software.
- Version 2:
/opt/UniFi/data/config.properties - Version 3+:
/opt/UniFi/data/sites/the_site/config.properties– to get the site id take a look at this article.
After that change you need to trigger the re-provision on the access points affected. You can do this by enabling and disabling the guest portal(for the entire site) or on a per access point basis, changing TX power one by one, for example.
To verify that the configuration got deployed, log into the access point via ssh and check the ebtables – it should look like this:
BZ.vx.x.x# ebtables -L

Bridge table: filter
Bridge chain: INPUT, entries: 0, policy: ACCEPT
Bridge chain: FORWARD, entries: 3, policy: ACCEPT

-p IPv4 -i ath* --ip-proto udp --ip-dport 68 -j DROP

-p IPv4 -i ath* --ip-proto udp --ip-sport 67 -j DROP

-p IPv4 -i eth0 --ip-proto udp --ip-dport 67 -j DROP
Bridge chain: OUTPUT, entries: 0, policy: ACCEPT
Securing your client network 2: Separate by device classes
June 16, 2015
The second article in the securing your client network series (after Enforce DHCP usage) is about separating different client device classes in the network. Typically enterprises separate different departments in separate VLANs. If the VLANs are routed in the same VRF and no ACLs separate them, the gained security is negligible. If you’re configuring ACLs for this, you have too much time on hand or the rules are not tight. And the setup works only good if you’re within one central office building and your network is not distributed over an city or even country. So after I told you what is not a good idea – what setup do I recommend for bigger networks (> 500 client switch ports .. works great for > 10.000 ports and more).
Separate not by department, separate by device class
Yes, that’s the basic idea behind it. Why is that better?
- less work
Employees and departments move around. You need to keep your configuration up to date and if part of a department moves to an other location you need to extend the layer2 network think about something else - simpler and more secure firewall rules
If your VoIP phones, PCs and printers of an department are in the same Layer2 network you need to keep track of the devices for the firewall rules or allow a printer the same access as an PC or an VoIP phone. If you separate your printers in a separated network the firewall rules for them are easy, every device in that network is a printer. The firewall rules can be much more strict than in the PC network – a printer needs to talk to the print server (and dns, dhcp, ntp) but nothing else – a PC needs much more - network authentication tailored to the device class
MAC authentication works for any device, but 802.1x only works if the device supports it. Switching 802.1x on for all devices at the same time won’t work, but if only one device is allowed into a network area with only MAC authentication – It does not help that all others use 802.1x, the attacker just fakes that MAC address. With a separation by device classes you can implemented 802.1x for some networks and others not. e.g. 802.1x for Windows PCs with AD integration is not that complicated – so for the PC network 802.1x could be required, but for the printer network MAC authentication is Ok. This is specially valid if the firewall rules in the printer network are much more strict – even if someone gets access to that network he is not able to connect to the Exchange, database or file server … only the print server is allowed to connect to the printers and not the other way round - separate systems with different patch intervals
Most likely your Windows clients get an update very month but when did your company the last time update the firmware of the printers? Separate them and attacker can’t jump systems that easy any more.
- block client to client communication
If a network area is only used for devices classes that don’t need (or should) communicated directly with each other, you can just block that communication with ACLs. The ACLs are the same for all Layer 2 client access switches and are maintenance free. A classic example for this would be the printer network … why should one printer talk with an other printer – just the print server needs to be able to reach the printers. So if one printer gets pwned it does not affect the other printers. The same is true for building automation networks (like cameras, access control systems, attendance clock) or maybe your PCs don’t need to talk to each other – VoIP most likely needs to 😉
I hope I convinced you its an good idea, but how is it technically done.
Dynamic VLAN assignment
I recommend to use dynamic VLAN assignment via MAC or 802.1x authentication (via RADIUS Server) .Lets assume you’ve following setup:
- Edge: Layer 2 edge switch to which the clients are connected to
- Distribution: Layer 3 switch which aggregates multiple Layer 2 edge switches in the same building
- Core: aggregates the distribution switches in the data center
- Firewall: firewall between DMZ and between the different client network areas
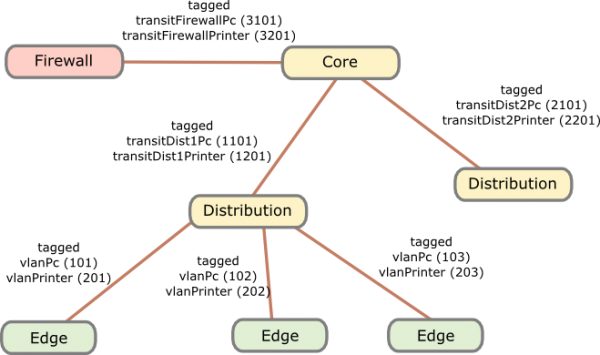
The names of the VLANs on every edge switch are the same, just the VLAN IDs are different. This allows the RADIUS server to return the name of the VLAN the switch should assign to a port or MAC. As the name is the same for all switches, the RADIUS server does not need to know the VLAN IDs. The RADIUS server just has a table that tells it which MAC or common name (in case of 802.1x EAP-TLS) does go into which VLAN. All your switches are configured exactly the same, just the management IP address and the VLAN IDs are different … that makes deploying and maintaining really easy.
For getting the traffic from the edge to the data center I recommend using VRF (Virtual Routing and Forwarding) and OSPF. Just assign the PC VLANs in one VRF and vlanPrinter in an other VRF. The link from the core to the firewall is also tagged. The firewall is now the only way to get from the PC network to the printer network.
I hope that example makes the setup clear, if now just write a comment.
Securing your client network 1: Enforce DHCP usage
June 14, 2015
In my last blog post I talked about going the full Layer 3 way and not building complex Layer2 subnets throughout your network. As many have the argument of security for building their networks this way I thought I write down how I secure client networks. With client networks I mean the part of the network client systems like PCs, phones, printer, … are connected to. Some of the articles and setups can also be used for the data center networks but thats an other story … 😉
All setups I describe in this series I have implemented in productions networks over the years and are therefore not stuff that only works in theory but they work in real life and solve real world problems. So lets start with something easy but which has real benefits not only for security – enforcing DHCP usage by all client systems.
Motivation
Sure, everybody knows for what DHCP is used but lets talk a little bit about the benefits besides not needing to configure each clients manually.
- If clients get their IP address via DHCP its easier to move the client systems to other subnets. So the need to extend your subnet over multiple switches decreases.
Result: Helps you to a more routed network and so simpler and more stable network. Clients can move through out your network and it just works. - It is also easier to change the client subnet if needed it for an upgrade/change of the network architecture.
Result: Makes much more flexible to change your network. - If you enforce the use of DHCP you also get an log file which client had which IP address at a given time and also to which switch port the client was connected. If there are static IP addresses in your network which you don’t control your log file ins incomplete.
Result: Audit logs in case you need to do a forensic investigation on how and by what systems an attack was carried out. Most systems log the IP address and you need to map that to a specify systems/location. - Also if you enforce the usage of DHCP, you can use the DHCP requests/replies for protection against of ARP spoofing (or at least mitigation) in your network.
Result: An attacker can not sniffer the traffic from an other client system in the same subnet. - If enforced, no idiot configures an IP address static which is also used dynamically.
Result: Quieter life for you. 😉
Implementation
To enforce DHCP usage we need to make sure that not using DHCP does not work. How can we do that? Simple – disable ARP learning on the Layer 3 switch, which is the default gateway of a client subnet. ARP (Address Resolution Protocol) is used to resolve IP addresses to MAC addresses, so if the default gateway needs to send a packet to a client systems and it does not know the MAC address (in its ARP table) – its not able to send the packet. Of course the setup needs to work for systems that use DHCP. How is this done? Also simple, the default gateway is most likely already configured as DHCP relay for the central DHCP server so it gets every request and reply. The DHCP reply contains the IP address assigned by the server and the MAC address of the client. The layer 3 switch just needs to write that into its ARP table. From this time on the IP address resolves always to that MAC address until a new DHCP rely provides and not MAC address for a given IP address.
For Extreme Networks switches (XOS) it is as simple as typing that lines per client VLAN/subnet:
enable ip-security dhcp-snooping vlan <vlanClient> port <ClientPorts> violation-action drop-packet snmp-trap

configure trusted-ports <UpLinkPorts> trust-for dhcp-server  (only once needed)

enable ip-security arp learning learn-from-dhcp vlan <vlanClient> ports <ClientPorts>

enable ip-security arp gratuitous-protection vlan Default

disable ip-security arp learning learn-from-arp vlan <vlanClient> ports <ClientPorts>
If the clients are connected directly to the layer 3 switch (default gateway for the client subnet) I recommend changing the first command to
enable ip-security dhcp-snooping vlan <vlanClient> port <ClientPorts> violation-action drop-packet block-port permanently snmp-trap
So that guy who did start a DHCP server in your network needs to call you, before it works again – otherwise I recommend configuring that this way on the switch the client is connected to.
Optional
Following setups / configurations should be done to increase the security in this part still more:
- Save the DHCP log file for a longer time period as is default for Windows DHCP servers which rotate every week and make sure all information you need is in the log file.
- Enable ARP spoofing protection also on the clients systems where possible (most likely on on PCs possible). Most enterprise endpoint protection systems allow such a configuration.
- Integrate the configuration of DHCP reservations (e.g. for printers) into your network authentication solution. It already needs to know the MAC address of the client so adding the IP address there is simple. It keeps also the DHCP scopes clean, so if a client is removed from the network authentication, it automatically removes the reservation from the DHCP server. The side benefit is that your service desk employees could also use this to create DHCP reservations without needing DHCP administrator privileges – and its often easier to have an audit log of the changes than on the Windows DHCP server.
Layer 3 network architecture is the way to go
May 24, 2015
In some of the last conferences I attended, other attendees showed their new network architectures in a short presentations and I’ll talked with some and there was something that puzzled me really. Their network design was completely different from mine. I’m a strong believer in Layer3 network architectures – outside the data centers with the virtualisation – there is no need to Layer 2 spanning more than one building. I go even as far as the floor switches are the only Layer2 switches – the building switch is already routing, also between 2 floor switches in the same building. At leased since 2010 I’m designing the networks in this way. I’m talking about networks > 500 or 1000 users in this blog post.
So lets dive a little bit deeper to see from what architecture they are generally coming and what their new architectures are like.
Their old architectures
The old setup is a grown architecture which is not balanced. Its most often a mix of various device types and often also vendors. A department is within its own VLAN even if its distributed over multiple locations. Some operate even some servers in the same VLAN. This leads to many Layer 2 domains distributed over the whole network – in one example I can remember it was over 700 VLANs tagged on one link. So it is already a complex setup which gets added additional complexity with spanning tree protocols (e.g. RSTP … so 700 separated spanning tree instances in this case – so you see why I can remember it 😉 ) for redundancy throughout the whole network. The IP addresses of the devices in the client networks are not all assigned by DHCP – some are static.
Their new architectures
As designing and deploying a new architecture is already such a big project they don’t want to change IP addresses if at all possible. As this would need the various department IT guys to change something and nobody knows how long that would take. And the other problem is that their firewall rules are based on the IP addresses of the clients and the servers in the client VLANs. This leads to a similar architecture in almost of presentations. Big devices in the center (ASR if Cisco is the vendor) and using L3VPN or VPLS to let everything the same for the user but getting rid of the spanning trees over the network backbone.
My opinion on that
My opinion on that is that they don’t ask why do they need to have everything the same. What are the reasons for this – can they be accomplished with other methods? These architectures are complicated, need big iron and are therefore expensive. Talking with them did reveal several points.
The servers in the client networks are operated by the various departments and they want to make sure that only their stuff is able to access them. Even if the server is not in the client network but in a data center network, the servers should only be reachable from the given department employees. The simplest way to do that was using a separate subnet for the department and use it as source address filter in the firewall rules. So basically they need a way to identify users for firewall rules and other stuff. In their setup the IP address of the client is that way to identify the user.
They are not identifying the user but the device in the first place and secondly there is a better way.
Identifying users
Forget about IP addresses to identify a single user. It can be used to identify a big group like all internal devices and users vs the Internet but otherwise you should not use it. I recommend using and enforcing DHCP for all devices in the client networks and use one of following methods to identify devices and users:
Active Directory integration
If your institution/company is running an Active Directory the simplest way to identify users is to install an agent on a Windows server which can parse the domain controllers logs and send user name + client IP address to the firewalls. It does not matter in which building or to which subnet the user is connected to. This allows you to setup firewall rules with AD groups as source addresses. The client IP address and user name combination is valid for a given time, e.g. 8h. This allows to use the department AD group in firewall rules. Second example: A special group is used to allow access to a special application . The same group can be used to let the traffic of the right persons through the firewall.
This setup provides another benefit for the networks/firewall guys. Allowing a new employee access to an application is generally done via an identify management system by a local IT guy or by the service desk of the IT department. In any case the firewall guys just got rid of the routine task – they just need to make sure every firewall rule for clients accessing servers is globally for all users or does use an AD group. In both cases no manual adding/removing is needed and if a user gets deleted in the AD his rights are removed too.
This setup also works for none Windows clients … the users just must be required to mount a SMB share with a domain user to allow the domain controller to make the mapping. This is also possible on MacOS and Linux. If this is not possible, most firewalls provide an web interfaces the user needs to log on once every e.g. 8h.
DNS Names
If you need to identify clients and not users, or in your setup client=user, than following setup is possible. Configure the client to update the DNS records for its host name after getting an IP address via DHCP. This can be configured for modern Windows clients to allow only a secure way. Most firewalls allow the usage of DNS names in firewall rules and every e.g. 15min the firewall resolves the DNS name to the current IP address. If you also make sure that a client can only use the IP address assigned by DHCP (disable arp learning on the Layer3 switch and using DHCP snooping for the IP to MAC address mapping) this is also fairly secure of an internal network.
802.1x
802.1x provides the possibility to identify devices and users. On centrally management windows clients you can configure if the device certificate is send or a user certificate after logon. Otherwise just provide the User with the correct certificate … be he on Linux oder Windows. If you provide per user certificates the RADIUS server has the user name to MAC address mapping (The MAC is part of the RADIUS requests). Combine that with the IP to MAC address mapping of the DHCP server you got username to IP via an standard protocol that works for any client operation system that supports 802.1x … just give the user the correct certificate. You can also use PEAP if you fear the complexity of EAP-TLS. Now you only need to provide that to the firewall with an API most provide – add and remove IPs from an IP Group in the firewall.
Outlook
This post got longer than I thought so I stop here with solutions for identifying users and remove the “using IP addresses for authentication”-requirement from the requirements list of a new network architecture.
Ghostery – prevent browser tracking
May 14, 2015
Sorry for not posting for a long time, but today I’ve again something for you. Its a Firefox plugin which allows you to easily block tracking sites. First what are tracking sites?
Lets say you want to visit www.example-a.com and your browser goes to that page. It loads the HTML page and that includes 1×1 pixel pictures from other domains or it loads java script code from other domains. e.g. like shown here (Adition – which is an advertising company):
![]()
These have mostly no other purpuse but to track you and get as much information about your system and you as is possible. The big tracking sites are not only used by www.example-a.com but also by www.example-b.com. So by using cookies and more subtle techniques they are able to track you over multiple sites and generate a profile about you. Only after installing the plugin I’ll show you, you’ll see how manny different tracking sites big sites are using to get you.
The software is called Ghostery and can be downloaed directly from the Mozilla guys here. Just click on the green button, no restart of Firefox is required.

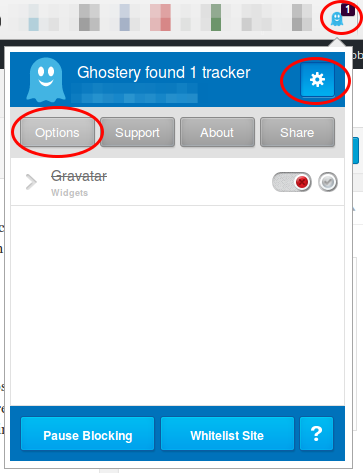
Click on the light blue ghost image on the right upper side of your browser. Click through the tuturial and than I recommend to set all sites to block and only unblock sites that you need. For this click on the Ghostery icon and than on the settings icon followed by options.
Now scroll down and click on select all and if asked if you want also new sites to be blocked and then click on save.

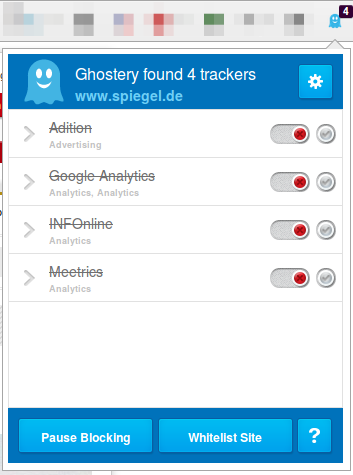
Now visit a big, prominent site and check the count. 4 sites like in this screen shot is low …. my personal record was 14 for one site – can you top it? Write in the comments.
major website in Tirol deanonymizes users
February 9, 2015
Important: This is a new version of the post, which does not contain the name of the website, as the owner removed the code and explained to my why he did it.
As you most likely know I’m running NIDS (Network Intrusion detection systems) to monitor the traffic going into and out of multiple networks. Today I saw a traffic which is normal if one is using VoIP via the Internet – but the source address did not use VoIP at that time.
[**] [1:2016149:2] ET INFO Session Traversal Utilities for NAT (STUN Binding Request) [**] [Classification: Attempted User Privilege Gain] [Priority: 1] {UDP} xxx.xxx.xxx.xxx:47865 -> 54.172.47.69:3478
Together with 2 friends I started investigating. The destination IP address belongs to Amazon AWS … even more interesting. So we took a look at the DNS requests the PC made and that resolved to that IP address, which showed:
stun1.webrtc.us-east-1.prod.mozaws.net
So that originates from the Firefox browser and is connected to WebRTC. So we went to the PC and looked through the browsing history, but the pages looked “normal”, so we started to access them again to find out which one triggers the request. And we found it, visiting thread pages on XXX did trigger the requests. Even more interesting was that we were able to reproduce the requests on a Firebox browser running NoScripts! So we looked at the HTML code of the page and found following:

And at the end there are following lines:
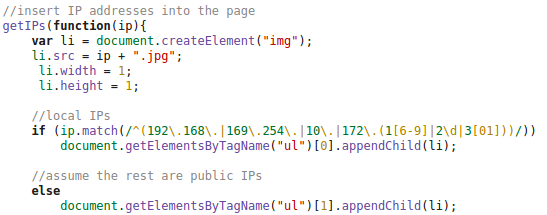
So we did take a look at the HTTP requests made by the client and at the DOM tree and found following:
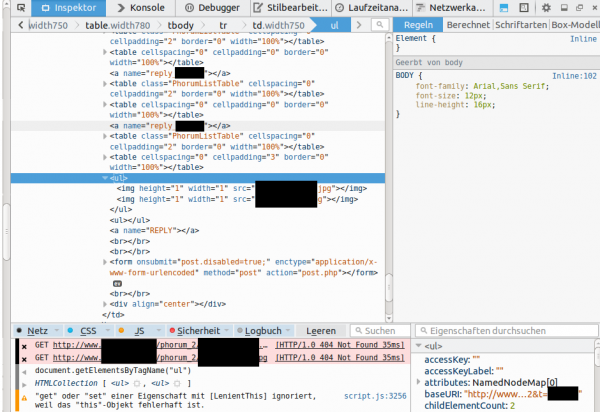
This shows that the local IP addresses (behind a NAT router) and the external IP address used for the WebRTC request is sent in an JPG image request to the server. This seemed to be aimed at deanonymizing the client, if the user accesses it via a VPN connection. Some weeks ago there was a post about something like this – deanonymizing Tor users – a little searching revealed following page. Looking at the source code there, showed that the most parts are identical, just adding it to the DOM tree was new. The exploit works for Firefox and Chrome currently – Internet Explorer does not support WebRTC so far.
After this findings I did sent an email to the owner of the homepage, asked if this is by purpose or if the homepage got hacked. He responded a day later and explained that it was needed against an attacker. Anyway as some people rely on their anonymity I wrote this post, to get the word out that if you need anonymity you need to take actions – not only for this page but for other too. The code is out in the wide – it will be used and misused.
Solutions:
- The best solution is to set the Tor/VPN Tunnel up on the router and not the PC – also for similar exploits in the future.
- Fast solution for this is to install a special plugin: Firefox, Chrome (does currently not work with Chrome V40.0.2214.111, as a reader just reported to me – ScriptSafe does) – this is also a good idea if you’re not using Tor or a VPN.
- Verify that you’re secure on this page or this page
ps: I want to thank my two friends (Benjamin Kostner and one friend who wants to stay anonymous) for helping as that made the process of finding the source of the problem much easier and faster.
Powered by WordPress
Entries and comments feeds.
Valid XHTML and CSS.
53 queries. 0.076 seconds.