
-

-

-

- Austria (27)
- General (16)
- HowTo (122)
- IT Security (129)
- Linux (128)
- Networking (65)
- Other (4)
-

- CDemu - a free, gpl cd/dvd-rom device emulator for linux
- heatpumpMonitor - Monitoring a Stiebel Eltron LWZ
- ignis backup tool - the heat-strengthened backup tool
-

- May 2026 (1)
- December 2021 (2)
- September 2019 (1)
- May 2019 (1)
- April 2019 (1)
- January 2019 (1)
- October 2018 (1)
- August 2018 (1)
- February 2018 (1)
- September 2017 (1)
- August 2017 (2)
- May 2017 (1)
- April 2017 (1)
- February 2017 (1)
- January 2017 (2)
- December 2016 (1)
- November 2016 (2)
- October 2016 (1)
- September 2016 (1)
- August 2016 (1)
- July 2016 (2)
- April 2016 (1)
- March 2016 (3)
- February 2016 (4)
- January 2016 (2)
- December 2015 (2)
- November 2015 (2)
- September 2015 (2)
- July 2015 (5)
- June 2015 (4)
- May 2015 (2)
- February 2015 (1)
- January 2015 (4)
- December 2014 (1)
- November 2014 (5)
- October 2014 (4)
- September 2014 (1)
- August 2014 (4)
- July 2014 (3)
- June 2014 (5)
- May 2014 (5)
- April 2014 (1)
- March 2014 (2)
- February 2014 (3)
- January 2014 (5)
- December 2013 (2)
- November 2013 (3)
- September 2013 (3)
- August 2013 (2)
- May 2013 (4)
- April 2013 (1)
- March 2013 (1)
- February 2013 (3)
- December 2012 (3)
- November 2012 (3)
- October 2012 (1)
- September 2012 (2)
- June 2012 (1)
- May 2012 (1)
- April 2012 (1)
- March 2012 (1)
- February 2012 (1)
- January 2012 (1)
- December 2011 (4)
- November 2011 (1)
- August 2011 (1)
- March 2011 (1)
- October 2010 (1)
- May 2010 (3)
- January 2010 (1)
- September 2009 (1)
- August 2009 (5)
- July 2009 (5)
- June 2009 (4)
- May 2009 (1)
- April 2009 (1)
- January 2009 (1)
- December 2008 (6)
- November 2008 (6)
- October 2008 (2)
- September 2008 (11)
- August 2008 (4)
- July 2008 (7)
- June 2008 (2)
- May 2008 (7)
- April 2008 (5)
- March 2008 (9)
- February 2008 (15)
- January 2008 (11)
- December 2007 (3)
Information Leak due OEBB Railjet WiFi
November 4, 2013
Today I traveled with the OEBB Railjet which provides a free WiFi. As the journey took some hours I had time to look at my networks traces and found something. After the captive portal with the Terms of Services was acknowledged, a page with some infos is shown. One of the infos is the original URL the user requested. If the users clicks on the link a separate tab opens with the page. The problem is that the URL the browser was given to access this info page has following format:
http://10.20.43.1:4990/www/portal/index.html?res=notyet&uamip=10.20.43.1&uamport=3990&challenge=7e623f476a0cd811b414ad6aa9cfce13&called=00-C0-3A-9D-55-E8&mac=xx-xx-xx-xx-xx-xx&ip=10.20.43.33&nasid=nas01&sessionid=5277d1c60000000b&userurl=http%3a%2f%2fwww.orf.at%2f
Which is sent as referrer to the original requested page if you click onto the link. As you see this referrer contains the full MAC address of the requesting device. Normally the MAC address is only visible via Layer 2 but with the information leak in my case www.orf.at knows my MAC address and if I have already gotten a cookie, they could add now my MAC to the list of know IDs. Ok, I guess the ORF doesn’t do that, but others might.
A solution would be simple for the OEBB, but until then don’t click on this link – type the URL again.
Howto restart a suspended KVM guest which can’t be resumed
November 3, 2013
I just had the problem that I was not able to resume a suspended KVM guest. It happened when I powered my KVM server down to add a new hard disk. My server did not power the guest down but did instead suspended them. I realized that only after I did have no “Run” .. just a “Restore” to choose from.
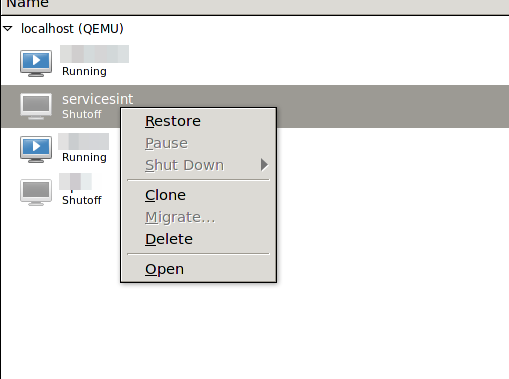
When I tried to “Restore” it I go following:
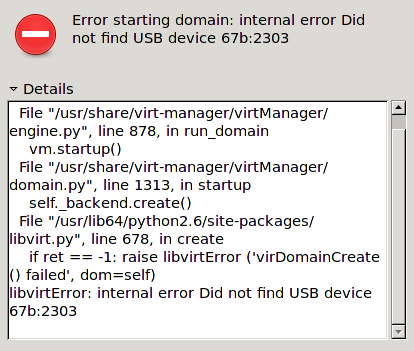
The problem was that I removed a mapped USB device some time ago but at resuming KVM checked for it. The solution was to remove the corrupted suspended virtual machine session so I could boot the machine again – naturally I did lose the suspended session, but that was ok.
[root@kvmserver ~]# virsh managedsave-remove <NameOfGuest>

Removed managedsave image for domain servicesint
Maybe there is a graphical way to do it, but I didn’t look further – as it worked.
Howto get your external IP address via command line
September 28, 2013
I just had to find out the external IP address (as seen from the Internet) of a Linux server which is behind a NAT router. The normal way to goto WhatsMyIP didn’t work as I was only connected via SSH to this server. But the solution is quite easy thanks to the guys from ipecho, just type:
wget http://ipecho.net/plain -O - -q ; echo
Thats so easy! And even faster than using a browser in the first way ….. 🙂
Session verification fails after update from PHP 5.3 to 5.4 with suhosin
September 15, 2013
I’ve just upgraded my PHP install from 5.3.25 to 5.4.19 and I ran into the problem that some PHP programs on my server stopped working. The first I found to have a problem was Tiny Tiny RSS as I use it myself. 🙂 I was not able to login into it anymore and in the log file I found following:
[Sun Sep 15 11:00:31 2013] [warn] [client xxx.xxx.xxx.xxx] mod_fcgid: stderr: PHP Warning: Unknown: Failed to write session data (user). Please verify that the current setting of session.save_path is correct (/var/xxxxxx/sessions/) in Unknown on line 0, referer: https://xxxxxxxx/
After searching really long I found out that it worked again if I disabled suhosin (which is a module to harden PHP) by editing /etc/php.d/suhosin.ini and putting a ; in front of
extension=suhosin.so
But this is not secure way to handle this, therefore I search further and found a pull request on GitHup which solves the problem. Ok you need to patch and compile the module … but technically it is fixed 😉
Howto access MTP devices via USB on Ubuntu 12.04
September 1, 2013
A friend asked me how he can access his Nexus 7 device via USB on his Ubuntu 12.04 notebook. With Android versions below 4.0 that was simple as the device registered as mass storage device. The problem now is the stock Ubuntu 12.04 does not support MTP via GVFS (the virtual filesystem of the GNOME desktop). Newer Ubuntu versions e.g. 13.04 have already a GVFS version which support MTP. But these are no LTS versions of Ubuntu, which I recommend for the average user. But it is quite easy to install a newer version of GVFS on Ubuntu 12.04 (and 12.10) that does support it.
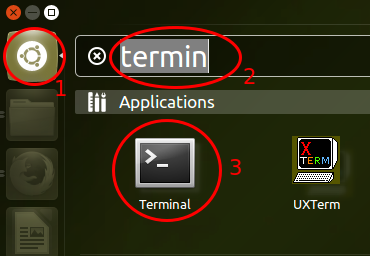
First you need to start a terminal. For this click on the dash home icon (1) and than type “terminal” (2) and you’ll the terminal icon – click on it (3.)
Now copy and paste following into the Terminal (the PC needs to be connected to the Internet while going through these steps):
sudo add-apt-repository ppa:langdalepl/gvfs-mtp
Enter your user password and than you’ll be shown following text:
You are about to add the following PPA to your system:

These builds of gvfs have my native mtp backend backported from gvfs master. Use this to easily access MTP based devices with Nautilus.

More info: https://launchpad.net/~langdalepl/+archive/gvfs-mtp

Press [ENTER] to continue or ctrl-c to cancel adding it
Hit the Enter Key. After this is done you need to type following command, which updates the package list:
sudo apt-get update
After this was successful you need to upgrade the installed packages with:
sudo apt-get upgrade
It should show something like this:
Reading package lists... Done

Building dependency tree

Reading state information... Done

The following packages will be upgraded:

gvfs gvfs:i386 gvfs-backends gvfs-bin gvfs-common gvfs-daemons gvfs-fuse gvfs-libs gvfs-libs:i386 libmtp-common libmtp-runtime libmtp9

12 upgraded, 0 newly installed, 0 to remove and 0 not upgraded.

Need to get 4,193 kB of archives.

After this operation, 4,157 kB of additional disk space will be used.

Do you want to continue [Y/n]?
Just press Enter here (the Y is the default section) to install the packages.
Now you just need to restart your PC and after login just connect your Android device to the PC and the file manager Nautilus will launch with your USB device.
Howto to quick test a DSCP based QoS system?
August 29, 2013
You’ve just completed your QoS system, which is based on DSCP for classifying and managing network traffic? Sure there are many sophisticated methods to validate your configuration, but there is also a really simple one which you can do from every Windows or Linux PC as a first check.
And you won’t believe it – the program is called ping. On Linux use the option -Q to set the DSCP value of the packets. From the manual:
-Q tos Set Quality of Service -related bits in ICMP datagrams. tos can be either decimal or hex number. Traditionally (RFC1349), these have been interpreted as: 0 for reserved (currently being redefined as congestion control), 1-4 for Type of Service and 5-7 for Precedence. Possible settings for Type of Service are: minimal cost: 0x02, reliability: 0x04, throughput: 0x08, low delay: 0x10. Multiple TOS bits should not be set simultaneously. Possible settings for special Precedence range from priority (0x20) to net control (0xe0). You must be root (CAP_NET_ADMIN capability) to use Critical or higher precedence value. You cannot set bit 0x01 (reserved) unless ECN has been enabled in the kernel. In RFC2474, these fields has been redefined as 8-bit Differentiated Services (DS), consisting of: bits 0-1 of separate data (ECN will be used, here), and bits 2-7 of Differentiated Services Codepoint (DSCP).
On Windows the same is achieved with -v
In both cases you need to provide the Type of Service (TOS) byte. While this is not the wished DSCP value, the ToS byte (or 8-bits) encompasses DSCP. DSCP only uses the first 6 bits of the ToS byte and ignores bits 7 and 8. You’re asking ??hey?? 😉
There is a quite easy way to get from one to the other: DSCP * 4 = TOS, or you can use following table.
Most VoIP systems use AF31(DSCP 26) for signaling (e.g. SIP) and EF (DSCP 46) for voice/media (e.g. RTP). This means for testing we use
ping -Q 104 <ip_address> # for DSCP 26

ping -Q 184 <ip_address> # for DSCP 46
After calling these commands you can easily check your counters if the increment correctly. After this put some load on the connection/link e.g. with FTP or SCP and let the ping run, it should be stable and with a low latency. If not the VoIP stuff with also not work. 😉
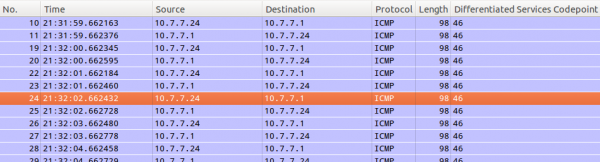
This quick test can also help you by an other problem. You need to deploy a system which relies on the fact that the DSCP value in not being stripped away in transit. For this you use the above command and let Wireshark run.
First you need to add the DSCP colum. Just select a packet and then select the DSCP header and use the right mouse button to get to the “Apply as Column” menu entry.
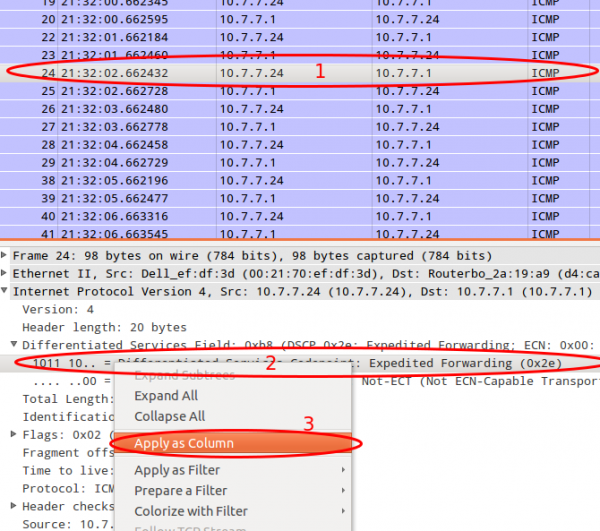
After this you can just look at the DSCP values. If they travel across the network everything is Ok.
Howto migrate mails from courier-imap without the passwords
August 26, 2013
I needed to move to a new mail server as the old one got too old. I had one problem – i didn’t know the old passwords of the virtual courier-imap users and the new system didn’t use the same hashing. It was ok to use new passwords for the new server, but as I needed to sync the most mails before I disabled the old mail server. This was needed as some users had really big mailboxes which would take too long to sync. So I needed a way to access the mails without knowing or reseting the old password. This post describes how I did the migration:
- I created a new user called “migrate” on the old mail server. I removed than its mail directory, in my case:
rm -rf /var/mail/domains/penz.name/migrate
And than I created a symlink to the mail of a user I wanted the mails to migrate:
ln -s /var/mail/domains/penz.name/robert/ /var/mail/domains/penz.name/migrate
Now I was able to login to the account with the “migrate” user and password - For the migration I used the defacto standard “imapsync”. I called it for the first user to check if it worked correctly. (checked also the mails on the new server and so on …)
- Now I wrote a small script which did create a symlink, started imapsync, removed the symlink, create a new symlink, …… sure with some error handling 😉
- All of the above was done without the user noticing. Most Mails where now migrated except the changes to the old mailboxes after imapsync did its job.
- I did send a mail to the users telling them of the move to the new server and providing them with the exact date of the change and their new login data, and that it could take some hours until all of there mails were migrated.
- At the given date I changed the DNS entries to the new server and stopped the SMTP/Webmail service on the old server and made sure the IMAP service was only reachable for the imapsync script (with iptables – localhost and uid check). The users which already got to the new mailserver (be it with Webmail or IMAP) got most of their mails – they others couldn’t connect until there dns server got the change. (It was done on a weekend)
- New mails from other SMTP servers where deferred or already delivered to the new server.
- After I made sure that the old mailboxes can’t be changed I started the script again and sync the differences to the server. This was now really fast as imapsync needed only to transfer a few mails.
- After the script was through I could switch the old server off.
I hope these steps help others – if you’ve an other/better way to migrate, tell me about it in the comments. Thx.
Simple way to secure a MySQL installation
May 27, 2013
I now know this script was there for years but I just found it some month ago, when I installed MySQL on a CentOS and it told me to use it. But I checked, it is also present on an old Ubuntu 8.04 LTS (released 5 years ago). The script is called:
/usr/bin/mysql_secure_installation
Here are the questions you get asked by it:
Change the root password? [Y/n]

Remove anonymous users? [Y/n]

Disallow root login remotely? [Y/n]

Remove test database and access to it? [Y/n]

Reload privilege tables now? [Y/n]
You really should run this program as it makes the basic securing of MySQL really easy.
Microsoft Remote Connectivity Analyzer
May 23, 2013
By pure luck I found the Microsoft Remote Connectivity Analyzer as I’m not into the Microsoft world. Anyway this web site lets you test easily if the Groupware server you’re using is configured correctly. For example if you’ve problems connecting/syncing with your mobile or tablet to a server via ActiveSync. This protocol is not just used by Exchange but also by some OpenSource Groupware applications. Anyway its a nice link to know.
How to get Tiny Tiny RSS running on a half-way secure PHP setup
May 20, 2013
As Google is discontinuing their Google Reader I needed to look for alternatives and after some looking I went for Tiny Tiny RSS, which I can run on one of my web servers. At least this was the theory :-). The problems I faced were that Tiny Tiny RSS seems to have problems with a half-way secure PHP setup, and I needed therefore to make some changes to get it working. As I didn’t find that much documentation on this topic and it seams the Tiny Tiny RSS developers are not really security affine.
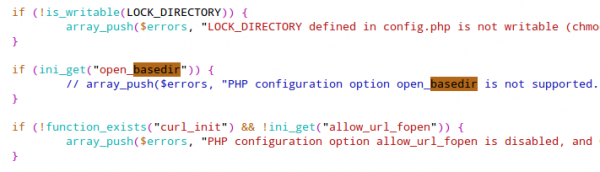
1. open_basedir is not supported
I did as described in the Install Notes and went to the http://your.site.com/tt-rss/install/ URL to use the installer to configure my Tiny Tiny RSS, but I was prompted with this error message:
PHP configuration option open_basedir is not supported. Please disable this in PHP settings file (php.ini).
I searched through the Internet and it seams that some obscure errors can occur if you use open_basedir. But to me it seem more like: I (=developer) don’t have the problem and the user has it and he has open_basedir activated so this must be the problem. Anyway, open_basedir is an imported security measure for PHP hosting, do not ever disabled it, specially if you have more than one vhost. I running with enabled open_basedir for 2 weeks now without getting any obscure errors (or any errors at all). At the time of writing this blog post I was running PHP 5.3.23 and 5.3.25 on this server.
After these preliminary words – how did I get rid of this error messages? Simple I just commented raising of the exceptions out. For this open the install/index.php in a text editor and search for the line containing “option open_basedir is not supported“, comment it out like this:
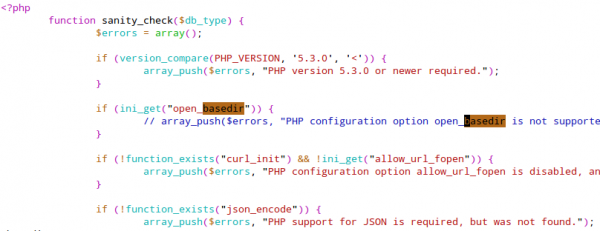
And you need to do the same in the include/sanity_check.php file:
2. passthru disabled
I wanted to call the ./update.php --daemon command from the command line but I got following error message:
PHP Warning: passthru() has been disabled for security reasons in /var/www/xxxx/html/update.php on line 150
This is because a secure configured default php.ini has following set:
disable_functions = exec, passthru, shell_exec, system, proc_open, popen, curl_exec, curl_multi_exec, parse_ini_file, show_source
I remove disabled functions per vhost so I don’t have the least common denominator for security. In this case needed to make sure that the update.php called via the command line uses a custom made php.ini. I therefore created this bash script.
#!/bin/bash

export PHPRC="/var/www/php/xxxx/"

./update.php --daemon
In this directory a special php.ini is located which has passthru enabled.
3. undefined function posix_getpid
I wanted to use the update_daemon2.php script as it is recommended but I got following error message:
[09:48:30] [MASTER] installing shutdown handlers

PHP Fatal error:  Call to undefined function posix_getpid() in /var/www/xxxx/html/update_daemon2.php on line 223

PHP Fatal error:  Call to undefined function posix_getpid() in /var/www/xxxx/html/update_daemon2.php on line 236

PHP Fatal error:  Call to undefined function posix_getpid() in /var/www/xxxx/html/update_daemon2.php on line 99
The solution on Centos/RHEL/SL is easy, just install the posix package for php:
yum install php-posix
I hope this post helps others which move to Tiny Tiny RSS and still want a reasonably secure PHP setup.
Powered by WordPress
Entries and comments feeds.
Valid XHTML and CSS.
45 queries. 0.066 seconds.