
-

-

-

- Austria (27)
- General (16)
- HowTo (122)
- IT Security (129)
- Linux (128)
- Networking (65)
- Other (4)
-

- CDemu - a free, gpl cd/dvd-rom device emulator for linux
- heatpumpMonitor - Monitoring a Stiebel Eltron LWZ
- ignis backup tool - the heat-strengthened backup tool
-

- May 2026 (1)
- December 2021 (2)
- September 2019 (1)
- May 2019 (1)
- April 2019 (1)
- January 2019 (1)
- October 2018 (1)
- August 2018 (1)
- February 2018 (1)
- September 2017 (1)
- August 2017 (2)
- May 2017 (1)
- April 2017 (1)
- February 2017 (1)
- January 2017 (2)
- December 2016 (1)
- November 2016 (2)
- October 2016 (1)
- September 2016 (1)
- August 2016 (1)
- July 2016 (2)
- April 2016 (1)
- March 2016 (3)
- February 2016 (4)
- January 2016 (2)
- December 2015 (2)
- November 2015 (2)
- September 2015 (2)
- July 2015 (5)
- June 2015 (4)
- May 2015 (2)
- February 2015 (1)
- January 2015 (4)
- December 2014 (1)
- November 2014 (5)
- October 2014 (4)
- September 2014 (1)
- August 2014 (4)
- July 2014 (3)
- June 2014 (5)
- May 2014 (5)
- April 2014 (1)
- March 2014 (2)
- February 2014 (3)
- January 2014 (5)
- December 2013 (2)
- November 2013 (3)
- September 2013 (3)
- August 2013 (2)
- May 2013 (4)
- April 2013 (1)
- March 2013 (1)
- February 2013 (3)
- December 2012 (3)
- November 2012 (3)
- October 2012 (1)
- September 2012 (2)
- June 2012 (1)
- May 2012 (1)
- April 2012 (1)
- March 2012 (1)
- February 2012 (1)
- January 2012 (1)
- December 2011 (4)
- November 2011 (1)
- August 2011 (1)
- March 2011 (1)
- October 2010 (1)
- May 2010 (3)
- January 2010 (1)
- September 2009 (1)
- August 2009 (5)
- July 2009 (5)
- June 2009 (4)
- May 2009 (1)
- April 2009 (1)
- January 2009 (1)
- December 2008 (6)
- November 2008 (6)
- October 2008 (2)
- September 2008 (11)
- August 2008 (4)
- July 2008 (7)
- June 2008 (2)
- May 2008 (7)
- April 2008 (5)
- March 2008 (9)
- February 2008 (15)
- January 2008 (11)
- December 2007 (3)
Protect your PC against the BadUSB attack on Linux and Windows
October 12, 2014
At the Black Hat conference this year researchers from Berlin-based Security Research Labs (SRLabs) showed an attack method they called “BadUSB“, which allowed them, with manipulated USB device firmwares (e.g. from a USB Stick), to simulate an keyboard. With this keyboard they executed commands on the victims computer without he/she knowing it. The victim just inserted a USB stick to copy some data …. but the new keyboard executes some commands in the background.
To protect yourself against such an attack the computer needs to configured in a way that it does not bind any newly added device as new keyboard without asking the user. For Linux there is a kernel feature starting with 2.6.13-rc3 ( = since 2005) which allows to bind and unbind drivers from devices manually from user space. More information can be found on this topic here and here. And this blog post from Christian Vogel shows how to use it against BadUSB. What is currently missing is a simple GUI program which allows you to allow/deny devices with on click.
On the Windows site there is already such a program. This freeware program is made by the German security vendor (e.g. anti virus software) G DATA and is called “G DATA USB KEYBOARD GUARD” and can be downloaded from here. After installing you’ll be prompted following screen if a new keyboard is inserted.
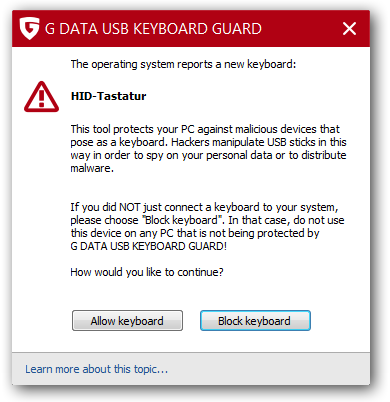
It would be nice if the various desktop environments on Linux add a similar feature … the kernel support is there already.
Check your hardening index of your Linux systems
October 6, 2014
I found a small program called Lynis, which does a system check of your Linux and Unix System. From the homepage:
Lynis is an open source security auditing tool. Primary goal is to help users with auditing and hardening of Unix and Linux based systems. The software is very flexible and runs on almost every Unix based system (including Mac). Even the installation of the software itself is optional!
To test a system is really easy, just download the tar.gz from here and extract the tar as root (otherwise it will complain) and change into its directory and call
./lynis -c
for the interactive mode (waits after each section) or
./lynis -q
for the quick mode which only logs the results to the log file. In both cases the log is written to /var/log/lynis.log.
For the following screenshots a I did setup a test system with some changes to show you some errors and warnings :-):
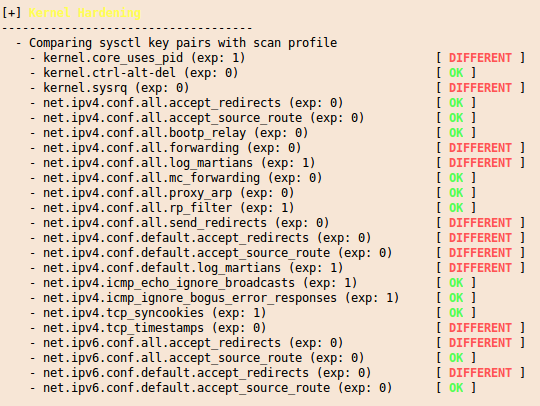
and at the end you get a summary with entries like this:
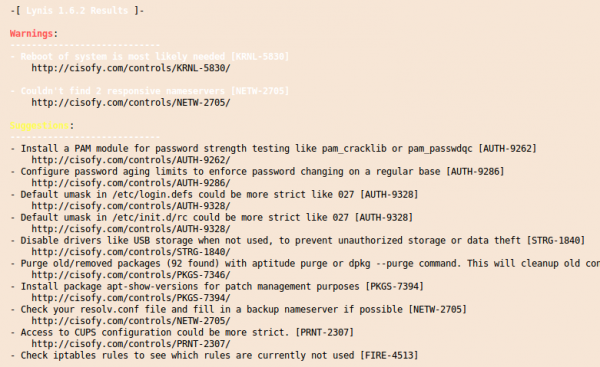
And you’ll get also a “Hardening index” which allows you to compare various systems against each other. 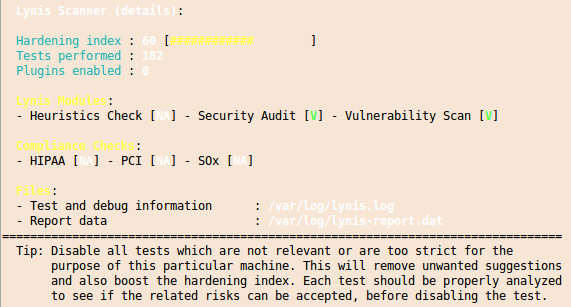

I you want to check multiple systems it it also possible to create an rpm file with the lynis.spec file from the Lynis homepage. You should run this software every time you setup a new system to make sure that you didn’t leave the big whole open.
US-CERT releases virtual appliance for MitM attacks
August 24, 2014
Some time ago I wrote a blog post on Burp as a MitM Proxy (Man-in-the-Middle) – now there is for some purposes an even easier way. The US-CERT has released the first version of a virtual appliance with the name Tapioca (Transparent Proxy Capture Appliance). With it, it is easy to check if programs don’t do certificates validation correctly. I really recommend to try it out! Some areas that are often good for a bad implementations are: mobile apps, hardware and embedded devices and generally stuff that needs a high domain specify know how and that often goes with less software engineering know how. 😉
Check if your mailserver is encrypting SMTP to/from other mail servers
August 10, 2014
For readers with their own mail server (or if you want to check what your provider is doing) – verify that your mail server accepts encrypted communication and that PFS is enabled. Just click on this link and enter the domain name to test. Some big players goof there …. It should at least look like in the screen shot. DANE would be cool, but that’s not that easy at this point as you need a working DNSsec DNS server, which not all registrars provide. Sure you can host your own authoritative DNS servers but that is work …
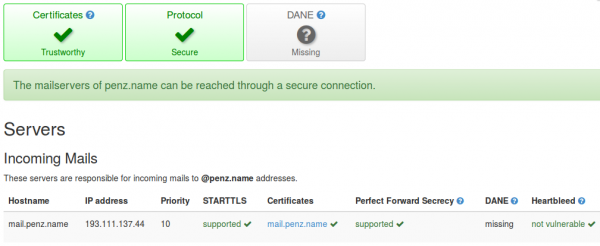
ps: send also a mail to [email protected] to check if sending mails is also encrypted. It should look like this:

Start securing your debit cards and why you should do it
July 18, 2014
Many people got new debit cards (called “Bankomatkarte in Austria) from the various bankings institutes in the last months and years. Many cards are PayPass enabled for wireless money transactions. PayPass is based on NFC, which is also integrated in some of the modern smart phones. The default setting is that five 25 Euro transactions can be done without entering a PIN. So a possible damage can be up to 125 Euro. You’ll verify if your debit card supports that standard by checking it has PayPass printed on it.

Picture: Maestro PayPass
But I’ve seen some cards with only this symbol (at least on the front side):
![]()
Anyway in therapy the card needs to be within 10cm of the reader and therefore an attack is not that easy. But already at Defcon 20 in 2012 Eddie Lee presented the possible of a NFCProxy which allows to misuse a card. The attack setup looks like this:
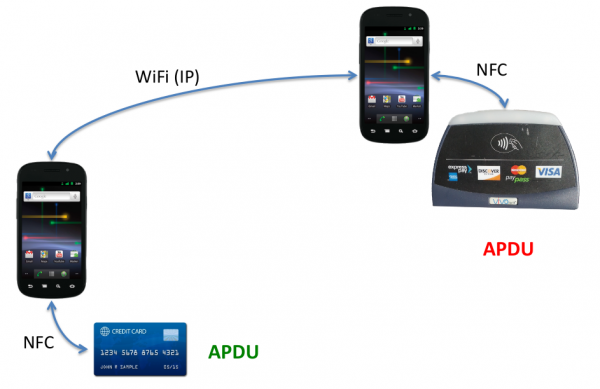
Picture: Eddie Lee @ Defcon 20
So this allows following attack vector. You’re standing in a crow or in a line and have your debit card in your back pocket. One of the attacker stands behind you …. and the other can be e.g. hundred meters away (only limited by the delay and reach of the network connection). They will be able to get your money with much less risk than with pocket picketing. And to make it even better – you can download the App for Android as an .apk file, ready to install and use, from Sourceforge.
So now you know of the problem, what can you to mitigate that problem?
- If you don’t need that feature at all, try to talk to your bank to disable that function. Some will do it for free, others will charge you. Some banks allow to you to choose if you want one with or without at renewal of your card.
- You basically like the feature, but you would like to have more control over it – thats also possible:
- Search for RFID/NFC blocking sleeves for credit card or payment cards
- You can get also wallets with RFID/NFC blocking feature … but currently they look not that great .. at least the ones I found
How to configure SNMPv3 securely on Extreme Networks XOS
July 11, 2014
In two of the last posts I wrote about configuring SNMPv3 securely for Linux and Mikrotik RouterOS. This time I’ll show the configuration for Extreme Networks XOS. Its quite easy and supports more encryption algorithm and options than e.g. Mikrotiks RouterOS. To allow SNMPv3 access we only need these commands – as I use SNMP only for reading, I’ll create a readonly user:
config snmpv3 add user snmpv3ro authentication sha XXXXXXXXXX privacy aes XXXXXXXXXX

config snmpv3 add group snmpv3group user snmpv3ro sec-model usm

configure snmpv3 add access snmpv3group sec-model usm sec-level priv read-view defaultAdminView write-view None notify-view None
If we want to disable a previously configured SNMPv1 or v2c access type following:
disable snmp access snmp-v1v2c
If you want also SNMPv3 traps you need this command:
configure snmpv3 add target-addr snmpv3Target param snmpv3Params ipaddress transport-port 162 tag-list defaultNotify
Hint: You can/should also add from or vr entries depending on your switch config
Some addition ways so secure your SNMP:
- You can specify in which virtual router instance the SNMP is reachable with following commands:
disable snmp access vr all

enable snmp access vr vrMgmt - And you can also configure ACLs which defines from which IP addresses it is possible to access the SNMP service with following command:
configure snmp access-profile snmpACL readwriteYou need to create following file first with
vi snmpACL.pol:entry allow_subnet_1 {
if match all {
source-address 10.x.x.0/24;
}
then {
permit;
}
entry allow_subnet_2 {
if match all {
source-address 10.y.y.0/24;
}
then {
permit;
}
Android Devices send many Multicast Packets per Second for Chromecast – How to disable it?
June 28, 2014
While tracing/sniffing for something, I mirrored all packets of my mobile phone to Wireshark and I was was really astonished to see many multicast DNS requests (_googlecast._tcp.local) from my mobile …
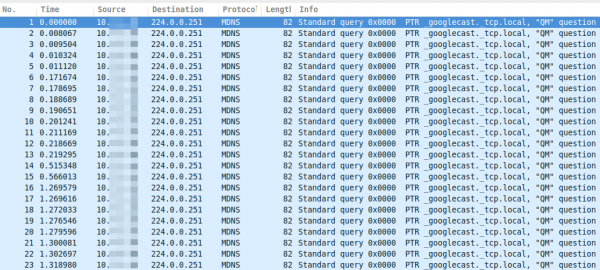
As you see, these are more than 15 packets per second, which leaded at once to following 3 thoughts:
- That can’t be good for the battery
- The mobile is sending this surely not only in my home network but also in hotspot networks … I don’t like that for security/privacy reasons (specially what happens if the phone gets an answer and maybe sends more info about itself)
- I’m not using Chromecast anywhere
Which leaded at once to the question:
- How can I disable this?
So I went on a search trough the Internet …. but I was not able to find a solution. So the question to the community .. has someone an idea how I can disable that?
ps: I found only one guy asking the same question in the xda developers forum
Howto install and use the Burp Suite as HTTPS Proxy on Ubuntu 14.04
June 26, 2014
This article shows you how to intercept and analyze HTTPS traffic. This of course only works if you can add your CA to the client system or the client system does not check the key chain. But you would not believe how many clients, specially embedded devices and mobiles apps don’t check it. The software I use in this post is the Free version of the Burp Suite – from the homepage of the Burp Suite:
Burp Suite is an integrated platform for performing security testing of web applications. Its various tools work seamlessly together to support the entire testing process, from initial mapping and analysis of an application’s attack surface, through to finding and exploiting security vulnerabilities.
Installation
As it is written in Java it is really easy to install and run. Just these 3 commands
sudo apt-get install openjdk-7-jre

wget http://portswigger.net/burp/burpsuite_free_v1.6.jar

sudo java -jar -Xmx2g burpsuite_free_v1.6.jar
I use sudo for the Java process as it needs in my cases to listen on ports lower than 1024 and this requires root permissions. After entering the last command and accepting the EULA you get following window:
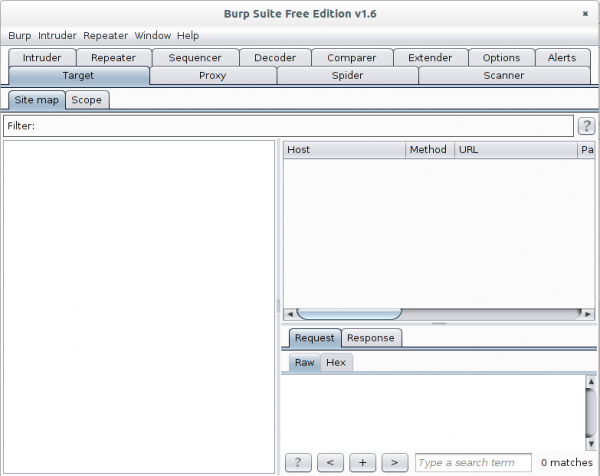
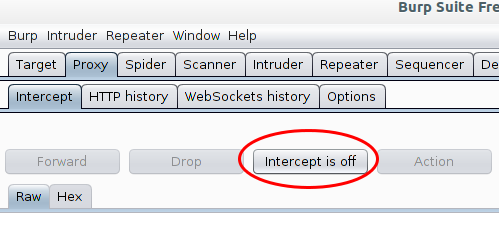
Now go to the Proxy | Intercept tab and click onto “Intercept is on” button to disabled it. Otherwise you’ll need to acknowledge every request.
The proxy is already running but only on localhost, we need it to listen on all to look at traffic from other devices.
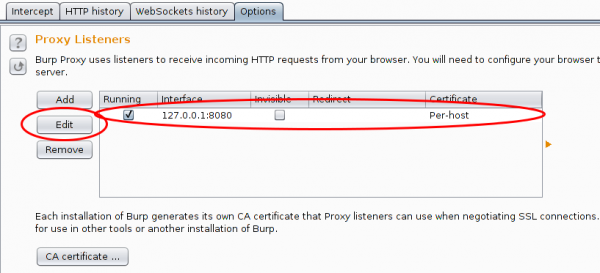
And in this case I want to see the traffic to a specific host from my mobile, so I set Burp to port 443 and to invisible mode and define a redirect IP address (the original host IP address).

After this, you only need to set on my local DNS Server the wished host name to my desktop IP address and the traffic runs over it and if the client accepts the faked certificate you can look at the traffic. Which looks e.g. like this:
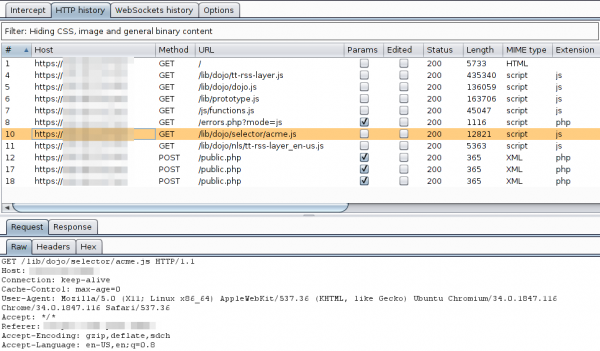
For other devices or requirements it is also possible to use Burp as a HTTP Proxy, just configured it on the client. ARP spoofing is also an idea…..
Howto setup a Mikrotik RouterOS with Suricata as IDS
June 1, 2014
Lets say you’ve a Mikrotik router as your internet router and you would like to detect bad traffic that is going over it, so basically you would like to have an IDS (Intrusion detection system). This article shows how you can setup a IDS with a Mikrotik router and Suricata running on a Ubuntu 14.04 (but it runs on any other Linux). This is no high performance setup for 10Gbit links, as in this case you would use a SPAN port a manged switch and you would need to tune the drivers, Linux and Suricata a bit (a lot actually for 10Gbit … and the server hardware is not cheap/small). This setup is for the SOHO (small office home office) space where you use the Mikrotik as your Internet router, be it for Cable or DSL. I use this setup at home and I’ve installed Ubuntu 14.04 64bit Server as virtual machine on my home server. No special switch or hardware is required as we facilitate the TaZmen Sniffer Protocol (TZSP) which is supported by Mikrotik. It is even possible to sent the data over a Layer-3 connection, you just need the bandwidth for the traffic you want to sent to Suricata.
I assume that Ubuntu 14.04 is installed (minimal server install is recommended).
Mikrotik Setup
You just need to configure it to copy the traffic to the Linux server with these commands:
/tool sniffer set filter-stream=yes streaming-enabled=yes streaming-server=xxx.xxx.xxx.xxx

/tool sniffer start
xxx.xxx.xxx.xxx is the IP of the Linux server
Basic Suricata Setup
First we change into the super user mode for every command we execute later:
sudo bash
Now we add the stable Suricata PPA to our system. At the time of writing the stable version is 2.0.1.
add-apt-repository ppa:oisf/suricata-stable

apt-get update

apt-get install suricata oinkmaster
Now we download the open/free Emerging Threats rules for the first tests. (There are also commercial rules available.)
cd /etc/suricata/

wget https://rules.emergingthreatspro.com/open/suricata/emerging.rules.tar.gz

tar -xzf emerging.rules.tar.gz
We use the reference.config from ET:
mv reference.config reference.config.orig

ln -s /etc/suricata/rules/reference.config /etc/suricata/reference.config
And we need to create one file and one directory:
touch /etc/suricata/threshold.config

mkdir /var/log/suricata
In the 2.0.1 packages one file got forgotten, so check if it is also missing in your version and if so download it manually.
ll /etc/suricata/rules/dns-events.rules
If it is missing … do following:
cd /etc/suricata/rules

wget https://raw.githubusercontent.com/inliniac/suricata/master/rules/dns-events.rules
Test Suricata alone
To make the first test call it like this (wait for some minutes):
suricata -c /etc/suricata/suricata.yaml -i eth0
you should get some files in /var/log/suricata
root@nids:/var/log/suricata# ll

total 364

drwxr-xr-x  2 root root     4096 Jun  1 13:45 ./

drwxrwxr-x 10 root syslog   4096 Jun  1 13:32 ../

-rw-r--r--  1 root root    46195 Jun  1 13:51 eve.json

-rw-r--r--  1 root root    25138 Jun  1 13:51 fast.log

-rw-r--r--  1 root root        0 Jun  1 13:36 http.log

-rw-r--r--  1 root root   236014 Jun  1 13:51 stats.log

-rw-r--r--  1 root root     1846 Jun  1 13:36 unified2.alert.1401622567

-rw-r--r--  1 root root    42445 Jun  1 13:51 unified2.alert.1401623113
Test the Mikrotik sniffer stream
Check if you get traffic by first downloading trafr from here and copy it to /usr/local/bin and extract and test it like this:
cd /usr/local/bin/

tar xzf trafr.tgz

./trafr
If you get -bash: ./trafr: No such file or directory, take a look at this post. Now check with tcpdump if you’re getting any packets (hit CTRL-C to stop)
trafr -s | tcpdump -r - -n
If you don’t get packets something is wrong with the Mikrotik setup or the packets getting filtered/blocked.
Connect Suricata with Mikrotik sniffer stream
I assume that you got packets and are now ready for your first run of Suricata with the Mikrotik sniffer stream. Just enter following command …
trafr -s | suricata -c /etc/suricata/suricata.yaml -r -
.. and open a second console and type following
tail -f /var/log/suricata/fast.log
your should see output like this (this are just examples)
06/01/2014-14:50:22.703188 [**] [1:2012648:3] ET POLICY Dropbox Client Broadcasting [**] [Classification: Potential Corporate Privacy Violation] [Priority: 1] {UDP} xxx.xxx.xxx.xxx:17500 -> 255.255.255.255:17500

06/01/2014-14:57:16.608473 [**] [1:2210021:2] SURICATA STREAM ESTABLISHED retransmission packet before last ack [**] [Classification: (null)] [Priority: 3] {TCP} xxx.xxx.xxx.xxx:443 -> xxx.xxx.xxx.xxx:49503

06/01/2014-15:26:03.601539 [**] [1:2006380:13] ET POLICY Outgoing Basic Auth Base64 HTTP Password detected unencrypted [**] [Classification: Potential Corporate Privacy Violation] [Priority: 1] {TCP} xxx.xxx.xxx.xxx:58188 -> xxx.xxx.xxx.xxx:8080
If you got also some entries its good, it works – we need to make it permanent now.
Auto-Update ET Rules
Now that every works we need to configure it in a way to get new rules every night. For this we add following line at the end of /etc/oinkmaster.conf
url = https://rules.emergingthreatspro.com/open/suricata/emerging.rules.tar.gz
To test it we run following command:
oinkmaster -C /etc/oinkmaster.conf -o /etc/suricata/rules
So the config works we create /etc/cron.daily/suricataUpdateRules with following content:
#!/bin/bash

/usr/sbin/oinkmaster -C /etc/oinkmaster.conf -o /etc/suricata/rules |& grep -i "error" > /dev/null

/bin/kill -USR2 `pidof suricata`
After we created it we need to make it executable:
chmod 755 /etc/cron.daily/suricataUpdateRules
Init Script
The last step is to make a init script so everything is started automatically, for this create a file /etc/init/suricata.conf with following content:
# suricata

description "Intruder Detection System Daemon"

start on runlevel [2345]

stop on runlevel [!2345]

expect fork

exec /usr/local/bin/trafr -s | /usr/bin/suricata -c /etc/suricata/suricata.yaml -r - &
Stop the test Suricata command and try it with the init script:
start suricata
You should get something like this:
suricata start/running, process 8003
But to make sure everything is really running, call
ps aux | grep -E "(suri|trafr)"
and you should get following output:
root      8003  0.1  0.0   2020   272 ?        S    14:50   0:00 trafr -s

root      8005  8.8 17.5 841852 360556 ?       Sl   14:50   0:15 suricata -c /etc/suricata/suricata.yaml -r -
And that’s it. Your IDS is running in a basic configuration. You now need to tune your rules and maybe you want to install a Web GUI for your IDS. I can recommend following to look at:
Why doesn’t the Ubiquiti Unifi DNS based controller location function work with Mikrotik RouterOS DNS? [Update]
May 18, 2014
Last week I ran into a problem with my Unifi UAPs after I switched the central router to Mikrotik RouterOS and also used the DNS server of the RouterOS. If the Unifi UAPs are in the same subnet as the controller, the UAPs find it via a broadcast but if there is no layer 2 connection they need a special DHCP Option or the DNS name unifi.xxxxx (xxx in this case is the domain name specified via DHCP) needs to resolve to the IP address of the controller. My setup was using the DNS variant but after I switched to the Mikrotik DNS server the UAPs stopped to connecting to the controller. I logged into the one of them via SSH and saw following in /var/log/messages.
ace_reporter.reporter_fail(): Unable to resolve (http://unifi:8080/inform)
I did at once a ping unifi, which worked so I started to sniff the traffic and saw following:

The DNS resolution is working at first glance but it seems to be funny that the requests are always different, as the case changes all the time. So I did a closer look into a requesting packet and the corresponding answer packet. The request looks this way:
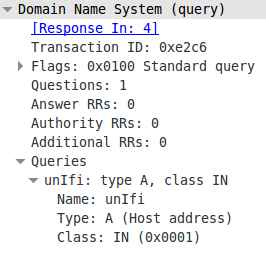
And the answer looks this way:
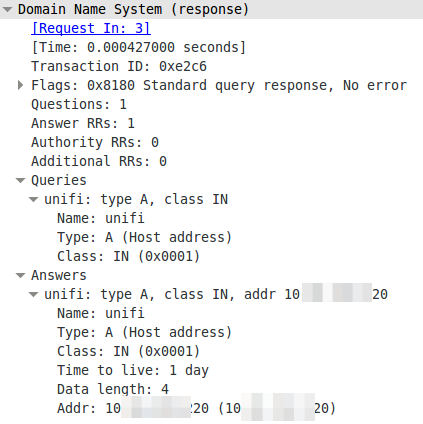
The DNS server is lower casing the answers. This seams to break it. So I searched more into the topic why the Unifi UAPs are using the case randomizing in the first place and where the blame lies for this not working. Unifi UAPs started to use randomize-case in the DNS lookup with Version 2.4.6 (the current stable version) as a security feature, which is named dns0x20 and described in this RFC draft (called Use of Bit 0x20 in DNS Labels to Improve Transaction Identity). From the abstract:
The small (16-bit) size of the DNS transaction ID has made it a frequent target for forgery, with the unhappy result of many cache pollution vulnerabilities demonstrated throughout Internet history. Even with perfectly and unpredictably random transaction ID’s, random and birthday attacks are still theoretically feasible. This document describes a method by which an initiator can improve transaction identity using the 0x20 bit in DNS labels.
The RFC draft states that further:
In practice, all question sections in responses are exact copies of question sections from requests, even if the zone data and answer section owner names differ in their uppercase/lowercase attributes from the question section. So while it is theoretically possible for a request’s question section to contain the name “www.ietf.org” and a response’s question section to contain the name “WWW.IETF.ORG”, this has not been observed, and might not even work reliably.
I guess we found one DNS server, which handles that differently. So Unifi UAPs are using a draft version of a RFC to make it more secure and Mikrotik RouterOS is one of the few it does not work with. It works with the Linux standard DNS server bind. So who to blame? its not that easy. Anyway I made a feature request to Mikrotik because returning the correct query does not break anything and more security with DNS is always good idea.
ps: I switched to the DHCP option for getting the UAPs to work with the RouterOS DNS.
Update:
Just got following back from the Mikrotik support:
Hello,
that will be possible in RouterOS v7
Regards,
Janis Krumins
Powered by WordPress
Entries and comments feeds.
Valid XHTML and CSS.
55 queries. 0.078 seconds.