Howto force scheduled DSL reconnects on Mikrotik routers
November 10, 2012
In my last blog post I have shown how to connect to a PPPoA provider with a Mikrotik router and get the public IP address on the router. I also mentioned that my provider has the bad habit of disconnecting every 8h. As thats not exactly 8h, it tends to wander, but I want at least always the same times. This blog post shows you how to do that if you want the same.
What the script basically does is to force a reconnect at a given time once a day. First we need to make sure that we’ve the correct time on the router. The simplest way to do that is following line:
/system ntp client set enabled=yes mode=unicast primary-ntp=91.189.94.4
But you can only use an IP address there, if you want DNS names take a look hat this script. Also verify that you’ve configured the correct time zone with this command:
/system clock set time-zone-name=Europe/Vienna
Verify the current time with
[admin@MikroTik] > /system clock print

time: 20:56:44

date: nov/04/2012

time-zone-name: Europe/Vienna

gmt-offset: +01:00

dst-active: no
Now we need to write the script, which we to in 2 steps. First we create the script ….
/system script add name=scriptForcedDslReconnect source=""
… than we open it in the editor and add the actual code
[admin@MikroTik] > /system script edit 0

value-name: source
After this you get an editor and just copy and paste following lines:
/interface pptp-client set [find name="pptpDslInternet"] disabled=yes

/interface pptp-client set [find name="pptpDslInternet"] disabled=no

/log info message="pptpDslInternet forced reconnect. Done!"
and press CRTL-O. You can now check if all is correct with (everything should be colored in the script)
/system script print
Now we only need to add it to the scheduler
/system scheduler add name=schedularForcedDslReconnect start-time=00:40:00 interval=24h on-event=scriptForcedDslReconnect
And we’re done, it will disconnect always at 00:40, 8:40, 16:40 … as we wanted.
Howto use a Mikrotik as router for a PPPoA DSL Internet connection
November 4, 2012
I live in Austria and the biggest Internet provider is A1 Telekom Austria and they use PPPoA and not PPPoE. I’ve searched through out the Internet to find some documentation on how to configure a Mikrotik router for this. I wanted to have the public IP address on the Mikrotik and not on the provider router/modem. I did not find any documentation. But as I got it working I’ll provide such a documentation now. 😉
1. The Basics
PPPoA is the abbreviation for PPP over ATM or some say PPP over AAL5 and it is used to encapsulate PPP into ATM cells to get into the Internet via ADSL connections. The more commonly used standard in this space is PPPoE (PPP over Ethernet), but which has somewhat more overhead as you need also to encapsulate the Ethernet header too.
There are now two possibilities:
The first is that the provider modem/router handles everything and you get only a private IP address behind the router, and the router masquerade the private IP addresses. This is normally the default as it works for 95% of the customers but your PC or own router does not get a public IP address. You need to use port forwarding if you want to provide services which are reachable from the Internet. And something which I specially need. You don’t get a event when you get disconnected and assigned a new IP address. A1 Telekom Austria has the bad habit to disconnect you every 8 hours … 3 times a day. As I want to have the disconnects always at the same time I need my own router to time it once a day, so it gets reseted to my desired reconnect times.
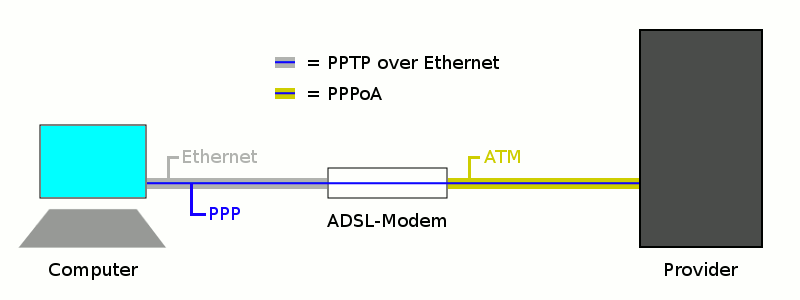
The second way it to get somehow the public IP address on the PC or router. In this case your need a provider modem/router with a PPPoA-to-PPTP-Relays. Take a look at the picture I took from the German Wikipedia(CC-BY-SA-3.0, Author Sonos):
The computer (or Mikrotik router) thinks it establishes a PPTP tunnel with the modem, but instead the modem encapsulates the packets and send them on via ATM to the provider backbone. So the computer or Miktrotik router does not need to be able to talk PPPoA it is enough if it is able to talk PPTP, the rest is handled by the modem.
2. Requirements
But of course there are some requirements:
- The provider modem needs to be able to make a PPPoA-to-PPTP-Relays and which is important you need to be able to configure it, as some provider firmwares restrict that.
- You need to know the username and password which is used for the ppp authentication
- And for the sake of completeness – you need a Mikrotik router 😉
3. Provider modem / router
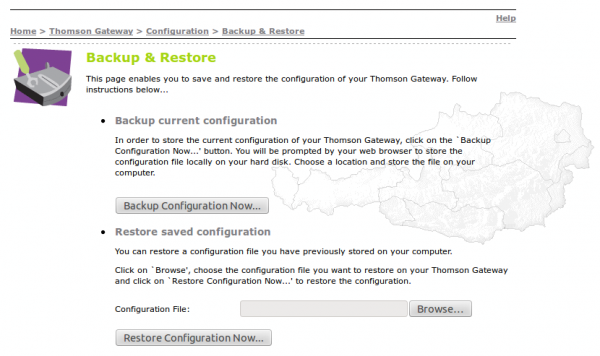
My provider gave me a Thomson Speedtouch TG585 v7 modem/router. The firmware is old (8.2.1.5) and branded but I was able to upload a new configuration via the web interface.
And as it works stable I did not see a reason to upgrade. I found in the Internet a INI file, which configured the router to PPPoA-to-PPTP-Relays mode. Three important notes:
- If you search the Internet for a configuration file … look for “single user” or “single user mode” (SU), the masquerade mode is called “multi user mode” (MU)
- It is also possible to configure the single user mode via telnet, there are some howto’s out there. The specific ones for Austria are of course in German.
- The version numbering is quite broken. The A1 Telekom Austria branded firmwares are often higher (e.g. 8.6.9.0) than the newer generic firmwares (e.g 8.2.6.5_AA).
After configuring the router as PPPoA-to-PPTP-Relays it has the IP address 10.0.0.138/24 for my setup.
4. Mikrotik PPP configuration
So now to the Mikrotik configuration … we start with resetting the configuration with no defaults.
/system reset-configuration no-defaults=yes
Then we rename the first interface and add a transit network IP address
/interface ethernet set 0 name=ether1vlanTransitModem

/ip address add address=10.0.0.1/24 interface=ether1vlanTransitModem
And now we only need to configure the PPTP
/ppp profile add change-tcp-mss=yes name=pppProfileDslInternet use-compression=no use-encryption=no use-vj-compression=no

/interface pptp-client add add-default-route=yes connect-to=10.0.0.138 disabled=no name=pptpDslInternet password=YourPassword profile=pppProfileDslInternet user=YourUsername
this configuration should lead after connecting the ether1 with the modem to following log entries:
[admin@MikroTik] > /log/print

00:29:03 pptp,ppp,info pptpDslInternet: initializing...

00:29:03 pptp,ppp,info pptpDslInternet: dialing...

00:29:05 pptp,ppp,info pptpDslInternet: authenticated

00:29:05 pptp,ppp,info pptpDslInternet: connected
you should see the IP address too:
[admin@MikroTik] > /ip route print

Flags: X - disabled, A - active, D - dynamic, C - connect, S - static, r - rip, b - bgp, o - ospf, m - mme, B - blackhole, U - unreachable, P - prohibit

#      DST-ADDRESS        PREF-SRC        GATEWAY            DISTANCE

0 ADS  0.0.0.0/0                         xxx.xxx.xxx.xxx            1

1 ADC  10.0.0.0/24        10.0.0.1        ether1vlanTrans...        0

2 ADC  xxx.xxx.xxx.xxx/32   yyy.yyy.yyy.yyy   pptpDslInternet           0
But if you try to ping something you’ll get
[admin@MikroTik] > ping 8.8.8.8

HOST                                     SIZE TTL TIME  STATUS

8.8.8.8                                                 timeout

8.8.8.8                                                 timeout

sent=2 received=0 packet-loss=100%
whats the problem? the router uses the wrong source IP address, try following (the xxx.xxx.xxx.xxx is the IP address from /ip route print (entry 2) )
[admin@MikroTik] > /ping src-address=xxx.xxx.xxx.xxx 8.8.8.8

HOST                                     SIZE TTL TIME  STATUS

8.8.8.8                                    56  46 37ms

8.8.8.8                                    56  46 36ms

8.8.8.8                                    56  46 37ms

8.8.8.8                                    56  46 37ms

8.8.8.8                                    56  46 37ms

8.8.8.8                                    56  46 37ms

sent=6 received=6 packet-loss=0% min-rtt=36ms avg-rtt=36ms max-rtt=37ms
Now the Internet connection is working, we just need to make it usable ….
5. Mikrotik on the way to be usable
The first thing we need is a masquerade rule that we use the correct IP address into the Internet, following does the trick.
/ip firewall nat add action=masquerade chain=srcnat out-interface=pptpDslInternet
But we want also a client to test it … so here is the configuration I use for the clients (without explanation as it is not the topic of this Howto)
/interface ethernet set 2 name=ether3vlanClients

/ip address add address=10.23.23.1/24 interface=ether3vlanClients
/ip dns set allow-remote-requests=yes servers=8.8.8.8,8.8.4.4

/ip dns static add address=10.23.23.1 name=router.int
/ip pool add name=poolClients ranges=10.23.23.20-10.23.23.250

/ip dhcp-server add address-pool=poolClients authoritative=yes disabled=no interface=ether3vlanClients name=dhcpClients

/ip dhcp-server network add address=10.23.23.0/24 dns-server=10.23.23.1 domain=int gateway=10.23.23.1
Connect a client behind it, set it to DHCP and everything should work. I hope this Howto demystifies PPPoA and Mirkotik.
Howto get Ubiquiti AirView running under Ubuntu 12.04
September 9, 2012
Ubiquiti AirView is a spectrum analyzer for the 2.4GHz band, which is sadly End-of-Life, but you can still get it from various online stores. Why would you get such a product? Because it is much much cheaper (around 70 Eur) than the other spectrum analyzers I found on the net and its software runs under Linux. This short howto shows you, how to get it running under Ubuntu 12.04.
First you need to install openjdk-7-jre with following command:
apt-get install openjdk-7-jre
Than you need check which java version is the default one:
$ java -version

java version "1.6.0_24"
As in this case it is the wrong one … change it following command:
$ sudo update-alternatives --config java

There are 2 choices for the alternative java (providing /usr/bin/java).
Selection    Path                                           Priority   Status

------------------------------------------------------------

* 0            /usr/lib/jvm/java-6-openjdk-i386/jre/bin/java   1061      auto mode

1            /usr/lib/jvm/java-6-openjdk-i386/jre/bin/java   1061      manual mode

2            /usr/lib/jvm/java-7-openjdk-i386/jre/bin/java   1051      manual mode
Press enter to keep the current choice[*], or type selection number: 2

update-alternatives: using /usr/lib/jvm/java-7-openjdk-i386/jre/bin/java to provide /usr/bin/java (java) in manual mode.
As you see I’ve have chosen 2 and the check confirms it:
$ java -version

java version "1.7.0_03"

OpenJDK Runtime Environment (IcedTea7 2.1.1pre) (7~u3-2.1.1~pre1-1ubuntu3)

OpenJDK Server VM (build 22.0-b10, mixed mode)
Now you just need to to download, extract and run the software (don’t forget to insert the AirView into the USB port ;-):
wget http://www.ubnt.com/airview/download/AirView-Spectrum-Analyzer-v1.0.12.tar.gz

tar xzf AirView-Spectrum-Analyzer-v1.0.12.tar.gz

cd AirView-Spectrum-Analyzer-v1.0.12/

./airview.sh
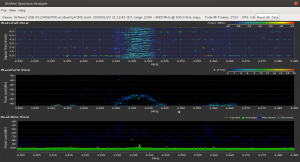
Following screenshot shows it running on my system. I’ve switched to “waterfall view” in the settings. Click onto it to see the unscaled version:
Solution for “perl: warning: Setting locale failed”
September 6, 2012
Sometimes I come across Debian or Ubuntu Systems which report following error e.g. during installing new packages:
perl: warning: Setting locale failed.

perl: warning: Please check that your locale settings:

        LANGUAGE = (unset),

        LC_ALL = (unset),

        LC_PAPER = "de_AT.UTF-8",

        LC_ADDRESS = "de_AT.UTF-8",

        LC_MONETARY = "de_AT.UTF-8",

        LC_NUMERIC = "de_AT.UTF-8",

        LC_TELEPHONE = "de_AT.UTF-8",

        LC_MEASUREMENT = "de_AT.UTF-8",

        LC_TIME = "de_AT.UTF-8",

        LC_NAME = "de_AT.UTF-8",

        LANG = "en_US.UTF-8"

    are supported and installed on your system.

perl: warning: Falling back to the standard locale ("C").

locale: Cannot set LC_ALL to default locale: No such file or directory
In this special case it is complaining about de_AT.UTF-8, as the system is setup with German / Austria. To solve this you need to do following:
# locale-gen en_US en_US.UTF-8 de_AT.UTF-8

Generating locales...

  de_AT.UTF-8... done

  en_US.ISO-8859-1... done

  en_US.UTF-8... up-to-date

Generation complete.
Important: Replace de_AT.UTF-8 with the language it is complaining about. If you just copy’n’past it will not work, if you’re not from Austria. 😉
After this call:
# dpkg-reconfigure locales

Generating locales...

  de_AT.UTF-8... up-to-date

  en_US.ISO-8859-1... up-to-date

  en_US.UTF-8... up-to-date

Generation complete.
and it should work again.
Howto install Adobe Digital Editions on Ubuntu 12.04 and use it with an e-book reader
June 3, 2012
A local public library here in Tirol/Austria allows you to rent e-books, you only need to have Windows PC or Mac to run Adobe Digital Editions – at least that is stated on their homepage, but it is quite easy to get the software running on an Ubuntu 12.04.
This is a short description on how to install the software and than integrate a generic e-book reader so you can read the rented e-books on your e-book reader. The e-book reader just needs to presents itself a USB mass storage device. I’ve tried it with an Iriver Story HD and an old Sony PRS-505 – both work. I guess the e-book reader needs to be Adobe Digital Editions ready as both of mine show that during boot up.
Anyway lets start. First you need to start the Ubuntu Software Center and search for the meta package “wine” and install it.
Than you need to download the Adobe Digital Editions Installer for Windows. I provide here a direct link (hope it stays valid for a long time) as on the Adobe homepage you don’t get the download link as it “verifies” with Flash if your OS is supported which it is not in this case. So here is the link.
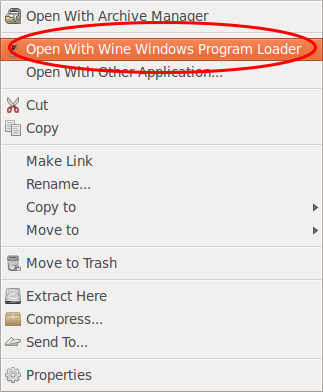
Start now your file browser (Nautilus) press the right mouse bottom on the installer and select than “Open With Wine Windows Program Loader”.
After some seconds you are within the installer. I would say just press “Next” as the software is installed anyway within the .wine subdirectory in your home directory.
Now the Adobe Digital Editions got started and greets you with following window.
And after a next click you need to select “Authorize Computer” if you want later to connect an e-book reader.
Just click on “get an Adobe ID online” and your default browser is launched and you can create one.
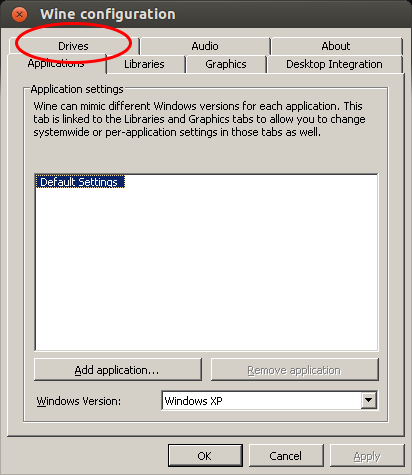
The Adobe Digital Editions is running but it does not see the e-book reader. For this we need to start the program “Wine Configuration” (Just type “wine” in the “Dash Home”), which looks like this:
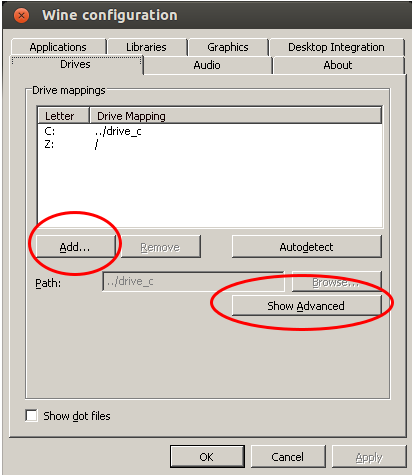
Go to the Drives tab where you need to add a new drive letter for your e-book reader (even if it shows it already with an other drive letter).
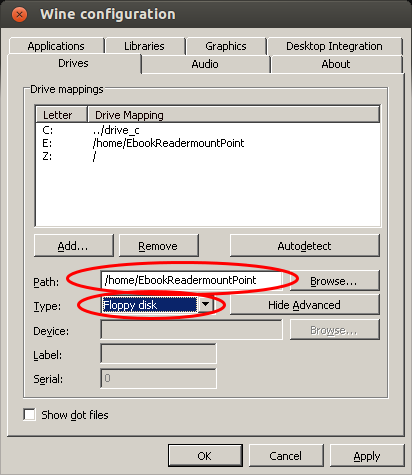
After choosing the drive letter select “Show Advanced” and choose the path of the mount point for your e-book reader (plug it into your computer and a directory within /media should be created automatically) and now the important setting: Change the type from automatic to “Floppy disk”.
Save the changes, and restart “Adobe Digital Editions” (Just close it and than type “adobe” in the “Dash Home” and select it). If your e-book reader is mounted in the specified directory, the e-book reader should be detected and its content shown or if you connected it the first time you will be asked to peer it.
The End!
FreeRADIUS and CRLs – Done the right way [Update]
May 28, 2012
Update: I changed the FreeRADIUS in-line CRL verification to an external program – running it now for several month at it works without restart of FreeRADIUS.
While I was implementing 802.1x EAP-TLS with FreeRADIUS I googled for documentation on how to implement Certificate Revocation Lists (CRL) in FreeRADIUS. The first text was in the eap.conf:
# Check the Certificate Revocation List

#

# 1) Copy CA certificates and CRLs to same directory.

# 2) Execute 'c_rehash '.

# 'c_rehash' is OpenSSL's command.

# 3) uncomment the line below.

# 5) Restart radiusd

check_crl = yes

CA_path = /etc/freeradius/certs/CA/
Which is basically correct, but it is so short on information that I googled on and found following posts:
- A solution where you need to combine the CA and the CRL in one File (and you need to restart FreeRADIUS to reload the CRL)
- Also ignoring the c_rehash stuff and using a variable crl_file (and I guess, as in this case as didn’t try it, restart FreeRADIUS to reload the CRL)
Both where not the solution I needed as I didn’t want to restart FreeRADIUS all the time and I have multiple sub CAs. I than started googling for more information on c_rehash, as the version on RHEL5/CentOS5/SL5 don’t need to have a man page. Take a look at this online man page.
And just as info as it is not that clear which package has c_rehash: yum provides "*/c_rehash" --> yum install openssl-perl. Basically c_rehash needs to be provided a directory with .pem files in it (also the CRLs need to be name .pem) and it than creates symlinks with the hashes of the files as names. After I got a prototype working but before I wrote this blog, Erik Inge Bolso wrote this blog post describing the same thing.
You need at least FreeRADIUS 2.1.10 (shipped with Centos/RHEL 5 (inc. updates) and later) for this solution to work.
After I got the prototype working I wrote a script which does download multiple CRLs, converts them from DER (e.g. used by Windows CAs) to PEM, verifies them and than uses c_rehash to hash them for FreeRadius. You need to do following steps to get it working for you.
- Create some directories
mkdir /var/tmp/cacheCRLs

mdir /etc/pki/crl/
- download this script cacheCRLs4FreeRadius.py to /usr/local/sbin/
cd /usr/local/sbin/

wget http://robert.penz.name/wp-content/uploads/2012/05/cacheCRLs4FreeRadius.py
- edit
/usr/local/sbin/cacheCRLs4FreeRadius.pyand change the URLs and names to your CAs - run
/usr/local/sbin/cacheCRLs4FreeRadius.py, no output means no error and check the content of/etc/pki/crl/ - check that your radius config contains following and restart FreeRADIUS after the change
# we're using our own code for checking the CRL

# check_crl = yes

CA_path = /etc/pki/crl/

....

tls {

....

verify {

tmpdir = /var/tmp/radiusd

client = "/usr/local/sbin/checkcert.sh ${..CA_path} %{TLS-Client-Cert-Filename}"

}

}
/usr/local/sbin/checkcert.sh should contain following
#!/bin/sh
output=`/usr/bin/openssl verify -CApath $1 -crl_check $2`if [ -n "`echo $output | /bin/grep error`" ]; then
RC=1
else
RC=0
fi
echo $output
exit $RC
- If you need more performance replace the shell script a C program, as this program is started at every authentication request.
- Try to authenticate with an revoked certificate and you should get following. If you’re running FreeRADIUS with -X you should see following (this log looks a little bit different when using the external program, which is the method I’m using now) :
[eap] Request found, released from the list

[eap] EAP/tls

[eap] processing type tls

[tls] Authenticate

[tls] processing EAP-TLS

[tls] eaptls_verify returned 7

[tls] Done initial handshake

[tls] < << TLS 1.0 Handshake [length 05f8], Certificate --> verify error:num=23:certificate revoked

[tls] >>> TLS 1.0 Alert [length 0002], fatal certificate_revoked

TLS Alert write:fatal:certificate revoked

TLS_accept: error in SSLv3 read client certificate B

rlm_eap: SSL error error:140890B2:SSL routines:SSL3_GET_CLIENT_CERTIFICATE:no certificate returned

SSL: SSL_read failed in a system call (-1), TLS session fails.

TLS receive handshake failed during operation

[tls] eaptls_process returned 4

[eap] Handler failed in EAP/tls

[eap] Failed in EAP select
- run the script via cron in intervals that are required in your setup. e.g. once a day or once every hour
Howto enable SSH public key authentication on Ubiquiti AirOS (e.g. NanoStation2)
March 31, 2012
First you need to check if the ssh service is enabled and than you need to login and use following commands. First you need to make sure your home directory is the same as mine:
echo ~
should return /etc/persistent, which is used in this Howto. So lets start the actual work:
chmod 750 /etc/persistent/

cd /etc/persistent/

mkdir .ssh

chmod 700 .ssh
Type on the machine you want to be able to use for public key login:
cat ~/.ssh/id_dsa.pub | ssh [email protected] 'cat >> /etc/persistent/.ssh/authorized_keys'
Now you should be able to login like this
ssh [email protected]
without a password. If so you need to make sure that it stays so even after a reboot:
cfgmtd -w -p /etc/
Type reboot to test it!
Howto setup a haproxy as fault tolerant / high available load balancer for multiple caching web proxies on RHEL/Centos/SL
February 12, 2012
As I didn’t find much documentation on the topic of setting up a load balancer for multiple caching web proxies, specially in a high availability way on common Linux enterprise distributions I sat down and wrote this howto.
If you’re working at a large organization, one web proxy will not be able to handle the whole load and you’ll also like some redundancy in case one proxy fails. A common setup is in this case to use the pac file to tell the client to use different proxies, for example one for .com addresses and one for all others, or a random value for each page request. Others use DNS round robin to balance the load between the proxies. In both cases you can remove one proxy node from the wheel for maintenances or of it goes down. But thats not done withing seconds and automatically. This howto will show you how to setup a haproxy with corosync and pacemaker on RHEL6, Centos6 or SL6 as TCP load balancer for multiple HTTP proxies, which does exactly that. It will be high available by itself and also recognize if one proxy does not accept connections anymore and will remove it automatically from the load balancing until it is back in operation.
The Setup
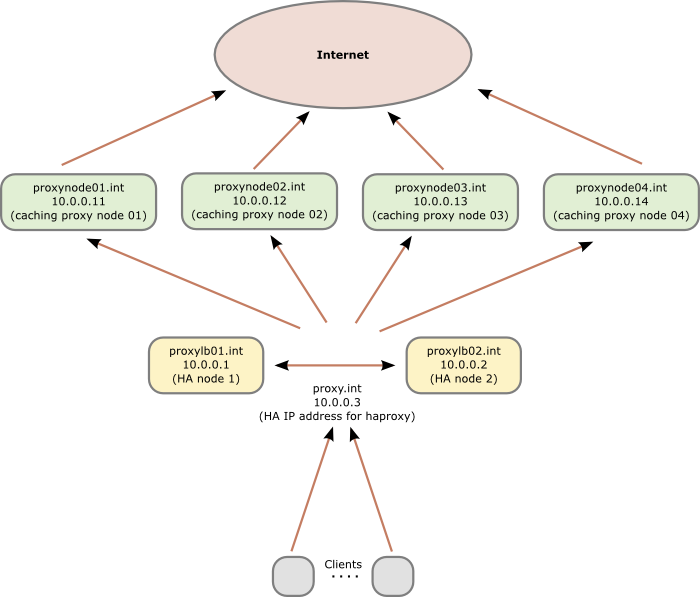
As many organizations will have appliances (which do much more than just caching the web) as their web proxies, I will show a setup with two additional servers (can be virtual or physical) which are used as load balancer. If you in your organization have normal Linux server as your web proxies you can of course use two or more also as load balancer nodes.
Following diagram shows the principle setup and the IP addresses and hostnames used in this howto:
Preconditions
As the proxies and therefore the load balancer are normally in the external DMZ we care about security and therefore we’ll check that Selinux is activated. The whole setup will run with SeLinux actived without changing anything. For this we take a look at /etc/sysconfig/selinux and verify that SELINUX is set to enforcing. Change it if not and reboot. You should also install some packages with
yum install setroubleshoot setools-console
and make sure all is running with
[root@proxylb01/02 ~]# sestatus

SELinux status: enabled

SELinuxfs mount: /selinux

Current mode: enforcing

Mode from config file: enforcing

Policy version: 24

Policy from config file: targeted
and
[root@proxylb01/02 ~]# /etc/init.d/auditd status

auditd (pid 1047) is running...
on both nodes. After this we make sure that our own host names are in the hosts files for security reasons and if the the DNS servers go down. The /etc/hosts file on both nodes should contain following:
10.0.0.1 proxylb01 proxylb01.int

10.0.0.2 proxylb02 proxylb02.int

10.0.0.3 proxy proxy.int
Software Installation and corosync setup
We need to add some additional repositories to get the required software. The package for haproxy is in the EPEL repositories. corosync and pacemaker are shipped as part of the distribution in Centos 6 and Scientific Linux 6, but you need the High Availability Addon for RHEL6 to get the packages.
Install all the software we need with
[root@proxylb01/02 ~]# yum install pacemaker haproxy

[root@proxylb01/02 ~]# chkconfig corosync on

[root@proxylb01/02 ~]# chkconfig pacemaker on
We use the example corsync config as starting point:
[root@proxylb01/02 ~]# cp /etc/corosync/corosync.conf.example /etc/corosync/corosync.conf
And we add following lines after the version definition line:
# How long before declaring a token lost (ms)

token: 5000
# How many token retransmits before forming a new configuration

token_retransmits_before_loss_const: 20
# How long to wait for join messages in the membership protocol (ms)

join: 1000
# How long to wait for consensus to be achieved before starting a new round of membership configuration (ms)

consensus: 7500
# Turn off the virtual synchrony filter

vsftype: none
# Number of messages that may be sent by one processor on receipt of the token

max_messages: 20
These values make the switching slower than default, but less trigger happy. This is required in my case as we’ve the machines running in VMware, where we use the snapshot feature to make backups and also move the VMware instances around. In both cases we’ve seen timeouts under high load of up to 4 seconds, normally 1-2 seconds.
Some lines later we’ve define the interfaces:
interface {

member {

memberaddr: 10.0.0.1

}

member {

memberaddr: 10.0.0.2

}

ringnumber: 0

bindnetaddr: 10.0.0.0

mcastport: 5405

ttl: 1

}

transport: udpu
We use the new unicast feature introduced in RHEL 6.2, if you’ve an older version you need to use the multicast method. Of course you can use the multicast method also with 6.2 and higher, I just didn’t see the purpose of it for 2 nodes. The configuration file /etc/corosync/corosync.conf is the same on both nodes so you can copy it.
Now we need to define pacemaker as our resource handler with following command:
[root@proxylb01/02 ~]# cat < <-END >>/etc/corosync/service.d/pcmk

service {

# Load the Pacemaker Cluster Resource Manager

name: pacemaker

ver: 1

}

END
Now we’ve ready to test-fly it and …
[root@proxylb01/02 ~]# /etc/init.d/corosync start
… do some error checking …
[root@proxylb01/02 ~]# grep -e "corosync.*network interface" -e "Corosync Cluster Engine" -e "Successfully read main configuration file" /var/log/messages

Feb 10 11:03:20 proxylb01/02 corosync[1691]: [MAIN ] Corosync Cluster Engine ('1.2.3'): started and ready to provide service.

Feb 10 11:03:20 proxylb01/02 corosync[1691]: [MAIN ] Successfully read main configuration file '/etc/corosync/corosync.conf'.

Feb 10 11:03:21 proxylb01/02 corosync[1691]: [TOTEM ] The network interface [10.0.0.1/2] is now up.
… and some more.
[root@proxylb01/02 ~]# grep TOTEM /var/log/messages

Feb 10 11:03:20 proxylb01/02 corosync[1691]: [TOTEM ] Initializing transport (UDP/IP Unicast).

Feb 10 11:03:20 proxylb01/02 corosync[1691]: [TOTEM ] Initializing transmit/receive security: libtomcrypt SOBER128/SHA1HMAC (mode 0).

Feb 10 11:03:21 proxylb01/02 corosync[1691]: [TOTEM ] The network interface [10.0.0.1/2] is now up.

Feb 10 11:03:21 proxylb01/02 corosync[1691]: [TOTEM ] A processor joined or left the membership and a new membership was formed.

Feb 10 11:03:21 proxylb01/02 corosync[1691]: [TOTEM ] A processor joined or left the membership and a new membership was formed.
Pacemaker setup
Now we need to check Pacemaker …
[root@proxylb01/02 ~]# grep pcmk_startup /var/log/messages

Feb 10 11:03:21 proxylb01/02 corosync[1691]: [pcmk ] info: pcmk_startup: CRM: Initialized

Feb 10 11:03:21 proxylb01/02 corosync[1691]: [pcmk ] Logging: Initialized pcmk_startup

Feb 10 11:03:21 proxylb01/02 corosync[1691]: [pcmk ] info: pcmk_startup: Maximum core file size is: 18446744073709551615

Feb 10 11:03:21 proxylb01/02 corosync[1691]: [pcmk ] info: pcmk_startup: Service: 10

Feb 10 11:03:21 proxylb01/02 corosync[1691]: [pcmk ] info: pcmk_startup: Local hostname: proxylb01/02.int
… and start it …
[root@proxylb01/02 ~]# /etc/init.d/pacemaker start

Starting Pacemaker Cluster Manager: [ OK ]
… and do some more error checking:
[root@proxylb01/02 ~]# grep -e pacemakerd.*get_config_opt -e pacemakerd.*start_child -e "Starting Pacemaker" /var/log/messages

Feb 10 11:05:41 proxylb01/02 pacemakerd: [1709]: info: get_config_opt: Found 'pacemaker' for option: name

Feb 10 11:05:41 proxylb01/02 pacemakerd: [1709]: info: get_config_opt: Found '1' for option: ver

Feb 10 11:05:41 proxylb01/02 pacemakerd: [1709]: info: get_config_opt: Defaulting to 'no' for option: use_logd

Feb 10 11:05:41 proxylb01/02 pacemakerd: [1709]: info: get_config_opt: Defaulting to 'no' for option: use_mgmtd

Feb 10 11:05:41 proxylb01/02 pacemakerd: [1709]: info: get_config_opt: Found 'off' for option: debug

Feb 10 11:05:41 proxylb01/02 pacemakerd: [1709]: info: get_config_opt: Found 'yes' for option: to_logfile

Feb 10 11:05:41 proxylb01/02 pacemakerd: [1709]: info: get_config_opt: Found '/var/log/cluster/corosync.log' for option: logfile

Feb 10 11:05:41 proxylb01/02 pacemakerd: [1709]: info: get_config_opt: Found 'yes' for option: to_syslog

Feb 10 11:05:41 proxylb01/02 pacemakerd: [1709]: info: get_config_opt: Defaulting to 'daemon' for option: syslog_facility

Feb 10 11:05:41 proxylb01/02 pacemakerd: [1711]: info: main: Starting Pacemaker 1.1.5-5.el6 (Build: 01e86afaaa6d4a8c4836f68df80ababd6ca3902f): manpages docbook-manpages publican ncurses cman cs-quorum corosync snmp libesmtp

Feb 10 11:05:41 proxylb01/02 pacemakerd: [1711]: info: start_child: Forked child 1715 for process stonith-ng

Feb 10 11:05:41 proxylb01/02 pacemakerd: [1711]: info: start_child: Forked child 1716 for process cib

Feb 10 11:05:41 proxylb01/02 pacemakerd: [1711]: info: start_child: Forked child 1717 for process lrmd

Feb 10 11:05:41 proxylb01/02 pacemakerd: [1711]: info: start_child: Forked child 1718 for process attrd

Feb 10 11:05:41 proxylb01/02 pacemakerd: [1711]: info: start_child: Forked child 1719 for process pengine

Feb 10 11:05:41 proxylb01/02 pacemakerd: [1711]: info: start_child: Forked child 1720 for process crmd
We should also make sure that the process is running …
[root@proxylb01/02 ~]# ps axf | grep pacemakerd

6560 pts/0 S 0:00 pacemakerd

6564 ? Ss 0:00 \_ /usr/lib64/heartbeat/stonithd

6565 ? Ss 0:00 \_ /usr/lib64/heartbeat/cib

6566 ? Ss 0:00 \_ /usr/lib64/heartbeat/lrmd

6567 ? Ss 0:00 \_ /usr/lib64/heartbeat/attrd

6568 ? Ss 0:00 \_ /usr/lib64/heartbeat/pengine

6569 ? Ss 0:00 \_ /usr/lib64/heartbeat/crmd
and as a last check, take a look if there is any error message in the /var/log/messages with
[root@proxylb01/02 ~]# grep ERROR: /var/log/messages | grep -v unpack_resources
which should return nothing.
cluster configuration
We’ll change into the cluster configuration and administration CLI with the command crm and check the default configuration, which should look like this:
crm(live)# configure show

node proxylb01.int

node proxylb02.int

property $id="cib-bootstrap-options" \

dc-version="1.1.5-5.el6-01e86afaaa6d4a8c4836f68df80ababd6ca3902f" \

cluster-infrastructure="openais" \

expected-quorum-votes="2"

crm(live)# bye
And if we call following:
[root@proxylb01/02 ~]# crm_verify -L

crm_verify[1770]: 2012/02/10_11:08:22 ERROR: unpack_resources: Resource start-up disabled since no STONITH resources have been defined

crm_verify[1770]: 2012/02/10_11:08:22 ERROR: unpack_resources: Either configure some or disable STONITH with the stonith-enabled option

crm_verify[1770]: 2012/02/10_11:08:22 ERROR: unpack_resources: NOTE: Clusters with shared data need STONITH to ensure data integrity

Errors found during check: config not valid

-V may provide more details
We see that STONITH, has not been configurated, but we don’t need it as we have no filesystem or database running which could go corrupt, so we disable it.
[root@proxylb01/02 ~]# crm configure property stonith-enabled=false

[root@proxylb01/02 ~]# crm_verify -L
Now we download the OCF script for haproxy
[root@proxylb01/02 ~]# wget -O /usr/lib/ocf/resource.d/heartbeat/haproxy http://github.com/russki/cluster-agents/raw/master/haproxy

[root@proxylb01/02 ~]# chmod 755 /usr/lib/ocf/resource.d/heartbeat/haproxy
After this we’re ready to configure the cluster with following commands:
[root@wgwlb01 ~]# crm

crm(live)# configure

crm(live)configure# primitive haproxyIP03 ocf:heartbeat:IPaddr2 params ip=10.0.0.3 cidr_netmask=32 op monitor interval=5s

crm(live)configure# group haproxyIPs haproxyIP03 meta ordered=false

crm(live)configure# property no-quorum-policy=ignore

crm(live)configure# primitive haproxyLB ocf:heartbeat:haproxy params conffile=/etc/haproxy/haproxy.cfg op monitor interval=30s

crm(live)configure# colocation haproxyWithIPs INFINITY: haproxyLB haproxyIPs

crm(live)configure# order haproxyAfterIPs mandatory: haproxyIPs haproxyLB

crm(live)configure# commit
These commands added the floating IP address to the cluster and than we created an group of IP addresses in case we later need more than one. We than defined that we need no quorum and added the haproxy to the mix and we made sure that the haproxy and its IP address is always on the same node and that the IP address is brought up before haproxy is.
Now the cluster setup is done and you should see the haproxy running on one node with crm_mon -1.
haproxy configuration
We now only need to setup haproxy, which is done by configurating following file: /etc/haproxy/haproxy.cfg
We make sure that haproxy is sending logfiles by having following in the global section
log 127.0.0.1 local2 notice
and set maxconn 8000 (or more if you need more). The defaults sections looks following in my setup:
log global

# 30 minutes of waiting for a web request is crazy,

# but some users do it, and then complain the proxy

# broke the interwebs.

timeout client 30m

timeout server 30m

# If the server doesnt respond in 4 seconds its dead

timeout connect 4s
And now the actual load balancer configuration
listen http_proxy 10.0.0.3:3128

mode tcp

balance roundrobin

server proxynode01 10.0.0.11 check

server proxynode02 10.0.0.12 check

server proxynode03 10.0.0.13 check

server proxynode04 10.0.0.14 check
If your caches have public IP addresses and are not natted to one outgoing IP address, you may wish to change the balance algorithm to source. Some web applications get confused when a client’s IP address changes between requests. Using balance source load balances clients across all web proxies, but once a client is assigned to a specific proxy, it continues to use that proxy.
And we would like to see some stats so we configure following:
listen statslb01/02 :8080 # choose different names for the 2 nodes

mode http

stats enable

stats hide-version

stats realm Haproxy\ Statistics

stats uri /

stats auth admin:xxxxxxxxx
rsyslog setup
haproxy does not write its own log files, so we need to configure rsyslog for this. We add following to the MODULES configuration in /etc/rsyslog.conf
$ModLoad imudp.so

$UDPServerRun 514

$UDPServerAddress 127.0.0.1
and following to the RULES section.
local2.* /var/log/haproxy.log
and at last we do a configuration reload for haproxy with
[root@wgwlb01 ~]# /etc/init.d/haproxy reload
After all this work, you should have a working high availability haproxy setup for your proxies. If you have any comments please don’t hesitate to write a comment!
Howto fix W: GPG error: http://ppa.launchpad.net oneiric Release: The following signatures were invalid: BADSIG C2518248EEA14886 Launchpad?
January 20, 2012
Today I ran into the problem that my Ubuntu 11.10 (Oneiric) show following error message while trying apt-get update:
Fetched 16.3 MB in 34s (473 kB/s)
Reading package lists... Done

W: GPG error: http://ppa.launchpad.net oneiric Release: The following signatures were invalid: BADSIG C2518248EEA14886 Launchpad VLC

W: A error occurred during the signature verification. The repository is not updated and the previous index files will be used. GPG error: http://extras.ubuntu.com oneiric Release: The following signatures were invalid: BADSIG 16126D3A3E5C1192 Ubuntu Extras Archive Automatic Signing Key
W: Failed to fetch http://extras.ubuntu.com/ubuntu/dists/oneiric/Release
W: Some index files failed to download. They have been ignored, or old ones used instead.
I did following to fix it. Maybe it helps you too.
apt-get clean

cd /var/lib/apt

mv lists lists.old

mkdir -p lists/partial

apt-get clean

apt-get update
How to fix the font for virt-manager via X forwarding
December 24, 2011
I’ve installed the virt-manager on one of my servers (RHEL/Centos/SL) and tried to access the virt-manager via X forwarding but I just got following:
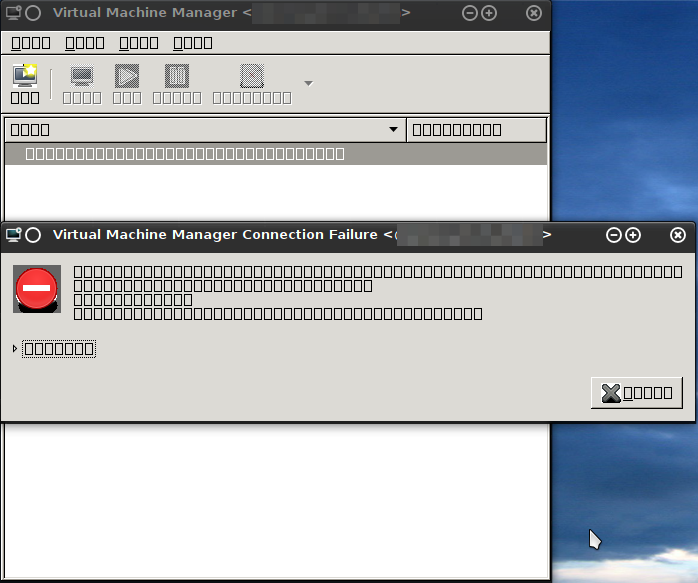
Other programs like xclock or xterm worked without problem .. after some searching and debugging I solved the problem with following command:
yum install dejavu-lgc-sans-fonts
Hope this solution spares someone-other some minutes. 😉
Powered by WordPress
Entries and comments feeds.
Valid XHTML and CSS.
40 queries. 0.070 seconds.


