
-

-

-

- Austria (27)
- General (16)
- HowTo (122)
- IT Security (129)
- Linux (127)
- Networking (65)
- Other (3)
-

- CDemu - a free, gpl cd/dvd-rom device emulator for linux
- heatpumpMonitor - Monitoring a Stiebel Eltron LWZ
- ignis backup tool - the heat-strengthened backup tool
-

- December 2021 (2)
- September 2019 (1)
- May 2019 (1)
- April 2019 (1)
- January 2019 (1)
- October 2018 (1)
- August 2018 (1)
- February 2018 (1)
- September 2017 (1)
- August 2017 (2)
- May 2017 (1)
- April 2017 (1)
- February 2017 (1)
- January 2017 (2)
- December 2016 (1)
- November 2016 (2)
- October 2016 (1)
- September 2016 (1)
- August 2016 (1)
- July 2016 (2)
- April 2016 (1)
- March 2016 (3)
- February 2016 (4)
- January 2016 (2)
- December 2015 (2)
- November 2015 (2)
- September 2015 (2)
- July 2015 (5)
- June 2015 (4)
- May 2015 (2)
- February 2015 (1)
- January 2015 (4)
- December 2014 (1)
- November 2014 (5)
- October 2014 (4)
- September 2014 (1)
- August 2014 (4)
- July 2014 (3)
- June 2014 (5)
- May 2014 (5)
- April 2014 (1)
- March 2014 (2)
- February 2014 (3)
- January 2014 (5)
- December 2013 (2)
- November 2013 (3)
- September 2013 (3)
- August 2013 (2)
- May 2013 (4)
- April 2013 (1)
- March 2013 (1)
- February 2013 (3)
- December 2012 (3)
- November 2012 (3)
- October 2012 (1)
- September 2012 (2)
- June 2012 (1)
- May 2012 (1)
- April 2012 (1)
- March 2012 (1)
- February 2012 (1)
- January 2012 (1)
- December 2011 (4)
- November 2011 (1)
- August 2011 (1)
- March 2011 (1)
- October 2010 (1)
- May 2010 (3)
- January 2010 (1)
- September 2009 (1)
- August 2009 (5)
- July 2009 (5)
- June 2009 (4)
- May 2009 (1)
- April 2009 (1)
- January 2009 (1)
- December 2008 (6)
- November 2008 (6)
- October 2008 (2)
- September 2008 (11)
- August 2008 (4)
- July 2008 (7)
- June 2008 (2)
- May 2008 (7)
- April 2008 (5)
- March 2008 (9)
- February 2008 (15)
- January 2008 (11)
- December 2007 (3)
Howto protect BGP router against DOS and injection attacks
September 17, 2016
It is good practice to configure an individual MD5 password for each BGP peer, but this is not enough. Why?
- Resource consumption attacks against TCP connections protected with MD5 as the router must verify the MD5 signature of packets it receives
- Many routers are based on Linux as there base operating system and there is a weakness which allows an attacker to insert arbitrary data into TCP connection. For more details click on this link.
The classical BGP TTL security is based on using a low TTL, generally 1, for single-hop BGP connections. The measure is effective in preventing a BGP connection from being established from a peer more than one hop away. Why? routers decrement the TTL when routing the packets and won’t route packets with a TTL of 1. So if your BGP session is a multi hop connection over one router a TTL of 2 makes sure the packet travels only over one router and not more. That sounds fine but has still has a drawback, as packets with a TTL of 1 are trivial to spoof, so rogue packets will still reach the router – leading to the problems described above.
GTSM (Global TTL Security Mechanism; RFC 5082, which obsolated RFC 3682) suggests the opposite approach. Instead of using a TTL value of 1, it suggests a value of 255 and discarding any packets received with have a TTL lower than 255 minus the hop count for this BGP session. Doing that an attacker is not able to perform the attack as the TTL gets decremented by every router (something the attacker can’t prevent). So setting the TTL on the router to 255 and having no multi hop BGP session allows to drop all packets on the receiving router which are lower than 255. This way only an attack in the same subnet is possible.
After the theory here the actual doing:
For Cisco routers is quite easy, just add ttl-security hops 1 (for a BGP session in the local subnet) to the peering config neighbor x.x.x.x command. For Mikrotik routers it is a little more complicated. For IPv4 connections configure following (should be default anyway):
/routing bgp peer set 0 ttl=255
For dropping incoming packets just use the firewall on the Mikrotik with a command like this:
/ip firewall filter add action=drop chain=input log=yes log-prefix="RFC 5082 block" src-address=xxx.xxx.xxx.xxx ttl=less-than:255
For IPv6 it is a little more complicated as setting the TTL for bgp peer configuration does have no effect (I’ve reported the bug already) but there is a simple workaround possible. Just use the mangle function of the firewall to set the correct hop count:
/ipv6 firewall mangle add action=change-hop-limit chain=output dst-address=xxx:xxx:xxx::xxx/128 new-hop-limit=set:255
Now you need only to filter the IPv6 packets:
/ipv6 firewall filter add action=drop chain=input log=yes log-prefix="RFC 5082 block" src-address=xxx:xxx:xxx::xxx/128 hop-limit=less-than:248
This configuration is quite easy and minimal invasive but should help a lot against attacks on your BGP routers.
Block Ransomware botnet C&C traffic with a Mikrotik router
March 14, 2016
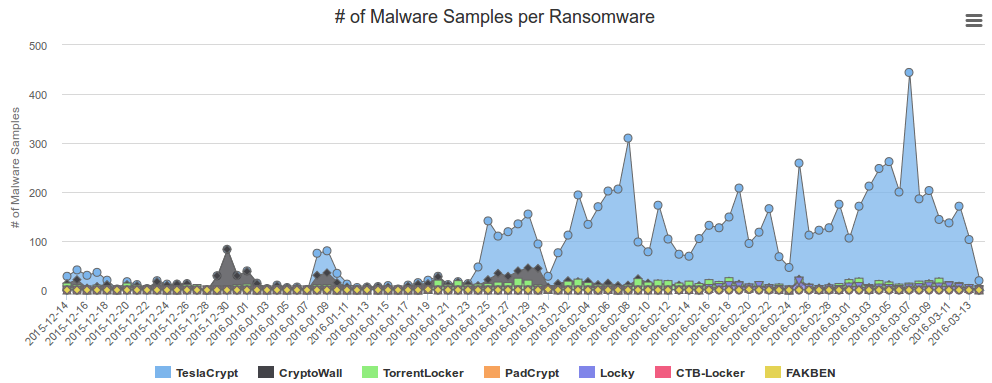
In my last blog post I wrote about blocking, detecting and mitigating the Locky Ransomware. I’ve referenced to a earlier blog post of mine which allows to block traffic to/from the Tor network. This blog post combines both – a way to block Ransomware botnet C&C traffic on a Mikrotik router. The base are the block lists from Abuse.ch, which also provide a nice statistic. Locky is not the most common Ransomware today.
Linux part
You need also a small Linux/Unix server to help. This server needs to be trustworthy one as the router executes a script this server generates. This is required as RouterOS is only able to parse text files up to 4096 by itself, and the IP address and domain list is longer.
So first we create the script /usr/local/sbin/generateMalwareBlockScripts.py on the Linux server by downloading following Python script. Open the file and change the paths to your liking. The filename path works on CentOS, on Ubuntu you need to remove the html directory. Now make the file executable
chmod 755 /usr/local/sbin/generateMalwareBlockScripts.py
and execute it
/usr/local/sbin/generateMalwareBlockScripts.py
No output is good. Make sure that the file is reachable via HTTP (e.g. install httpd on CentOS) from the router. If everything works make sure that the script is called once every hour to update the list. e.g. place a symlink in /etc/cron.hourly:
ln -s /usr/local/sbin/generateMalwareBlockScripts.py /etc/cron.hourly/generateMalwareBlockScripts.py
Mikrotik part
Copy and paste following to get the IP address script onto the router:
/system script

add name=scriptUpdateMalwareIPs owner=admin policy=ftp,reboot,read,write,policy,test,password,sniff,sensitive source="# Script which will download a script which adds the malware IP addresses to an address-list\

\n# Using a script to add this is required as RouterOS can only parse 4096 byte files, and the list is longer\

\n# Written by Robert Penz <[email protected]> \

\n# Released under GPL version 3\

\n\

\n# get the \"add script\"\

\n/tool fetch url=\"http://10.xxx.xxx.xxx/addMalwareIPs.rsc\" mode=http\

\n:log info \"Downloaded addMalwareIPs.rsc\"\

\n\

\n# remove the old entries\

\n/ip firewall address-list remove [/ip firewall address-list find list=addressListMalware]\

\n\

\n# import the new entries\

\n/import file-name=addMalwareIPs.rsc\

\n:log info \"Removed old IP addresses and added new ones\"\

\n"
and copy and paste following for the DNS filtering script – surely you can combine them … I let them separated as maybe someone needs only one part:
/system script

add name=scriptUpdateMalwareDomains owner=admin policy=ftp,reboot,read,write,policy,test,password,sniff,sensitive source="# Script which will download a script which adds the malware domains as static DNS entry\

\n# Using a script to add this is required as RouterOS can only parse 4096 byte files, and the list is longer\

\n# Written by Robert Penz <[email protected]> \

\n# Released under GPL version 3\

\n\

\n# get the \"add script\"\

\n/tool fetch url=\"http://10.xxx.xxx.xxx/addMalwareDomains.rsc\" mode=http\

\n:log info \"Downloaded addMalwareDomains.rsc\"\

\n\

\n# remove the old entries\

\n/ip dns static remove [/ip dns static find comment~\"addMalwareDomains\"]\

\n\

\n# import the new entries\

\n/import file-name=addMalwareDomains.rsc\

\n:log info \"Removed old domains and added new ones\"\

\n"
To make the first try run use following command
/system script run scriptUpdateMalwareIPs
and
/system script run scriptUpdateMalwareDomains
if you didn’t get an error
/ip firewall address-list print
and
/ip dns static print
should show many entries. Now you only need to run the script once a hour which following command does:
/system scheduler add interval=1h name=schedulerUpdateMalwareIPs on-event=scriptUpdateMalwareIPs start-date=nov/30/2014 start-time=00:05:00
and
/system scheduler add interval=1h name=schedulerUpdateMalwareDomains on-event=scriptUpdateMalwareDomains start-date=nov/30/2014 start-time=00:10:00
You can use the address list and DNS blacklist now in various ways .. the simplest is following
/ip firewall filter

add chain=forward comment="just the answer packets --> pass" connection-state=established

add chain=forward comment="just the answer packets --> pass" connection-state=related

add action=reject chain=forward comment="no Traffic to malware IP addresses" dst-address-list=addressListMalware log=yes log-prefix=malwareIP out-interface=pppoeDslInternet

add action=reject chain=forward comment="report Traffic to DNS fake IP address" dst-address=10.255.255.255 log=yes log-prefix=malwareDNS out-interface=pppoeDslInternet

add chain=forward comment="everything from internal is ok --> pass" in-interface=InternalInterface
If a clients generates traffic to such DNS names or IP address you’ll get following in your log (and the traffic gets blocked):
20:07:16 firewall,info malwareIP forward: in:xxx out:pppoeDslInternet, src-mac xx:xx:xx:xx:xx:xx, proto ICMP (type 8, code 0), 10.xxx.xxx.xxx->104.xxx.xxx.xxx, len 84
or
20:09:34 firewall,info malwareDNS forward: in:xxx out:pppoeDslInternet, src-mac xx:xx:xx:xx:xx:xx, proto ICMP (type 8, code 0), 10.xxx.xxx.xxx ->10.255.255.255, len 84
ps: The Python script is done in a way that it easily allows you to add also other block lists … e.g. I added the Feodo blocklist from Abuse.ch.
Setup Let’s encrypt TLS certificate for Proxmox [Update]
February 21, 2016
The graphical interface of Proxmox runs on port 8006 and uses HTTPS. By default this is a self signed certificate, which is a problem if you login in from a client the first time. In this case you’re not sure if there is no MitM attack going on. But there is a solution for this by using Let’s encrypt.
First you need to install git
apt-get install git
download the client software
cd /root

git clone https://github.com/letsencrypt/letsencrypt
and now you need to “patch” it as with running containers the check for a free port 80 most likely fails as a container with a running a web server is quite common. Open this file /root/letsencrypt/letsencrypt/plugins/util.py with an editor and place
return False
as first command in the already_listening method. Make sure that it is aligned with the line above and below as Python requires that. It should look this:

ps: If you started to read this article after calling ./letsencrypt-auto the first time you also need to patch following file the same way.
/root/.local/share/letsencrypt/local/lib/python2.7/site-packages/letsencrypt/plugins/util.py
[Update] In the newer version the client is called certbot and so the path got changed to
/root/.local/share/letsencrypt/local/lib/python2.7/site-packages/certbot/plugins/util.py
[/Update]
Now make sure that Port 80 is not firewalled and therefore reachable from the Internet and call following command:
cd /root/letsencrypt/

./letsencrypt-auto certonly --standalone --standalone-supported-challenges http-01 -d <dnsname>
Replace with the <dnsname> with the dns name you use to connect to the management Web GUI. If all worked, you should see following:
IMPORTANT NOTES:

- Congratulations! Your certificate and chain have been saved at

/etc/letsencrypt/live//fullchain.pem. Your cert

will expire on 2016-05-21. To obtain a new version of the

certificate in the future, simply run Let's Encrypt again.

- If you like Let's Encrypt, please consider supporting our work by:

....
Now only saving the old certificate with these commands …
mv /etc/pve/pve-root-ca.pem /etc/pve/pve-root-ca.pem.orig

mv /etc/pve/local/pve-ssl.key /etc/pve/local/pve-ssl.key.orig

mv /etc/pve/local/pve-ssl.pem /etc/pve/local/pve-ssl.pem.orig
and copying the new ones to the correct place …
cp /etc/letsencrypt/live/<hostname>/chain.pem /etc/pve/pve-root-ca.pem

cp /etc/letsencrypt/live/<hostname>/privkey.pem /etc/pve/local/pve-ssl.key

cp /etc/letsencrypt/live/<hostname>/cert.pem /etc/pve/local/pve-ssl.pem
followed by a restart of the processes:
service pveproxy restart

service pvedaemon restart
is open.
The last 5 commands are needed, because the special file system Proxmox uses for /etc/pve does not support symlinks. You need to execute that 5 commands after each renewal. The option for this is “renew”. You can/should automate the renew process.
Tips on how to provide a secure public WiFi hotspot – Part 3
February 4, 2016
This the last part of the the series “tips on how to provide a secure public WiFi hotspot”. In the first two parts we concentrated on the wireless and layer 2 and 3 part, this time we take a look at the application layer stuff you should tune to provide a secure hotspot.
Captive Portal and non HTTP traffic
If you want or need to show the user a website before he is able to surf the web, you should not only think about redirecting HTTP to your landing page. You should reject (send an ICMP error) for all other TCP connection attempts. Why? Many pages are nowadays HTTPS and letting the user wait for a time-out is not nice. Sure technical minded user will not wait, but others may do. Sure this is not a security advice but an usability one. But it does work nice together with following: Don’t try to provide your own TLS certificate to redirect traffic to the captive portal. Users should not be trained to accept error messages and ignore them and it will give your hotspot an bad look security-wise.
There is just nothing you can do to redirect HTTPS URLs. Just make sure that the captive portal detection of modern operating systems work and so the user is told there is a captive portal.
HTTPS for captive portal
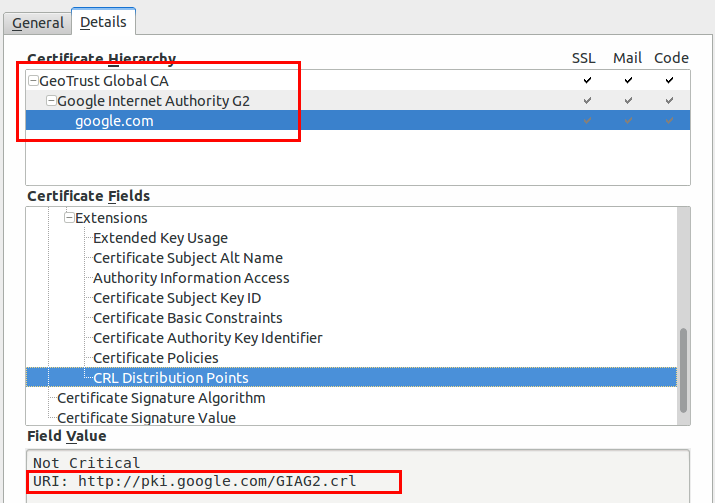
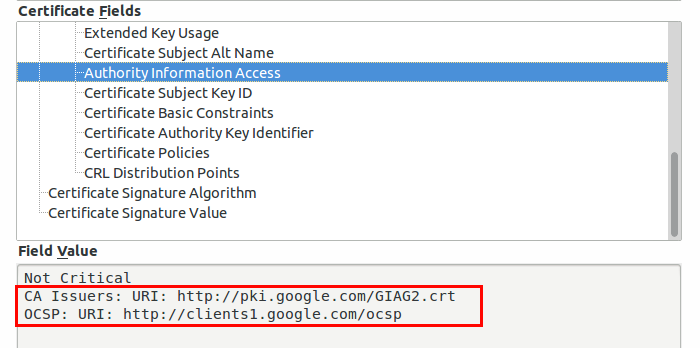
If you require any data from the user except accepting the terms of service your captive portal should be HTTPS. Get an official DNS name for your portal, e.g. portal.<company>.com and a valid TLS certificate. As there are multiple methods for getting free TLS certificate e.g. startssl or let’s encryt, you should get a real one. One thing that is important to whitelist for your captive portal are the OCSP and CRL URLs of your certificate, issuing CA and root CA. To check for the URLs look at the certificate details for all certificates in the chain of your captive portal. Following images show the 2 places for google.com (you need to check also the Google Internet Authority G2 and GeoTrust Gobal CA in this case.)
Why, you ask, you should whitelist these URLs? The browsers will check them before showing your captive portal site. Some/Most browsers will fail open, but some will fail close.
Limit and monitor the DNS
If the user has not past the captive portal his only way though the firewall will be the DNS server. You normally need to resolve the requests to the true IP address to guard against problems with false cached DNS entries after the user past the captive portal. As the user is able to craft the requests as he likes it is possible to send data through to a 3rd party DNS server. This setup can be used as DNS tunnel – it will be not fast but its possible to work through it. As nowadays simple howtos like following and OpenSource tools are provided, consider it easily possible for most power users – its not a expert thing any more.
So now comes the question what you can do against it. In this case you don’t need to block the covert channel of sophisticated malware but just script kiddies that want to tunnel through. Your typical user will only need A and AAAA query types. Tunneling is mostly done via TXT as it allows big packets. Following query types are common:
- Any
- A
- AAAA
- CNAME
- MX
- NS
- SOA
I won’t go into too much detail, but blocking can be done on the DNS server … e.g. if it is a Windows DNS Server (Allow only certain QTypes) or with the Firewall in this case iptables.
Content Filtering via DNS
Often you’re required to filter certain traffic but don’t want to setup and maintain a transparent proxy or with all the HTTPS it does not help that much any more. An easy way is to use the OpenDNS system, which allows to select certain categories which are then blocked on the DNS level (Query will resolve to an error page) . If you redirect all port 53 traffic to your DNS server which uses the OpenDNS ones as recursive DNS servers you should be good for most cases.
SMTP
Just reject (blocking lets the client run into timeouts) TCP port 25, otherwise infected client systems will flood your bandwidth with SPAM mails. A mail agent should not send mails to the mail server via port 25 anyway.
I hope this article series helped you and leads to more secure hot spots I’m also able to enjoy. 😉
Decoding SNMPv3 encrypted traffic in Wireshark
January 7, 2016
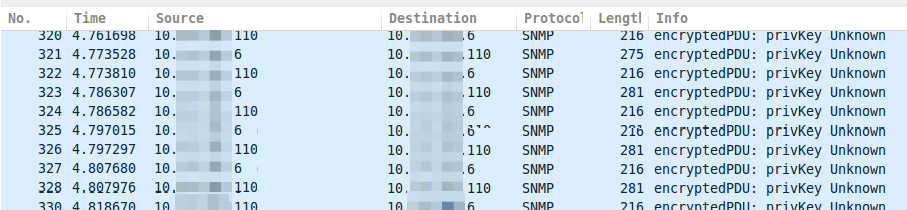
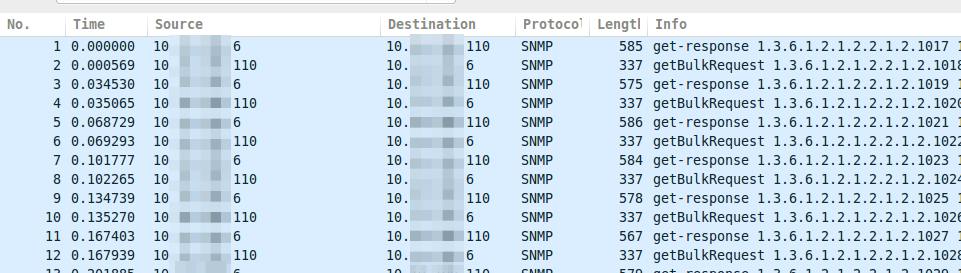
Talking with fellows about SNMPv3 I hear often that its not that critical that SNMP is encrypted and that encryption makes debugging more complicated as they can’t see what is send over the network.I won’t talk about the need for encrypting SNMP as it is like SSH gets used instead of Telnet. This post shows how easy it is to decode SNMPv3 encrypted messages with Wireshark (if you know the secrets 🙂 ). This is possible as SNMPv3 is a simple UDP protocol which encodes the packets with a shared secret and does not use forward secrecy like TLS does.
If you take a look on properly encrypted SNMPv3 traffic it looks like this.
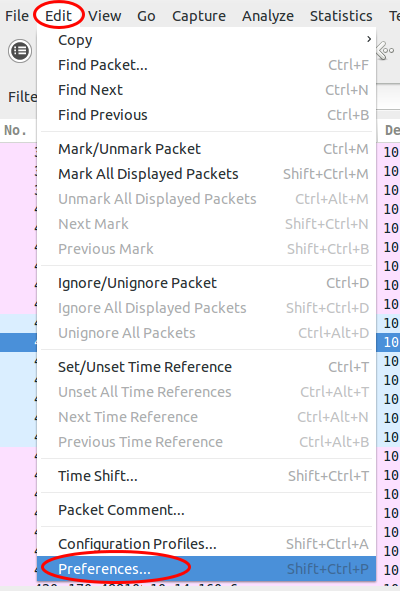
Now you just click on “Edit | Preferences”:
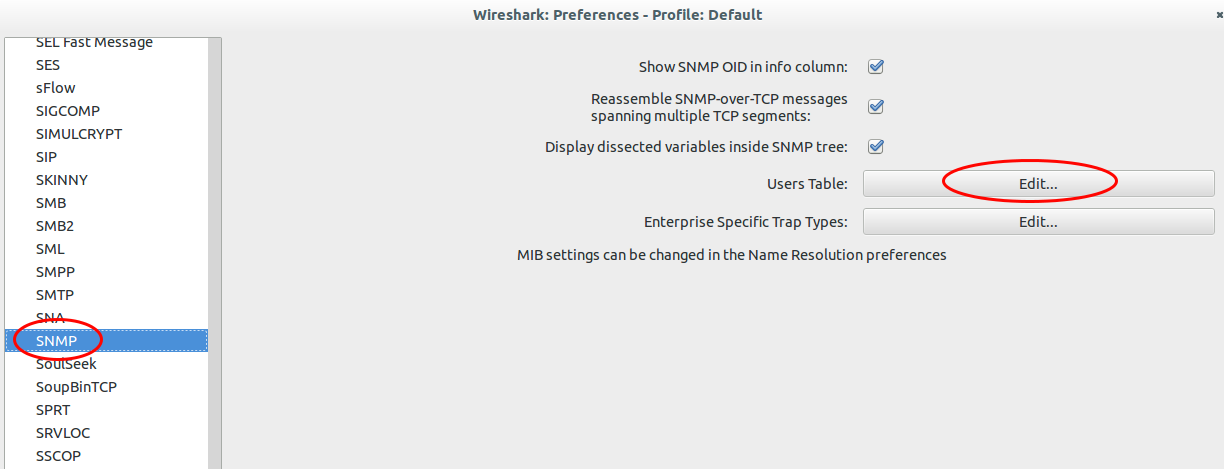
Search for “Protocols | SNMP” and click on “User Table | Edit”.
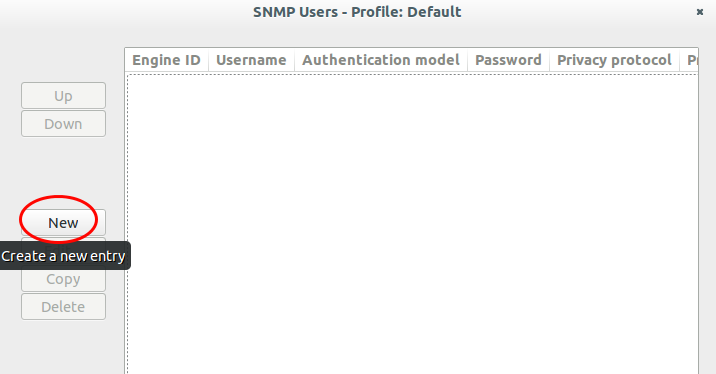
Click onto the “New” button:
Now enter your user name, select the authentication and encryption method and provide the 2 passwords. You don’t need to provide the Engine ID normally.
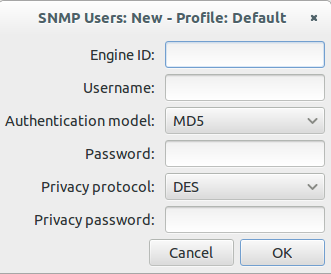
After clicking onto Ok multiple times the traffic looks like this:
If you use one SNMP profile for multiple systems its nice that the values get stored in the Wireshark preferences. Hope this takes some fear away from SNMPv3. 🙂
Tips on how to provide a secure public WiFi hotspot – Part 2
December 7, 2015
So lets start with tips on how to provide a secure public WiFi hotspot part 2. In the first part we concentrated on the wireless part, this time we take a look at the some layer 2 and 3 stuff you can do to protect your hotspot and your clients.
client 2 client traffic again
Yes, I know I’ve written about hat in the first part. But this was on the wireless side. Many access points block the traffic coming and leaving on the wireless interface but not traffic coming or leaving on the wired side. So it is possible to think of an attacker finding it’s victims not on the same access point but on others in the same layer 2. There are multiple way to achieve that once you think about it:
- Lets assume your client networks are all in 10.0.0/16 and you’re servers are in 10.1.0.0/24. You can simply filter with an ALC on the access points or switches which drop traffic where the source and destination host is within 10.0.0/16.
- If you’re using a VPN on you’re access points to tunnel the traffic back to a central controller, just don’t bridge/route traffic between them.
- If it’s one simple layer2 network on one switch, take a look at PVLANs. Many low cost managed switches have this feature.
Enforce DHCP usage
I’ve written a full blog post on why and how to enforce the usage of DHCP in any client network. Its even more important in an public WiFi setting. Following benefits are the most important in this setup:
- Protection against simple ARP spoofing
- That a client configures a fix IP address which an other client got via DHCP – be it by accident or malicious act.
Additionally to the example in the linked blog post, here is one where a Mikrotik router is the default gateway and DHCP server in a client network.
Disable the ARP learning on the router
/interface ethernet set 1 arp=proxy-arp
configure the DHCP server to add dynamic ARP entries
/ip dhcp-server set 1 add-arp=yes
Control the uplink bandwidth
This one is not directly a security point, but without it a user can use up all bandwidth and deny other clients access to the internet. I won’t stop long here, just use something similar like the PCQ on Mikrotiks. This will provide a fair distribution between the clients without looking at the traffic itself and classifying it. So you’re within the net neutrally rules if that matters for you.
Management of your devices
Make sure that no management interface of your devices is reachable via the customer/client networks. The easiest way to achieve this is to use a separate management network and make sure the management services of the devices only listen on this network. For access points it could be as easy as using the untagged VLAN to the switch for management and send the client traffic only as tagged traffic to the switch.
If this is not possible in your setup, make a least sure that a local firewall on the devices allow only administration from specify source IP addresses (e.g. the IP of your central management system, or the VPN IP range you use the remotely log into an router).
no default logins and encrypted management
This should be an no-brainer (but I’ll add it here so no one can say it was not on the list), but I’ve seen access points with the SNMP community public in the wild. And choose ssh over telnet and HTTPS over HTTP for management. Won’t write more lines about that basic stuff.
monitor the network traffic
Most routers provide plenty of data via netflow or sflow. Capture that with software like Ntop (open source) or a commercial offering. Look at the traffic what is normal and what is not. An example for something like this would be if the average packet sizes goes way down for a client it is likely it is scanning something with a tool like nmap or zmap. ps: Taking a look at the TCP retransmissions also helps to monitor the quality of your service.
After this layer 2 and layer 3 stuff only one part is still open for this series – the application level stuff. Stay tuned.
Tips on how to provide a secure public WiFi hotspot – Part 1
December 1, 2015
As I was travelling a little bit in the last few months I came across many public WiFi hotspots and most of them where not that good from a security perspective. So I thought lets write some articles with tips on how to build a secure public WiFi hotspot. This article is not for the end user on how to connect securely to a hotspot, but how to provide a secure hotspot.
The first part of this series talks about the wireless part and how to secure it, following posts will talk about other measures to secure your hotspot. So lets start with the security of the data transmitted over the air.
Encyption of the WiFi Traffic
All most all hotspots I cam across did use unencrypted WiFi , the exception where small hotels which used WPA2 PSK on the SOHO Router and told the guest the password at check in. From a security standpoint using WPA2 PSK with one password for all guest is better than an open network. Why do you ask?
- With an open WiFi its trivial to sniff the traffic of other guests and if there are no other protections in the network a man in the middle attack is simply possible. There are really simple to use tools for “normal people” like Firesheep.
- With WPA2 PSK each client gets its own session key during the association process. An attacker needs witness the associaton to eavesdrop on the connection. It is possible my an attacker to force a reassociations, by faking a disassociation packet in the name of the target.The disassociation packet attack is an attack at its own, we’ll talk later about it. With Wireshark you can decrypt all traffic if its sees the association process.
So using WP2 PSK is not perfect but its better than nothing. It is even easy to implement in some cases like in a hotel setting. Put the password in the folder in the guest rooms or tell it the customer at check in / arrival – so you can promote your service too. An other way is to provide two SSIDs one named “Public WLAN open” and one “Public WLAN wps2psk” and tell the user on a captive portal site (if you have/need such an site anyway) to change to the encrypted one for more security.
Ok, that basic security but, you can do better. Some hotels print a username and password on the receipts which you get on check in. You than need to connect to a insecure wifi and need to enter that in a HTTP website. Some hotels also just tell you to use room number as username and your family name or your birthday as password, yes again over an insecure network and over HTTP … ok I’ll stop with the rumpling.
If you provide the user already with a custom login – why not use PEAP or EAP-TTLS to secure the log in. The user chooses the network and gets prompted with an username/password dialog. For this you need to run an RADIUS server against which the Users authenticates, with FreeRadius, which is provided with all major Linux Distributions, its quite easy, even on embedded devices using with OpenWRT. Such a setup is maybe not the best way for a small hotel, but for a big hotel chain, with a central IT department which already prints the login data on the invoices, this should be easily possible. And if the marking persists (the legal stuff could be on the invoice .. as nobody reads the backside anyway) on a captive portal page, just make one where the terms of service needs to be accepted and put some nice marketing images there. 😉
There is also a way for you to use WPA2 Enterprise with PEAP / EAP-TTLS and the newer EAP-PWD if you don’t know the customers and just want to provide a more secure WiFi. Just tell every user the same username / password – as with WAP2 PSK. With FreeRadius its even possible to accept any username / password combinations. With PEAP that works for most clients but not all of them as the returning hash is not correct, but for those the written down username/passwords works. For example at the biggest European hacker congress from the Chaos Computer Club that setup was used 2 times already with over 9000 attendees.
Just to be sure to tell it. The use of PEAP is not recommend for authenticating users for an internal network (e.g. with BYOD) – Why? It is possible to intercept the wireless traffic using a roque accesspoint using the same (company) SSID-name and tools like freeradius-WPE and cloudcracker. But for a free / cheep public WiFi it does seem to an common attack route.
At the end of this chapter I’ll provide you also with a really secure setup (that’s what you want to read if you read my blog? Yeah ;-)), which is not that easy to setup but makes sure you know the user which connect to your network – even if its free to use but you’re required to know the user by law. I’ve not seen this setup in the wild, only told about it by a college.
- Provide an open WiFi which only gets you to an HTTPS page where the user can enter his/her phone number
- Generate a TLS key/cert in a format the mobile browser accepts and encrypt it with an random password
- Send the password via SMS to the user
- Let the User download the key/cert
- Tell him to connect to the secure WiFi with the certificate.
As told above that’s not easy to do … but secure ;-). You can also provide the decrypt password via the HTTPS page, but than you can’t identify the user, but maybe that’s not necessary in your case. This solution is only workable if the user does this once and uses your Internet connection for a long time. e.g. you provide public Wifi in a public transport vehicle for commuters. Otherwise I would stick with the WAP2 Enterprise and EAP-TTLS and as compatibility with PEAP.
rouge access points
Rouge access points in this context are devices an attacker normally uses near your hotspots with your SSIDs to get clients to connect to them. Specially if the WiFI is open or only secured with a know WPA2 PSK it’s easy to do so. Clients which have in past already been connected to your network will often connect automatically to the rouge access point using your SSID. If the attacker does a NAT and connects to your hotspot as client most users will not see a difference and their whole network traffic can be intercepted.
Most enterprise access points provide a feature to at least monitor for rouge access points and alert you if they see your SSID with an BSSID not from your access points. This helps but does not guard completely against it. To get the best protection against that attack you need to use EAP-TLS (certificates for every client – internal wifi setup) oder EAP-TTLS (certificate only for the RADIUS server and username/password for the client). But if the client does not validate the RADIUS server certificate (and there is no common name to check against, only the CA) you can’t prevent that attack, you need to monitor for it and act than.
Following measures can be taken to detect such access points on your network:
- Compare MAC addresses against know vendor IDs. An Apple or Samsung vendor looks more like a mobile phone than a Cisco or Mikrotik one as a client in your hotspot.
- Run an nmap finger print scan against new MAC addresses .. if the OS guess flags it as a WAP, or “Wireless Access” take a look, also take a look at the open ports … telnet and ftp or snmp (with default community) are not common for phones. 🙂
- Look at the traffic with IDSes like Suricata for a X-Forwarded-For field and User-Agent strings associated with proxies
- Detect when one IP address is presenting itself as multiple operating systems e.g. via different TTLs (Linux uses an different than Windows) .. Take a look at this paper and look also at this Linux netfilter module.
denial of service
Depending on the surrounding of your hotspots it is possible that an attacker wants to deny your customers the access to your public WiFi or use the attack to force the client to associate again with the access point to capture the session key. An easy way to do this is to send faked disassociation packets. In 802.11w (rolled up in the 802.11-2012 maintenance release) a protection against this disassociation packets has been implemented and is called protected management frames. Check your access points for support of it. On the client side all modern Linux/BSD distributions support it, starting with Windows 8 the support is also enabled by default.
client 2 client traffic
There is commonly no need for one client to talk to an other client –> block that traffic. Sure you can and should put some text into your terms of service that the user should only connect the network with a secure system and that you’re not responsible for any attack, but there is no harm in providing the user with some additional security against direct attacks and ARP spoofing and there like. Many access points provide this feature, it is often called client isolation –> so that’s a quick win.
dhcp replies / answers
This is connected to filtering client 2 client traffic but I’ve seen that some access points block normal unicast traffic but let broadcast through. With such traffic an attacker can provide the target with an wrong IP address, which is often not filtered by the client isolation feature as it is not within the local subnet and so the access points does not think about it as local traffic. More detail on how I filter that traffic can be found here.
That was the wireless part – I hope it was informative – … the next part will go up the chain to Layer2&3 an application stuff. Stay tuned!
ps: If you’ve ideas to increase the security even more, post a comment! I’m sure I forgot something.
Mini Howto for a simple way to block a MAC address on Extreme Network switches
September 12, 2015
Yesterday I needed to block a MAC address on an Extreme Networks switch (XOS) … sure, I could write an ACL for this but there is a better way:
To block a MAC address:
create fdbentry aa:bb:cc:dd:ee:ff vlan <VlanName> blackhole
To unblock a MAC address:
delete fdbentry aa:bb:cc:dd:ee:ff vlan <VlanName> blackhole
Howto configure a TG588 from A1 Telekom as VDSL modem and a Mikrotik device as router
September 11, 2015
Our big nation provider A1 Telekom went ahead and provided our house as first provider with VDSL – hoped FTTH makes the race … but anyway VDSL is better than the old stuff I had before. So I went ahead and ordered it and I got send an TG588 modem/router where you can almost configure nothing. e.g. UPNP is enabled and you can’t even deactivate it – when was it a good idea that a clients tells a firewall what to do in the first place? So I had to 3 options
- Buy a VDSL router like FRITZ!Box 3390, which is also a home router where I don’t like the configuration methods and feature set
- Buy a VDSL modem/bridge like Vigor130, and connect via a real router over pppoe. But the system is not on the A1 Telekom vectoring devices whitelist. No change for vectoring than ….
- Get the TG588 to play only modem and let my real router to do pppoe tunnel.
As you most likely already guested I opt for the last one. This howto shows you how to configure the TG588 as modem and an Mikrotik router as router (could be any other devices that supports pppoe in client mode). I was not that easy to gather all this information and so it maybe helps others to save time.
First lets connect the TG588 to the telephone line and the Mikrotik with one interface (in my case ether0) to it. Let everything boot up and connect your PC to the Mikrotik clients ports (in the default config). Log into the Mikrotik and configure the interface to the modem like this:
/interface ethernet set [ find default-name=ether1 ] name=ether1vlanTransitModem

/ip address add address=10.0.0.1/24 interface=ether1vlanTransitModem network=10.0.0.0

/ip firewall nat add action=masquerade chain=srcnat comment="nat the traffic to the dsl modem web interface, only activate when needed" out-interface=ether1vlanTransitModem
This gives the interface a nice name, sets the IP address of that uplink interface and configures the router to perform an source NAT, so you’re able to configure the modem even if you’re behind the Mikrotik router.Make sure that there is not DHCP Client running on the Mikrotik (specially on the ether0 interface)
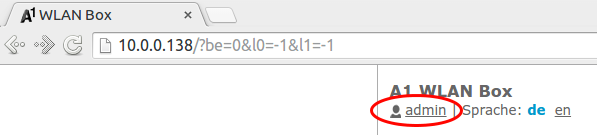
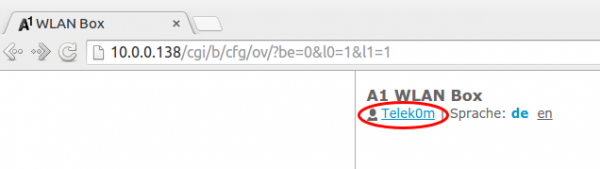
Now log into your TG588 by going to http://10.0.0.138. Your default user has not the rights to change anything – so we need to change to an other default created user, with higher privileges. Click on the “admin” username:
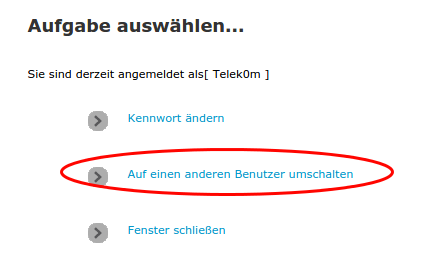
Choose “change to other user”:
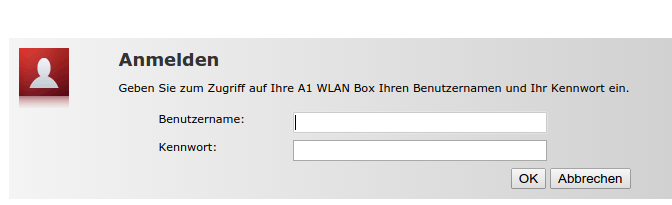
Provide following user data (worked at the time of writing, may got changed)
User: Telek0m
Password: Austria!Eur0
Now your user should have changed to following:
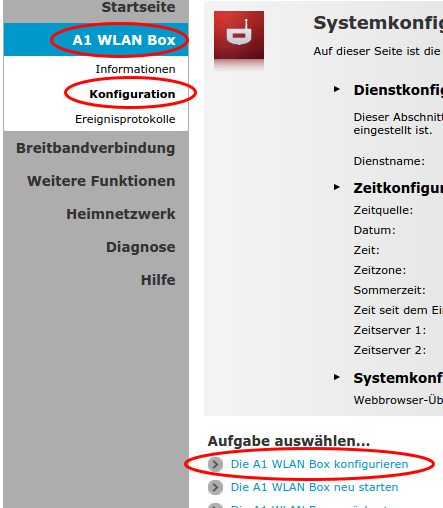
After that you will have more options to select from. Click onto “A1 WLAN Box” followed by “Configuration” and then choose “reconfigure A1 WLAN Box”
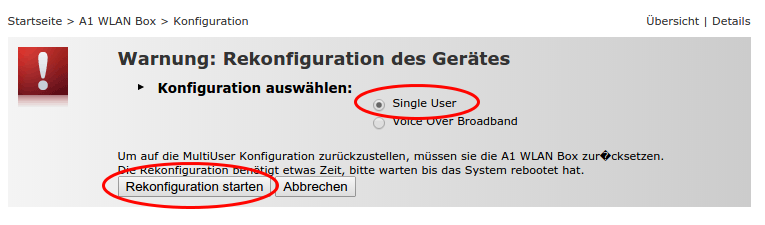
On the following page you need to select “single user” mode and click on reconfigure
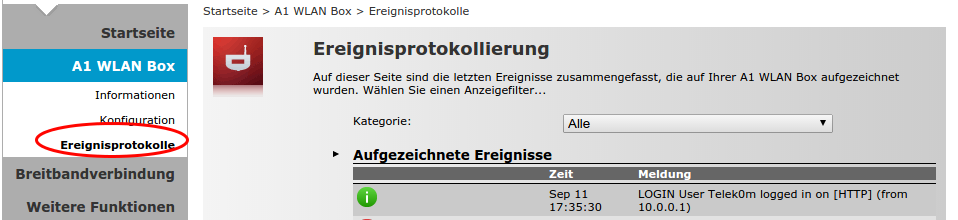
Now you’re done with the TG588 – after rebooting it should be fine. Now you need only following two pages on the TG588 – the rest is done by the Mikrotik router
First the event log, here you can check if something does not work:
And following page shows you the speed you’re connected with the provider network

The easy part
Now after all that clicking the Mikrotik part is easy:
/interface pppoe-client add add-default-route=yes disabled=no interface=ether1vlanTransitModem max-mru=1492 max-mtu=1492 mrru=disabled name=pppoeDslInternet password=XXXXXXXX use-peer-dns=no/yes user=XXXXXX
Replace XXXX with the data you got from A1 Telekom.
Now you’re internet connection should be up … test it with
ping 8.8.8.8
after that we only need some Firewall rules move the client traffic correctly to and from the Internet.
/ip firewall mangle add action=change-mss chain=forward comment="max MTU size for pppoe 1492" new-mss=1452 out-interface=pppoeDslInternet protocol=tcp tcp-flags=syn tcp-mss=!0-1452

/ip firewall nat add action=masquerade chain=srcnat comment="nat all traffic which goes over dsl into the internet" out-interface=pppoeDslInternet
Now you’re done. Hope this helped.
Unifi upgrade 2.4.6 to 3.2.10: maps not working
July 8, 2015
So after the migration itself worked and I’ve updated the access points I looked into the problem that my maps did not work anymore. Every map showed only white and I was not able to add new maps. After long googling I found part of the answer here. My solution is a bit different and works on the fly:
- Unifi management needs to be running
- check where your mongod is running … on my system its ports 27117
# netstat -pnl | grep mongod

tcp 0 0 127.0.0.1:27117 0.0.0.0:* LISTEN 16760/bin/mongod - login with
/usr/bin/mongo --port 27117 - and type following
use acefollowed bydb.map.chunks.dropIndex("files_id_1_n_1")- choose a new map in the drop down box and it should work again
the full communication looks like this:
# /usr/bin/mongo --port 27117

MongoDB shell version: 2.6.10

connecting to: 127.0.0.1:27117/test

> use ace

switched to db ace

> db.map.chunks.dropIndex("files_id_1_n_1")

{ "nIndexesWas" : 2, "ok" : 1 }

>

bye
Powered by WordPress
Entries and comments feeds.
Valid XHTML and CSS.
41 queries. 0.074 seconds.