
-

-

-

- Austria (27)
- General (16)
- HowTo (122)
- IT Security (129)
- Linux (127)
- Networking (65)
- Other (3)
-

- CDemu - a free, gpl cd/dvd-rom device emulator for linux
- heatpumpMonitor - Monitoring a Stiebel Eltron LWZ
- ignis backup tool - the heat-strengthened backup tool
-

- December 2021 (2)
- September 2019 (1)
- May 2019 (1)
- April 2019 (1)
- January 2019 (1)
- October 2018 (1)
- August 2018 (1)
- February 2018 (1)
- September 2017 (1)
- August 2017 (2)
- May 2017 (1)
- April 2017 (1)
- February 2017 (1)
- January 2017 (2)
- December 2016 (1)
- November 2016 (2)
- October 2016 (1)
- September 2016 (1)
- August 2016 (1)
- July 2016 (2)
- April 2016 (1)
- March 2016 (3)
- February 2016 (4)
- January 2016 (2)
- December 2015 (2)
- November 2015 (2)
- September 2015 (2)
- July 2015 (5)
- June 2015 (4)
- May 2015 (2)
- February 2015 (1)
- January 2015 (4)
- December 2014 (1)
- November 2014 (5)
- October 2014 (4)
- September 2014 (1)
- August 2014 (4)
- July 2014 (3)
- June 2014 (5)
- May 2014 (5)
- April 2014 (1)
- March 2014 (2)
- February 2014 (3)
- January 2014 (5)
- December 2013 (2)
- November 2013 (3)
- September 2013 (3)
- August 2013 (2)
- May 2013 (4)
- April 2013 (1)
- March 2013 (1)
- February 2013 (3)
- December 2012 (3)
- November 2012 (3)
- October 2012 (1)
- September 2012 (2)
- June 2012 (1)
- May 2012 (1)
- April 2012 (1)
- March 2012 (1)
- February 2012 (1)
- January 2012 (1)
- December 2011 (4)
- November 2011 (1)
- August 2011 (1)
- March 2011 (1)
- October 2010 (1)
- May 2010 (3)
- January 2010 (1)
- September 2009 (1)
- August 2009 (5)
- July 2009 (5)
- June 2009 (4)
- May 2009 (1)
- April 2009 (1)
- January 2009 (1)
- December 2008 (6)
- November 2008 (6)
- October 2008 (2)
- September 2008 (11)
- August 2008 (4)
- July 2008 (7)
- June 2008 (2)
- May 2008 (7)
- April 2008 (5)
- March 2008 (9)
- February 2008 (15)
- January 2008 (11)
- December 2007 (3)
major website in Tirol deanonymizes users
February 9, 2015
Important: This is a new version of the post, which does not contain the name of the website, as the owner removed the code and explained to my why he did it.
As you most likely know I’m running NIDS (Network Intrusion detection systems) to monitor the traffic going into and out of multiple networks. Today I saw a traffic which is normal if one is using VoIP via the Internet – but the source address did not use VoIP at that time.
[**] [1:2016149:2] ET INFO Session Traversal Utilities for NAT (STUN Binding Request) [**] [Classification: Attempted User Privilege Gain] [Priority: 1] {UDP} xxx.xxx.xxx.xxx:47865 -> 54.172.47.69:3478
Together with 2 friends I started investigating. The destination IP address belongs to Amazon AWS … even more interesting. So we took a look at the DNS requests the PC made and that resolved to that IP address, which showed:
stun1.webrtc.us-east-1.prod.mozaws.net
So that originates from the Firefox browser and is connected to WebRTC. So we went to the PC and looked through the browsing history, but the pages looked “normal”, so we started to access them again to find out which one triggers the request. And we found it, visiting thread pages on XXX did trigger the requests. Even more interesting was that we were able to reproduce the requests on a Firebox browser running NoScripts! So we looked at the HTML code of the page and found following:

And at the end there are following lines:
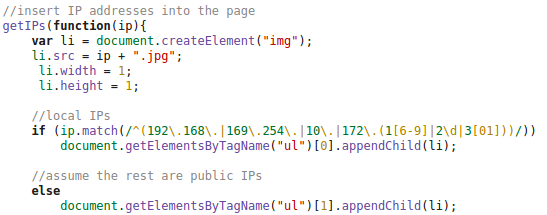
So we did take a look at the HTTP requests made by the client and at the DOM tree and found following:
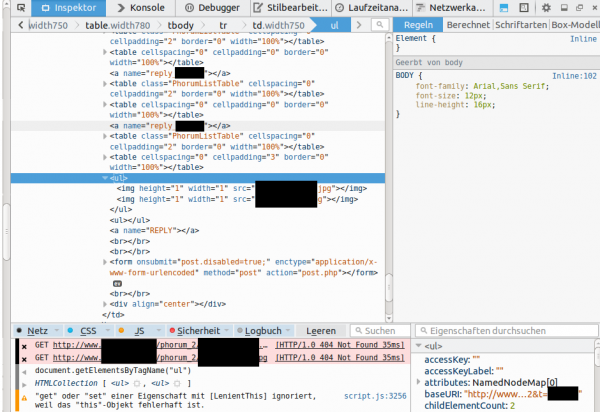
This shows that the local IP addresses (behind a NAT router) and the external IP address used for the WebRTC request is sent in an JPG image request to the server. This seemed to be aimed at deanonymizing the client, if the user accesses it via a VPN connection. Some weeks ago there was a post about something like this – deanonymizing Tor users – a little searching revealed following page. Looking at the source code there, showed that the most parts are identical, just adding it to the DOM tree was new. The exploit works for Firefox and Chrome currently – Internet Explorer does not support WebRTC so far.
After this findings I did sent an email to the owner of the homepage, asked if this is by purpose or if the homepage got hacked. He responded a day later and explained that it was needed against an attacker. Anyway as some people rely on their anonymity I wrote this post, to get the word out that if you need anonymity you need to take actions – not only for this page but for other too. The code is out in the wide – it will be used and misused.
Solutions:
- The best solution is to set the Tor/VPN Tunnel up on the router and not the PC – also for similar exploits in the future.
- Fast solution for this is to install a special plugin: Firefox, Chrome (does currently not work with Chrome V40.0.2214.111, as a reader just reported to me – ScriptSafe does) – this is also a good idea if you’re not using Tor or a VPN.
- Verify that you’re secure on this page or this page
ps: I want to thank my two friends (Benjamin Kostner and one friend who wants to stay anonymous) for helping as that made the process of finding the source of the problem much easier and faster.
Do not rely on Windows DHCP server logs as security logs
January 18, 2015
Many companies I know backup their DHCP log files so that they are able to but a MAC address to an IP address seen in an security incident. Sure it is possible that an attacker uses a static IP address, but more often than not is a dynamic one – just because it is easier or he does not posses the privileges to change it. Even if you’re using a simple MAC address based network authentication solution you’ll have log files which ties the MAC address to a specific Ethernet port and so a physical location.
So far so good, but there is a problem with this setup and the Windows DHCP server (at least in 2008R2 and newer) – I didn’t check other server. Lets take a look at the log file and how it looks normally.
Microsoft DHCP Service Activity Log

Event ID Meaning

...

10 A new IP address was leased to a client.

11 A lease was renewed by a client.

...

ID,Date,Time,Description,IP Address,Host Name,MAC Address,User Name, TransactionID, QResult,Probationtime, CorrelationID,Dhcid.

11,01/16/15,00:00:15,Renew,10.xxx.xxx.xxx,coolhostname.domain,940C6D4B992E,,373417312,0,,,
So we’ve a renew here and we’re able to tie the IP address to the MAC address. But sometimes you’ll see entries like this:
11,01/18/15,09:00:55,Renew,10.xxx.xxx.xxx,,1049406658305861646638,,2351324735,0,,,
or
11,01/18/15,12:49:12,Renew,10.xxx.xxx.xxx,coolhostname.domain,4019407634303263415422,,2657325422,0,,,
That does not look like a MAC address? Whats that?
I’ve seen this with some embedded devices and a Fedora 21 client. This put me on the right track. Following Bugzilla entry explains the problem:
“In Fedora 20, it sends a client identifier, and that client identifier is equal to the MAC address of the interface. This is recognized by the DHCP server’s static configuration and the Fedora 20 client gets an IP address.
Fedora 21 now sends a different client identifier that is not equal to the MAC address of the identifier. This new string format for client identifier doesn’t match anything in the static configuration of the DHCP server so it fails to get an IP address assigned.”
“Same issue here. I can confirm “send dhcp-client-identifier = hardware;” fixes the issue. DHCP server is a microsoft windows server and there’s nothing I can do to change its configuration.”
To see the difference in various DHCP packets I’ve some screenshots for you:
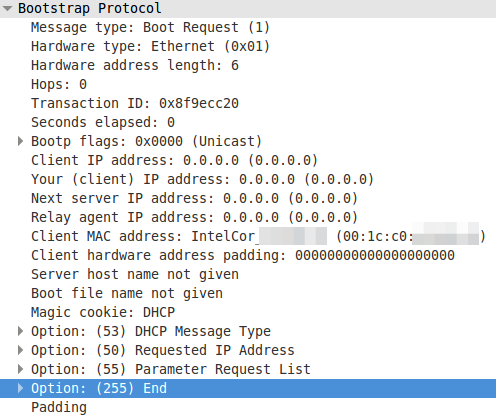
A DHCP request without a client identifier:
A DHCP request with a MAC address as client identifier:
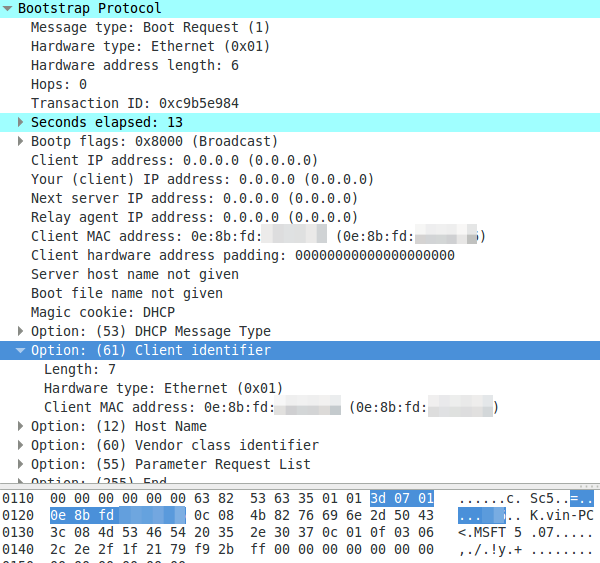
A DHCP request with a non MAC address as client identifier:
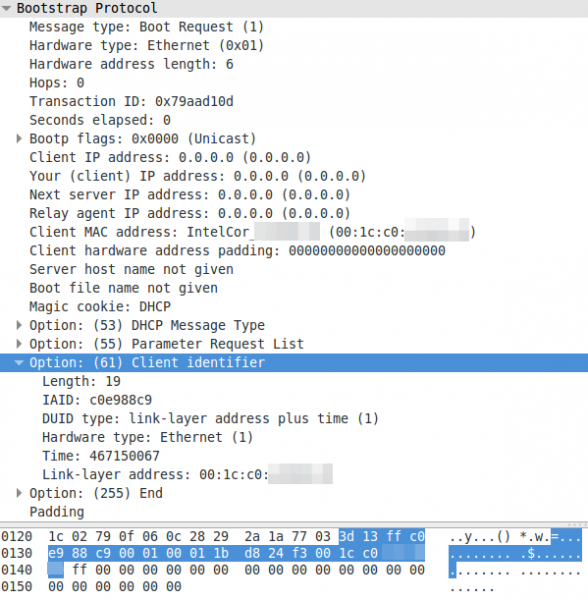
To summaries it – devices can use the MAC address or an UID to identify with the DHCP server. The problem now is that the Microsoft DHCP server does not log the MAC address anywhere and you won’t find the UID in your network logs. But as you see all requests have the client MAC address in the packet – Microsoft just does not write it into the log.
Whats funny is that the column in the Windows DHCP server log is called “MAC Address” but there is sometimes no mac address. A discussion with the Microsoft Premier Support reviled that this is a indented feature and no bug. 😉
Filter traffic from and to Tor IP addresses automatically with Mikrotik RouterOS
November 30, 2014
Some newer malware communicates with their command and control servers via the Tor network, in a typical enterprise network no system should connect the Tor network. A other scenario is that you’re providing services which don’t need to be accessed via the Tor network but your servers get attacked from Tor Exit Nodes. In both cases it may be a good defence to filter/log/redirect the traffic on your router. With Mikrotiks RouterOS this is possible. You need also a small Linux/Unix server to help. This server needs to be trustworthy one as the router executes a script this server generates. This is required as RouterOS is only able to parse text files up to 4096 by itself, and the Tor IP address list is longer.
Linux Part
So first we create the script /usr/local/sbin/generateAddTorIPsScript.sh on the Linux server with following content:
#!/bin/sh

# the full path of the file we create

filename=/var/www/html/addTorIPs.rsc
# remove the comment  if you want to use the List of All Current Tor Server IP Addresses

#url=http://torstatus.blutmagie.de/ip_list_all.php/Tor_ip_list_ALL.csv

# remove the comment  if you want to use the List of All Current Tor Server Exit Node IP Addresses

#url=http://torstatus.blutmagie.de/ip_list_exit.php/Tor_ip_list_EXIT.csv
echo "# This scrip adds Tor IP addresses to an address-list (list created: $(date))" > $filename

echo "/ip firewall address-list" >> $filename
/usr/bin/wget -q -O - $url | sort -u | /bin/awk --posix '/^[0-9]{1,3}\.[0-9]{1,3}\.[0-9]{1,3}\.[0-9]{1,3}/ { print "add list=addressListTor dynamic=yes address="$1" " ;}' >> $filename
The filename path works on CentOS, on Ubuntu you need to remove the html directory. Now make the file executable
chmod 755 /usr/local/sbin/generateAddTorIPsScript.sh
and execute it
/usr/local/sbin/generateAddTorIPsScript.sh
No output is good. Make sure that the file is reachable via HTTP (e.g. install httpd on CentOS) from the router. If everything works make sure that the script is called once a day to update the list. e.g. place a symlink in /etc/cron.daily:
ln -s /usr/local/sbin/generateAddTorIPsScript.sh /etc/cron.daily/generateAddTorIPsScript.sh
Mikrotik part
Copy and pasted following to get the script onto the router:
/system script

add name=scriptUpdateTorIPs policy=ftp,reboot,read,write,policy,test,password,sniff,sensitive source="# Script which will download a script which adds the Tor IP addresses to an address-list\

\n# Using a script to add this is required as RouterOS can only parse 4096 byte files, and the list is longer\

\n# Written by Robert Penz <[email protected]> \

\n# Released under GPL version 3\

\n\

\n# get the \"add script\"\

\n/tool fetch url=\"http://10.xxx.xxx.xxx/addTorIPs.rsc\" mode=http\

\n:log info \"Downloaded addTorIPs.rsc\"\

\n\

\n# remove the old entries\

\n/ip firewall address-list remove [/ip firewall address-list find list=addressListTor]\

\n\

\n# import the new entries\

\n/import file-name=addTorIPs.rsc\

\n:log info \"Removed old IP addresses and added new ones\"\

\n"
To make the first try run use following command
/system script run scriptUpdateTorIPs
if you didn’t get an error
/ip firewall address-list print
should show many entries. Now you only need to run the script once a day which following command does:
/system scheduler add interval=1d name=schedulerUpdateTorIPs on-event=scriptUpdateTorIPs start-date=nov/30/2014 start-time=00:05:00
You can use this address list now in various ways .. the simplest is following
/ip firewall filter

add chain=forward comment="just the answer packets --> pass" connection-state=established

add chain=forward comment="just the answer packets --> pass" connection-state=related

add action=reject chain=forward comment="no internal system is allowed to connect to Tor IP addresses" dst-address-list=addressListTor

add chain=forward comment="everything from internal is ok --> pass" in-interface=InternalInterface
Google services seems to be down if you’re accessing them via an IPv6 tunnel provider [Update 2]
November 8, 2014
For one of my Internet connections I use Hurricane Electric as IPv6 tunnel broker and the Google services (also Youtube) seems to be not accessable over it. I searched through the Internet and it seems that this is a more wide spread problem also with other tunnel brokers and other users. It is also interesting that following works.
first the dns request:
$ host www.google.com

www.google.com has address 188.21.9.57

www.google.com has address 188.21.9.56

www.google.com has address 188.21.9.59

www.google.com has address 188.21.9.53

www.google.com has address 188.21.9.52

www.google.com has address 188.21.9.55

www.google.com has address 188.21.9.54

www.google.com has address 188.21.9.58

www.google.com has IPv6 address 2a00:1450:4014:80b::1013
the ping to the IPv6 address works too:
$ ping6 2a00:1450:4014:80b::1013

PING 2a00:1450:4014:80b::1013(2a00:1450:4014:80b::1013) 56 data bytes

64 bytes from 2a00:1450:4014:80b::1013: icmp_seq=1 ttl=57 time=82.5 ms

64 bytes from 2a00:1450:4014:80b::1013: icmp_seq=2 ttl=57 time=93.3 ms

64 bytes from 2a00:1450:4014:80b::1013: icmp_seq=3 ttl=57 time=68.3 ms

64 bytes from 2a00:1450:4014:80b::1013: icmp_seq=4 ttl=57 time=75.5 ms
but a HTTP request runs into a timeout:
$ wget www.google.com

--2014-11-08 11:42:29-- http://www.google.com/

Resolving www.google.com (www.google.com)... 2a00:1450:4014:80b::1013, 188.21.9.56, 188.21.9.59, ...

Connecting to www.google.com (www.google.com)|2a00:1450:4014:80b::1013|:80... connected.

HTTP request sent, awaiting response... 302 Found

Location: http://www.google.de/?gfe_rd=cr&ei=lfNdVKbtEumk8wfgv4DgDg [following]

--2014-11-08 11:42:29-- http://www.google.de/?gfe_rd=cr&ei=lfNdVKbtEumk8wfgv4DgDg

Resolving www.google.de (www.google.de)... 2a00:1450:4014:80b::1017, 188.21.9.52, 188.21.9.56, ...

Connecting to www.google.de (www.google.de)|2a00:1450:4014:80b::1017|:80... connected.

HTTP request sent, awaiting response...
after the initial redirect … so small packets seem to go through but big not .. that looks like an MTU problem.
ps: yes
$ ping6 2a00:1450:4014:80b::1017

PING 2a00:1450:4014:80b::1017(2a00:1450:4014:80b::1017) 56 data bytes

64 bytes from 2a00:1450:4014:80b::1017: icmp_seq=1 ttl=57 time=100 ms

64 bytes from 2a00:1450:4014:80b::1017: icmp_seq=2 ttl=57 time=63.6 ms
works too. 😉
Update:
Take also a look at following links:
- https://www.sixxs.net/forum/?msg=general-12626989
- https://forums.he.net/index.php?topic=3281.0
Update 2:
The PMTUD seems to be not working .. Details on PMTUD und MTU and MSS can be found here. Workaround seems to be to set the MTU size to 1480 – it works for me and in IPv6 that’s MSS 1420 (60byte instead of 40 in IPv4). On a Mikrotik RouterOs it works like this:
/ipv6 firewall mangle add action=change-mss chain=forward new-mss=1420 protocol=tcp tcp-flags=syn tcp-mss=!0-1420 comment="max MTU size in Tunnel 1480 .. workaround for google bug"
On Linux it is similar with iptables:
ip6tables -A FORWARD -p tcp --tcp-flags SYN,RST SYN -j TCPMSS --set-mss 1420
Mikrotik changed the update policy in their license agreement
October 13, 2014
Just as information for you guys using Mikrotik’s RouterOS but who don’t monitor the wiki for changes or are regular readers of the forum. Mikrotik changed its license concerning the updates. Before this summer following paragraph was on their license wiki page:

You can take a look at the full old version here. Anyway this whole paragraph has been removed. Also with RouterOS 6.20 the following got removed when typing /system license print on the router:
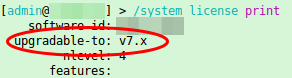
So what does that mean now? jarda from the forums put it nicely:
My first IPv6 problem – multihoming my home network without NAT
August 10, 2014
Today I ran into my first IPv6 problem … all was easy so far for some years .. just configured it and it worked … but this weekend I deployed a second Internet connection for my home. With IPv4 and masquerading the internal IP addresses to the one provider-given IP addresses I was able on the router to configure which traffic goes out over which provider. If one provider fails the route is withdrawn and all goes over the other link. But now comes IPv6 and it is not that easy anymore, as my router does not support IPv6 NAT. The problem is described in detail in this nice blog post by Ivan Pepelnjak.
My router is able to do VRF (Virtual Routing and Forwarding) also for IPv6 (at least the documentation says so .. didn’t try it so far). So the “best” option for me seems to advertise both subnets the providers gave me to the clients and route source based to the providers. Without VRF I would be depended that the providers don’t do a RPF (Reverse Path Forwarding) check, which is also not a good idea. But this leads to the problem that the end device decides which uplink it uses, which is most likely not the one I would choose ….
An other idea was to use one of my servers in a data center to tunnel the traffic through. Basically running two IP tunnels from my router to the server (one via each provider) and using IP addresses that are routed from the Internet to the server. But this is also not a good solution.
Anyway I don’t have good solution so far, maybe one of my readers does.
Slow DNS resolving with Linux systems against Windows DNS server
August 1, 2014
In the last days I encountered a problem with the DNS resolution by our Linux systems – must be there for a long time but it took a deep look into a different performance problem to get this one figured out. I did a simple wget to a HTTP site in the same data center and it took sometimes 5 seconds to get DNS name resolved to an IP address. As a network guy I launched tcpdump at once and did see following packets:
10:59:19.264987 IP LinuxClient.51463 > WindowsDnsServer.domain: 57223+ A? xxxx.penz.name. (35)

10:59:19.265056 IP LinuxClient.51463 > WindowsDnsServer.domain: 26702+ AAAA? xxxx.penz.name. (35)

10:59:19.265700 IP WindowsDnsServer.domain > LinuxClient.51463: 26702* 0/1/0 (103)
10:59:24.269981 IP LinuxClient.51463 > WindowsDnsServer.domain: 57223+ A? xxxx.penz.name. (35)

10:59:24.270303 IP WindowsDnsServer.domain > LinuxClient.51463: 57223* 1/0/0 A 10.10.xxx.xxx (51)

10:59:24.270370 IP LinuxClient.51463 > WindowsDnsServer.domain: 26702+ AAAA? xxxx.penz.name. (35)

10:59:24.270557 IP WindowsDnsServer.domain > LinuxClient.51463: 26702* 0/1/0 (103)
As you see the first A query gets not answered but the AAAA does. I changed to an other DNS server (first Windows 2008 R2 and the second Windows 2012 R2) but with the same results. I did tests with RHEL6/Centos6 and Ubuntu 14.04 .. no difference. As a next step I talked with the Windows guys to look at the Windows 2012 R2 DNS server. They did a packet capture and saw that the Windows server did not send that packet, but a DNS Debug log showed that the DNS server it self did answer it. I than called wget with the “–inet4-only” option, which made sure that only a A query was sent and I was not able to reproduce the problem. So it must be something with the second packet.
Getting a tip from a fellow network admin who said I should look at the source port of the packets I did so. The UDP source ports of the A and AAAA were the same and it looked like that the Linux system gets an answer if the A query is answered before the AAAA arrives on the Windows Server. The next step was to look for a way to change that behavior on the Linux side, which looked to me easier than to change something on the Windows site. 😉
Following resolv.conf option looked promising:
single-request-reopen (since glibc 2.9)
The resolver uses the same socket for the A and AAAA requests. Some hardware mistakenly sends back only one reply. When that happens the client system will sit and wait for the second reply. Turning this option on changes this behavior so
that if two requests from the same port are not handled correctly it will close the socket and open a new one before sending the second request.
And yes – that was the solution. On every system I added
options single-request-reopen
to the /etc/resolv.conf the problem went away. For systems which generate the resolv.conf automatically (like Ubuntu 14.04), which you can check by
ll /etc/resolv.conf

lrwxrwxrwx 1 root root 29 Mai 26 12:35 /etc/resolv.conf -> ../run/resolvconf/resolv.conf
you should add the line to /etc/resolvconf/resolv.conf.d/base instead and call sudo resolvconf -u afterwards.
All together this problem took me many hours to find and I didn’t find anything on the net .. so I thought a post may help other poor admins. 😉
Access Mikrotik Router OS via SSH Public Key authentication
July 12, 2014
Sometimes you need to execute various commands on a Mikrotik automatically from a Server. Surely it is possible to store the password in the script, but there is a better way – it is called Public Key authentication for SSH. Basically a pair of files is generated and the public one is copied to the Mikrotik and the private key stays on the PC. If you encrypt this key on the PC (which is useful if not a script does use it but a person) you get a 2-factor authentication. An attacker needs that private file and the password to decrypt it to administer the router. There are two types supported by SSH RSA and DSA. RSA is more commonly used but Mikrotik does only support DSA so we need to create a DSA key pair.
The first step is to generate the key pair as the user on the Linux system which is than used to access it. If it is a script it maybe a separate user just for this purpose is a good idea.
$ ssh-keygen -t dsa

Generating public/private dsa key pair.

Enter file in which to save the key (/home/<user>/.ssh/id_dsa):

Enter passphrase (empty for no passphrase):

Enter same passphrase again:

Your identification has been saved in id_dsa.

Your public key has been saved in id_dsa.pub.

The key fingerprint is:

.....
If you just press enter on the file question, the default one will be used. If you want to use some separate directory that’s fine, you just need to provide the location later at the ssh call. If you press just enter for the passphrase the private key will not be encrypted. Now we copy the public key (.pub extension) to the Mikrotik:
scp /home/<user>/.ssh/id_dsa.pub [email protected]:
And after that we need to import the key. If we choose the user admin, which we use our self to login, no password login will be possible anymore for that user. So if you don’t like that you should create a special user for the script. As my script needs only to read stuff I’m okay with the group “read” and create a user like this:
/user add name=scriptUser group=read comment="user for our readonly scripts" disabled=no
Now we import that public key to the scriptUser with following command:
/user ssh-keys import public-key-file=id_dsa.pub user=scriptUser
We’re done .. just testing is open …. if you used not the default directory to store the key files you need to provide them via the -i parameter, if its the default location you don’t need to provide it. This command logs into the router and gets you some basic data without entering a password.
$ ssh -i <pathTo/id_dsa> scriptUser@xxx.xxx.xxx.xxx “/system resource print”
You should also try to login as this user without the key file (e.g. from an other computer) and it should not be possible.
How to configure SNMPv3 securely on Extreme Networks XOS
July 11, 2014
In two of the last posts I wrote about configuring SNMPv3 securely for Linux and Mikrotik RouterOS. This time I’ll show the configuration for Extreme Networks XOS. Its quite easy and supports more encryption algorithm and options than e.g. Mikrotiks RouterOS. To allow SNMPv3 access we only need these commands – as I use SNMP only for reading, I’ll create a readonly user:
config snmpv3 add user snmpv3ro authentication sha XXXXXXXXXX privacy aes XXXXXXXXXX

config snmpv3 add group snmpv3group user snmpv3ro sec-model usm

configure snmpv3 add access snmpv3group sec-model usm sec-level priv read-view defaultAdminView write-view None notify-view None
If we want to disable a previously configured SNMPv1 or v2c access type following:
disable snmp access snmp-v1v2c
If you want also SNMPv3 traps you need this command:
configure snmpv3 add target-addr snmpv3Target param snmpv3Params ipaddress transport-port 162 tag-list defaultNotify
Hint: You can/should also add from or vr entries depending on your switch config
Some addition ways so secure your SNMP:
- You can specify in which virtual router instance the SNMP is reachable with following commands:
disable snmp access vr all

enable snmp access vr vrMgmt - And you can also configure ACLs which defines from which IP addresses it is possible to access the SNMP service with following command:
configure snmp access-profile snmpACL readwriteYou need to create following file first with
vi snmpACL.pol:entry allow_subnet_1 {
if match all {
source-address 10.x.x.0/24;
}
then {
permit;
}
entry allow_subnet_2 {
if match all {
source-address 10.y.y.0/24;
}
then {
permit;
}
Android Devices send many Multicast Packets per Second for Chromecast – How to disable it?
June 28, 2014
While tracing/sniffing for something, I mirrored all packets of my mobile phone to Wireshark and I was was really astonished to see many multicast DNS requests (_googlecast._tcp.local) from my mobile …
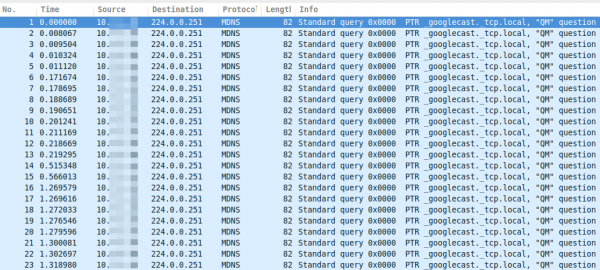
As you see, these are more than 15 packets per second, which leaded at once to following 3 thoughts:
- That can’t be good for the battery
- The mobile is sending this surely not only in my home network but also in hotspot networks … I don’t like that for security/privacy reasons (specially what happens if the phone gets an answer and maybe sends more info about itself)
- I’m not using Chromecast anywhere
Which leaded at once to the question:
- How can I disable this?
So I went on a search trough the Internet …. but I was not able to find a solution. So the question to the community .. has someone an idea how I can disable that?
ps: I found only one guy asking the same question in the xda developers forum
Powered by WordPress
Entries and comments feeds.
Valid XHTML and CSS.
37 queries. 0.086 seconds.