Tips for running Kubuntu 8.10 (Intrepid) on an EeePC 901go [Update 2]
December 26, 2008
As I’ve written before I got an Asus EeePC 901go for Christmas and of course I’ve installed Kubuntu (8.10 / Intrepid) on it. In this post I’m going to share the tricks I used to get it running well.
- I’ve attached a USB CD drive and installed Kubuntu from the alternative CD. The kernel on this CD is not able to get any networking to work, but this is no problem. The installed kernel will get the LAN running.
- Set noatime, nodiratime for your partitions. Take also a look at this post.
- When the installation is finished you should update your system, as this didn’t work with the install kernel.
- To get all devices running you need a special kernel for your EeePC. I recommend the usage of this kernel, take a look at the installation howto. I’m using the lean kernel.
- Now you should install eeepc-config (
apt-get install eeepc-config), which will allow you do en-/disable the webcam, wifi, … . Just try it out. Press the two most right buttons above the keyboard. The Fn-Keys work now also. Cool! - You’ll also notice that sometimes on high I/O activity the whole system will hang for seconds. This is because of the I/O scheduler, as the default one is optimized for hard disks and not for flash. This wiki page describes how you can change this. I’ve set it in
/boot/grub/menu.lstand added the echo line to/etc/init.d/bootmisc.sh(add the beginning of the do_start function) - As it seems the ath5k driver for the WLAN is more or less useless. It has a real poor performance but the biggest problem is that it has a package loss between 5-10% on my WiFi. To solve this it is best to go back to the old madwifi driver. Here is the mini howto:Go do
http://snapshots.madwifi-project.org/madwifi-hal-0.10.5.6/and download the newest version there. In my case I did following:wget http://snapshots.madwifi-project.org/madwifi-hal-0.10.5.6/madwifi-hal-0.10.5.6-r3879-20081204.tar.gzNow extract it:
$ tar xzf madwifi-hal-0.10.5.6-r3879-20081204.tar.gz

$ cd madwifi-hal-0.10.5.6-r3879-20081204/
Now we need some packages installed:
sudo apt-get install build-essential

sudo apt-get install linux-headers-eeepc-lean
And now the actual compiling and installationsudo ./madwifi-unload
sudo ./find-madwifi-modules.sh $(uname -r)
cd ..
sudo make
sudo make install
At last we need to add
blacklist ath5kto/etc/modprobe.d/blacklist-eeepcand appendath_pcito/etc/modules. After a reboot you should have a working WLAN. - The UMTS card ( a Huawei E620 USB Modem) works without any problems. Take a look here for get it to work on the command line. I was not able to get it to work with the KNetworkManager. PS (For my Austrian Reader): Here is a link to a site in German with the Init Strings and User/Password combinations needed for the various Austrian providers.
- The eepc has a multi touch track-pad, you can scroll by using 2 fingers and have a middle click when you click with 3 fingers. (Thx to Meredrica for this info! )
Following items are not resolved to my satisfaction – I need to look further into these topics
- (K)Ubuntu Intrepid seems to have a poor graphics performance and rendering errors on Intel 945 systems, which is build in the 901go. The rendering errors happens most often at the start of non KDE apps like Firefox. Here is a link to the Bug Report. I’ll post here if I find a fix or workaround.
- Get the UMTS dialing working with the KNetworkManager.
I’ll add additional tips as soon as I need and find them. Please also post tips and tricks you know for the Asus EeePC 901go. Thx.
PS: I’m running KDE 4.2 Beta2 on my 901go and I really can recommend it! Get it from there.
Home partition encryption with LUKS under Linux
December 25, 2008
I’m often asked how I crypt my notebooks. I normally crypt only my home partition and sometimes (more on servers in remote locations, than on notebooks) the swap partition. I use for this Linux Unified Key Setup (Luks), as it allows up to 8 passwords for a partition and you can change them without reformatting the partition. It also stores the used encryption method so you can use it also for encrypting external hard disks and you don’t need to keep track which encryption algorithms you used for it.
First you install your notebook with a swap and a root partition, but leave space for a /home partition. After the installation is finished you create the partition e.g. with cfdisk or fdisk. You need to restart your system after creating a new partition. In my example I call it /dev/sda3. Now you can tell cryptsetp (which you need to install on Ubuntu with apt-get install cryptsetup, reboot after installing it if the setup does not work) to create a container with following command
cryptsetup --cipher aes-cbc-essiv:sha256 --key-size 128 luksFormat /dev/sda3
After you did this, you need to open the container with
cryptsetup luksOpen /dev/sda3 home
Now you can format the container:
mkfs.ext3 -m 0 /dev/mapper/home
ps: -m 0 means that no blocks are reserved for root, as it is our home partition.
Now you need to go to the console of your system (ALT-CTRL-F1) and login there and stop the X server (log off before that 😉 ). On Ubuntu you do this by calling /etc/init.d/gdm stop on Kubuntu /etc/init.d/kdm stop.
Now you can mount the new partition on a temporary location and copy your home directory over.
mount /dev/mapper/home /mnt/

cp -a /home/* /mnt/.
Now we need to unmount it and close the crypto container.
umount /mnt/

cryptsetup luksClose home
Now we need to configure the system that it is launched at the boot time. Add following line to /etc/crypttab:
home /dev/sda3 none luks
and in your /etc/fstab you add following:
/dev/mapper/home /home ext3 noatime,nodiratime 0 0
Now everything is done. Reboot your system and you will be prompted for the password of your home partition. If you don’t enter it your system will use the “old” home directory.
secure file uploading with scponly
November 23, 2008
If you’re administrating Linux servers you may need someone or some script to copy files onto your server. You could now install a special service like a ftp server or you could use a normal ssh user for this. The problem with the first is that you need an extra service which adds complexity and also provides an additional attack vector. The problem with the normal ssh user is that you provide the script or user functionally on your server that he/it does not need for his/its work (like exciting programs) – this is never a good idea.
What I recommend for this is a program called scponly. It does basically what the name says, if a ssh user has it set as its shell the user is only able to use scp functionality. Ubuntu and Debian provide a package for it but you should read an article like this one to know to setup it up securely. For example it is a really bad idea to allow the user to write into his home directory as a writable home directory will make it possible for the user to subvert scponly by modifying ssh configuration files.
Local audio recording to boost the audio quality for asterisk recording
I’ve written a Howto for recording a podcast with asterisk. This setup is working for our podcast (in German) for some time now, but we wanted to boost our audio quality over the codecs quality asterisk supports. For this we use arecord, a command-line sound recorder for the ALSA soundcard driver, to record locally under Linux. So we use asterisk to talk with each other but normally we use the locally “with CD quality” recorded files for the podcast. The Asterisk recorded stuff is used as backup, as it happened already once that one lost his local recording. 😉
Kubuntu 8.10 Intrepid additional packages install script
November 1, 2008
This script is for my friends, who most know the previous versions already. It installs additional packages for kubuntu 8.10 Intrepid. I use it for the initial setup of a desktop system. First install Kubuntu from CD and than use this script to get the system which, has all codecs and commonly used programs (be it free or non free software) installed. So this blog entry is for my own reference and for my friends. Basically after running this script you’ll have a system which is ready for usage by a standard user.
Workaround for Kubuntu 8.10 (Intrepid) problems with “.local” DNS addresses
October 18, 2008
I installed Kubuntu 8.10 (Intrepid) Beta on one of my Workstations at work this week and I had really problems to get into the internet. Why? We have a PAC (proxy auto-config) script for our proxies and that PAC is reachable under http://pac.companyname.local (You put that into your Browser.). The problem with this setup is that somehow Kubuntu has problems resolving the .local DNS Zones. I did following as a workaround:
$ sudo vim /etc/nsswitch.conf
Replace:
hosts: files mdns4_minimal [NOTFOUND=return] dns mdns4
with:
hosts: files dns
I hope Google helps others to find this post fast, so they don’t need to search that long for a workaround.
Mini Howto for JMeter, an open source web load testing tool
October 4, 2008
In this post I describe in short how to make your first steps in JMeter. I found JMeter when I wanted to test how stable a new written web application was and searched for a tool that allowed me to record my browsing and rerun it multiple (and parallel) times. JMeter is quite pretty easy to get up and running and it’s quite fun to test and break things on your own server.
As JMeter is a Java application the installation comes basically down to extracting the zip/tar.gz file and start bin/jmeter.sh or bin/jmeter.bat, if you’ve setup your Java correctly.
So now to the actual howto:
Start Jmeter by changing to jakarta-jmeter-2.3.2/bin and executing ./jmeter.sh You’ll see following screen:
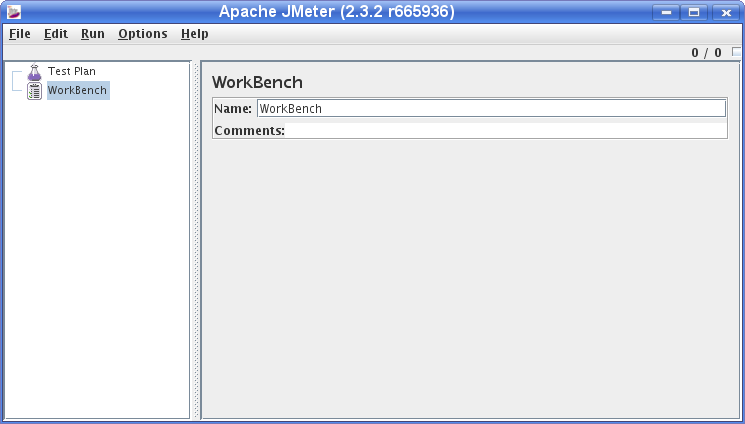
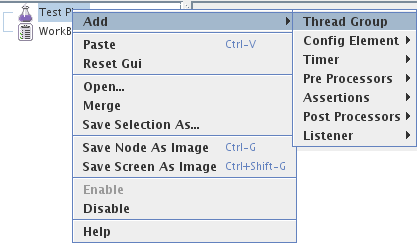
First we add a “Thread group” to the “Test Plan” via right click onto “Test Plan” as shown in following screenshot:
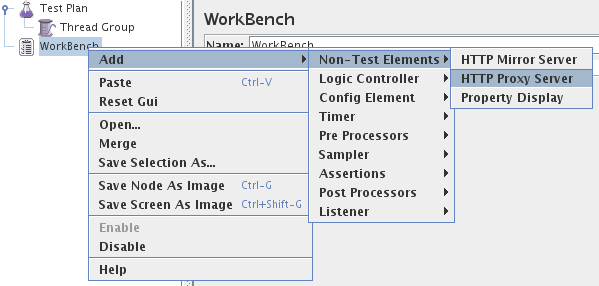
After this we add an “HTTP Proxy Server” to the Workbench (as “Non Test Element”) to capture the traffic between your browser and the web site to test. Following screenshot shows how to add the proxy server.
Open the “HTTP Proxy Server” page and change the port if required and set the “Target Controller” to “Test Plan > Thread Group” on the same page.

Now configure your browser to use the Proxy Server (127:0.0.1:8080 in the default settings) and go to bottom of the “HTTP Proxy Server” page and click the “Start” button. Make also sure that you deleted the cache of your browser or even better deactivated it for the test. Otherwise you will not see the full traffic a new visitor would generate.
![]()
Now, JMeter will record all the HTTP requests your browser makes, so make sure you have closed all the other tabs you have open, otherwise you will get a mixture of Ad’s and AJAX requests recorded as well. After you did click through the workflow JMeter show test later you click the “Stop” Button and take a first look what JMeter has recorded for you.
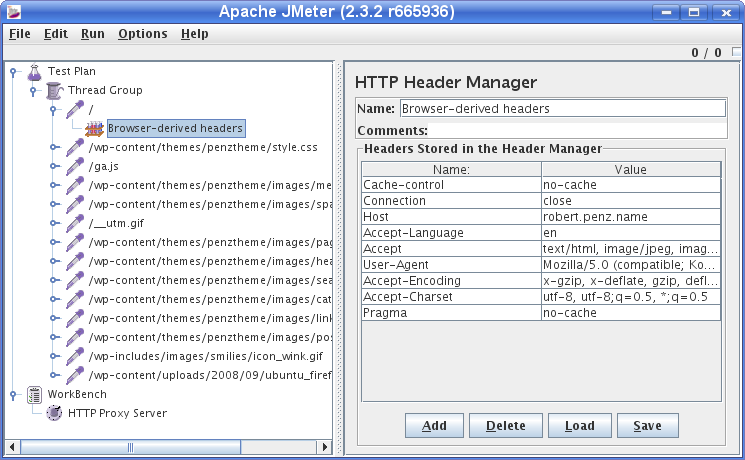
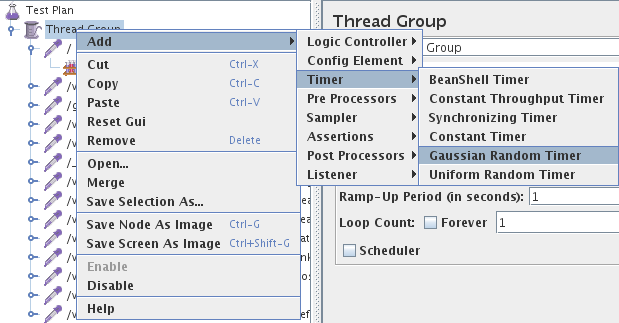
Delete any request that you don’t like by right clicking onto the node and selecting “Remove”. Now we’ve recorded everything we need and we wand now to simulate a typical user. For this we want a time delay between the various http requests and the delay should not be fixed. If you want to query the server as fast as possible to you don’t need this step. We add therefore the Gaussian Random Timer as shown in this screenshot:
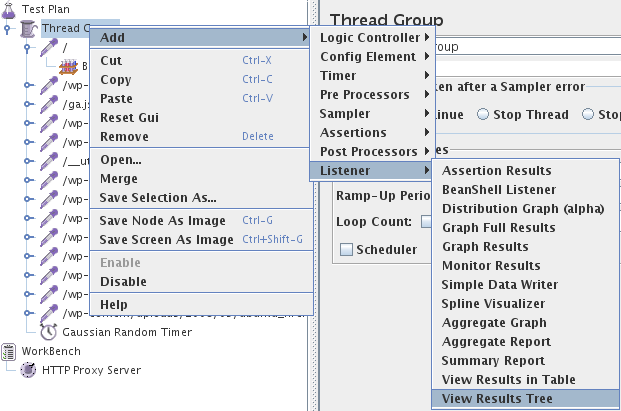
The last thing we need for a first test run is a Listener which tells us what worked and what not. We use for this “View Results Tree”. This Listener is not good for later use when you want to hammer with multiple threads onto the server.
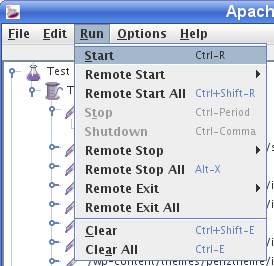
Now we’re ready for our first run, the default settings are fine (in the Menu: Run > Start).
You should get something like this:
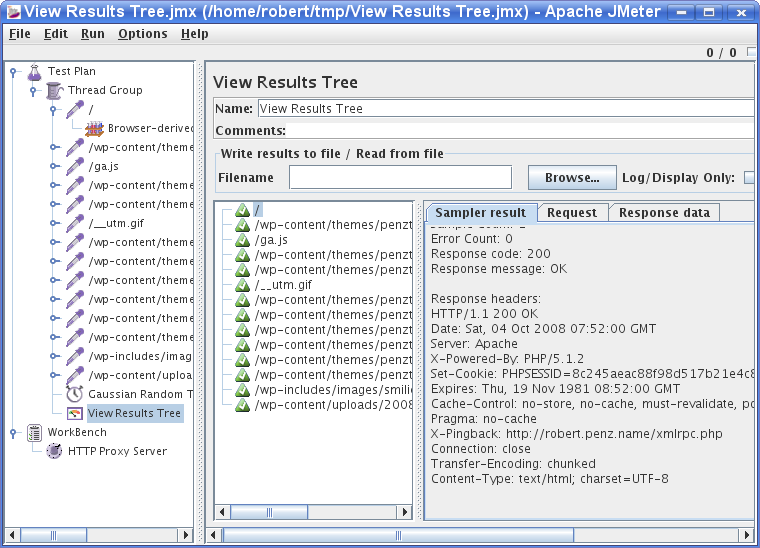
This Listener is good for testing your test setup, as you can look at request and response data. Now it would be the time to add an “Cookie Manager” or “User Parameters”. The First you need if your site requires cookies and the second is handsome when you want different threads to use different user/password combinations to login, as one use can only login once at a time.
After you verified the setup you should disable the “View Results Tree” Listener and choose something like “Aggregate Report”. Change now the settings of “Thread Group” do your likings and hammer your web server. 😉
If you are running a big load test, remember each Listener keeps a copy of the results in memory so you might be better running a Listener > Simple Data Writer instead which writes the results out to a file. You can then read the file in later into any of the reports.
Have fun hammering your web server 😉
ps: Always start with a smaller load, you better off finding and fixing a bug which occurs often under low load, than an obscure bug which occurs only under extreme load.
Convert m4b to ogg on Linux
September 23, 2008
I got my hand on some audio books in the m4b format (They are not DRM protected) and I wanted to listen to them on my mp3 player. But the m4b format is a special format for the Ipod and don’t own a Ipod (and I don’t want to own one 😉 )
As I’m a Linux user I decided to write a program which converts them to ogg (which my mp3 player supports). It should be a console program which goes recursively through a directory and its sub directories and converts all mb4 files to ogg. Of course this script does not reinvent the wheel and uses some mighty console programs for the main work. You need to have following stuff installed on your system:
- oggenc (on Ubuntu/Debian you can it install with apt-get install vorbis-tools)
- faad (apt-get install faad)
- python (should be normally already installed, apt-get install python)
Download the m4b2ogg.py script and set the execute permissions. Call m4b2ogg.py -h to get a list of the possible parameters. I hope this script helps also other Linux users – if so drop a line please. Thx.
ps: If you’re searching for converting other media formats into yet an other media formats on linux, take a look at this site.
Update dynDns record periodically
September 20, 2008
I’ve the IP of my dnyDNS record updated via a script in /etc/ppp/ip-up.d/ on my router but sometimes (not often) the ppp connections seems not to be fully up or due to some other problems the update of the IP address does not work. In this case the system is not reachable until the next time I reconnect. I know I can run ddclient as daemon, but I wanted something lighted and easier.
I’ve written a small python script which gets the current IP address of the ppp connection and calls the ddclient to update the IP to the provided one. My script is called by cron every half an hour. This also guards against the problem that I get no disconnect in 3 month (I think it was something in this time frame) and dnyDNS disables my account.
Download the setdyndns.py script. Change the external network interface to your setting in the variable networkInterface.
nf_conntrack and the conntrack program
September 14, 2008
Today I had a problem with my VoIP connection to my provider. The hardware SIP client did not connect for some hours. I had a look at the packets which went over my router into the internet. At the first glance it looked as everything worked right on my side, but the other side did not answer.
15:04:46.131077 IP xxx.xxx.xxx.xxx.5061 > yyy.yyy.yyy.yyy.5060: SIP, length: 532

15:04:47.147701 IP xxx.xxx.xxx.xxx.5061 > yyy.yyy.yyy.yyy.5060: SIP, length: 335

15:04:50.130068 IP xxx.xxx.xxx.xxx.5061 > yyy.yyy.yyy.yyy.5060: SIP, length: 532

15:04:51.147168 IP xxx.xxx.xxx.xxx.5061 > yyy.yyy.yyy.yyy.5060: SIP, length: 335
But at a closer look i realized that the xxx.xxx.xxx.xxx IP address was not my current IP address, given by the DSL provider, but one from an older ppp session with my provider. It was at once clear that there must be a problem with the connection tracking of IPtables, as the SIP client used an internal IP address and gets masqueraded by the router. If you want to know more about IPtables and connection tracking take a look at this.
Anyway I did at a fast cat /proc/net/nf_conntrack | grep 5060 to get all connection tracking entries for SIP. And I found more than one, here is on example.
ipv4 2 udp 17 172 src=10.xxx.xxx.xxx dst=yyy.yyy.yyy.yyy sport=5061 dport=5060 packets=1535636 bytes=802474523 src=yyy.yyy.yyy.yyy dst=xxx.xxx.xxx.xxx sport=5060 dport=5061 packets=284 bytes=114454 [ASSURED] mark=0 secmark=0 use=1
The timeout for this entry is 180 sec and 172 seconds to go, and the SIP client was all the time sending new probes and therefore the connection was never dropped. What can you do in this instance? You can install conntrack. It is a userspace command line program targeted at system administrators. It enables you to view and manage the in-kernel connection tracking state table. If you want to take a look at the manual without installing it (apt-get install conntrack) you can take a look at this webpage which contains the man page. With this program I did delete the entries with the wrong IP address and everything worked again.
I think this program and the knowledge of the connection tracking is important for many of my readers, so I’ve written this post. The current cause to talk about this topic is only one of many, so take a look at it.
Powered by WordPress
Entries and comments feeds.
Valid XHTML and CSS.
35 queries. 0.093 seconds.


