
-

-

-

- Austria (27)
- General (16)
- HowTo (122)
- IT Security (129)
- Linux (127)
- Networking (65)
- Other (3)
-

- CDemu - a free, gpl cd/dvd-rom device emulator for linux
- heatpumpMonitor - Monitoring a Stiebel Eltron LWZ
- ignis backup tool - the heat-strengthened backup tool
-

- December 2021 (2)
- September 2019 (1)
- May 2019 (1)
- April 2019 (1)
- January 2019 (1)
- October 2018 (1)
- August 2018 (1)
- February 2018 (1)
- September 2017 (1)
- August 2017 (2)
- May 2017 (1)
- April 2017 (1)
- February 2017 (1)
- January 2017 (2)
- December 2016 (1)
- November 2016 (2)
- October 2016 (1)
- September 2016 (1)
- August 2016 (1)
- July 2016 (2)
- April 2016 (1)
- March 2016 (3)
- February 2016 (4)
- January 2016 (2)
- December 2015 (2)
- November 2015 (2)
- September 2015 (2)
- July 2015 (5)
- June 2015 (4)
- May 2015 (2)
- February 2015 (1)
- January 2015 (4)
- December 2014 (1)
- November 2014 (5)
- October 2014 (4)
- September 2014 (1)
- August 2014 (4)
- July 2014 (3)
- June 2014 (5)
- May 2014 (5)
- April 2014 (1)
- March 2014 (2)
- February 2014 (3)
- January 2014 (5)
- December 2013 (2)
- November 2013 (3)
- September 2013 (3)
- August 2013 (2)
- May 2013 (4)
- April 2013 (1)
- March 2013 (1)
- February 2013 (3)
- December 2012 (3)
- November 2012 (3)
- October 2012 (1)
- September 2012 (2)
- June 2012 (1)
- May 2012 (1)
- April 2012 (1)
- March 2012 (1)
- February 2012 (1)
- January 2012 (1)
- December 2011 (4)
- November 2011 (1)
- August 2011 (1)
- March 2011 (1)
- October 2010 (1)
- May 2010 (3)
- January 2010 (1)
- September 2009 (1)
- August 2009 (5)
- July 2009 (5)
- June 2009 (4)
- May 2009 (1)
- April 2009 (1)
- January 2009 (1)
- December 2008 (6)
- November 2008 (6)
- October 2008 (2)
- September 2008 (11)
- August 2008 (4)
- July 2008 (7)
- June 2008 (2)
- May 2008 (7)
- April 2008 (5)
- March 2008 (9)
- February 2008 (15)
- January 2008 (11)
- December 2007 (3)
Unifi upgrade 2.4.6 to 3.2.10: exception: remove needs a query at src/mongo/shell/collection.js
July 8, 2015
If you try to upgrade Ubiquiti Networks Unifi system from version 2.4.6 to 3.2.10 it is possible that you’ll run into following problem:
Exception in thread "launcher" org.springframework.beans.factory.BeanCreationException: Error creating bean with name 'class.super': Instantiation of bean failed; nested exception is org.springframework.beans.factory.BeanDefinitionStoreException: Factory method [public final com.ubnt.A.new.B com.ubnt.A.new$$EnhancerByCGLIB$$ad7756e2.class.super()] threw exception; nested exception is org.springframework.beans.factory.BeanCreationException: Error creating bean with name 'Ø00000': Invocation of init method failed; nested exception is com.mongodb.CommandResult$CommandFailure: command failed [$eval]: { "serverUsed" : "/127.0.0.1:27117" , "errmsg" : "exception: remove needs a query at src/mongo/shell/collection.js:299" , "code" : 16722 , "ok" : 0.0}
when trying to start it like this
/usr/bin/java -jar /opt/UniFi/lib/ace.jar start
Searching through the Internet shows that more people have the problem but a working solution is not posted anywhere. So here is it:
The reason for the problem is quit easily found here. Basically the syntax of the command is not correct. So I started to search through the lib directory for a file that contains this incorrect string. It is within /opt/UniFi/lib/ace.jar so I installed the jar command line utility (on Centos 6)
yum install java-1.7.0-openjdk-devel
and extracted all files to search in which it was. As I found it, its easier for you just type:
jar xf ace.jar com/ubnt/A/ooOO/OOoO.class
Now you need a Java class editor – we use this Java one. Download and extract it and start it like this:
java -jar ce.jar
Now you need to find and change the values:
- Click on “Constant Pool”
- Type
db.cache_device.removein the search field and find the line 459 - Activate the “Modify Mode” and change the values
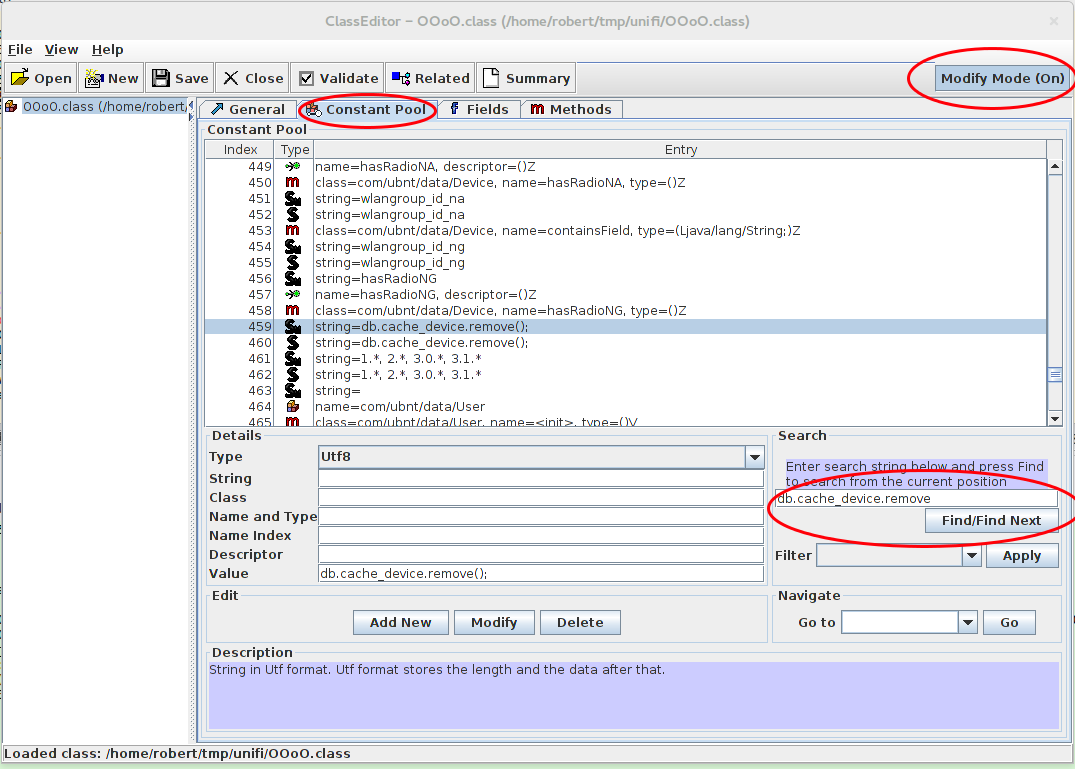
In the end it should look like this (the second one is a link to the fist, just update):
![]()
Now save the file and update the jar file:
jar uf ace.jar com/ubnt/A/ooOO/OOoO.class
Now a restart and migration should work. Hope this helps others .. it took me one hour to find my solution, so I hope its now faster for you. 😉
Howto filter rogue DHCP servers on Ubiquiti Networks UniFi access points
June 25, 2015
This short post shows how to filter rogue DHCP servers, which are connected via the WiFi to the network. The UniFi management software allows you to block traffic between 2 clients connected to the same access point. This feature is often called “client isolation”. But for seamless handover to an other access point, all need to be in the same layer 2 network. So an rogue DHCP server can serve clients on an other access point. This setup filters that traffic.
For this you need to put following lines into a file called config.properties (most likely you need to create the file).
config.system_cfg.1=ebtables.1.cmd=-A FORWARD -i ath* --protocol ipv4 --ip-protocol udp --ip-destination-port 68 -j DROP

config.system_cfg.2=ebtables.2.cmd=-A FORWARD -i ath* --protocol ipv4 --ip-protocol udp --ip-source-port 67 -j DROP

config.system_cfg.3=ebtables.3.cmd=-A FORWARD -i eth0 --protocol ipv4 --ip-protocol udp --ip-destination-port 67 -j DROP
The location of the file depends on the version of your UniFi management software.
- Version 2:
/opt/UniFi/data/config.properties - Version 3+:
/opt/UniFi/data/sites/the_site/config.properties– to get the site id take a look at this article.
After that change you need to trigger the re-provision on the access points affected. You can do this by enabling and disabling the guest portal(for the entire site) or on a per access point basis, changing TX power one by one, for example.
To verify that the configuration got deployed, log into the access point via ssh and check the ebtables – it should look like this:
BZ.vx.x.x# ebtables -L

Bridge table: filter
Bridge chain: INPUT, entries: 0, policy: ACCEPT
Bridge chain: FORWARD, entries: 3, policy: ACCEPT

-p IPv4 -i ath* --ip-proto udp --ip-dport 68 -j DROP

-p IPv4 -i ath* --ip-proto udp --ip-sport 67 -j DROP

-p IPv4 -i eth0 --ip-proto udp --ip-dport 67 -j DROP
Bridge chain: OUTPUT, entries: 0, policy: ACCEPT
Securing your client network 2: Separate by device classes
June 16, 2015
The second article in the securing your client network series (after Enforce DHCP usage) is about separating different client device classes in the network. Typically enterprises separate different departments in separate VLANs. If the VLANs are routed in the same VRF and no ACLs separate them, the gained security is negligible. If you’re configuring ACLs for this, you have too much time on hand or the rules are not tight. And the setup works only good if you’re within one central office building and your network is not distributed over an city or even country. So after I told you what is not a good idea – what setup do I recommend for bigger networks (> 500 client switch ports .. works great for > 10.000 ports and more).
Separate not by department, separate by device class
Yes, that’s the basic idea behind it. Why is that better?
- less work
Employees and departments move around. You need to keep your configuration up to date and if part of a department moves to an other location you need to extend the layer2 network think about something else - simpler and more secure firewall rules
If your VoIP phones, PCs and printers of an department are in the same Layer2 network you need to keep track of the devices for the firewall rules or allow a printer the same access as an PC or an VoIP phone. If you separate your printers in a separated network the firewall rules for them are easy, every device in that network is a printer. The firewall rules can be much more strict than in the PC network – a printer needs to talk to the print server (and dns, dhcp, ntp) but nothing else – a PC needs much more - network authentication tailored to the device class
MAC authentication works for any device, but 802.1x only works if the device supports it. Switching 802.1x on for all devices at the same time won’t work, but if only one device is allowed into a network area with only MAC authentication – It does not help that all others use 802.1x, the attacker just fakes that MAC address. With a separation by device classes you can implemented 802.1x for some networks and others not. e.g. 802.1x for Windows PCs with AD integration is not that complicated – so for the PC network 802.1x could be required, but for the printer network MAC authentication is Ok. This is specially valid if the firewall rules in the printer network are much more strict – even if someone gets access to that network he is not able to connect to the Exchange, database or file server … only the print server is allowed to connect to the printers and not the other way round - separate systems with different patch intervals
Most likely your Windows clients get an update very month but when did your company the last time update the firmware of the printers? Separate them and attacker can’t jump systems that easy any more.
- block client to client communication
If a network area is only used for devices classes that don’t need (or should) communicated directly with each other, you can just block that communication with ACLs. The ACLs are the same for all Layer 2 client access switches and are maintenance free. A classic example for this would be the printer network … why should one printer talk with an other printer – just the print server needs to be able to reach the printers. So if one printer gets pwned it does not affect the other printers. The same is true for building automation networks (like cameras, access control systems, attendance clock) or maybe your PCs don’t need to talk to each other – VoIP most likely needs to 😉
I hope I convinced you its an good idea, but how is it technically done.
Dynamic VLAN assignment
I recommend to use dynamic VLAN assignment via MAC or 802.1x authentication (via RADIUS Server) .Lets assume you’ve following setup:
- Edge: Layer 2 edge switch to which the clients are connected to
- Distribution: Layer 3 switch which aggregates multiple Layer 2 edge switches in the same building
- Core: aggregates the distribution switches in the data center
- Firewall: firewall between DMZ and between the different client network areas
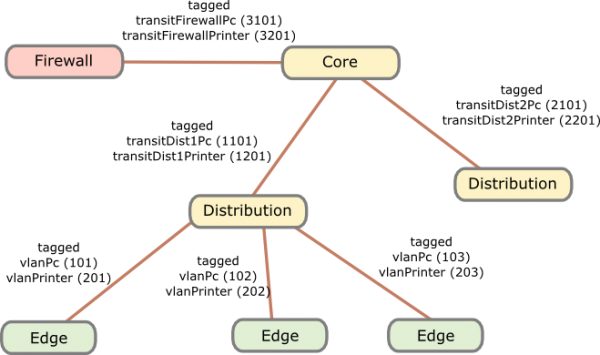
The names of the VLANs on every edge switch are the same, just the VLAN IDs are different. This allows the RADIUS server to return the name of the VLAN the switch should assign to a port or MAC. As the name is the same for all switches, the RADIUS server does not need to know the VLAN IDs. The RADIUS server just has a table that tells it which MAC or common name (in case of 802.1x EAP-TLS) does go into which VLAN. All your switches are configured exactly the same, just the management IP address and the VLAN IDs are different … that makes deploying and maintaining really easy.
For getting the traffic from the edge to the data center I recommend using VRF (Virtual Routing and Forwarding) and OSPF. Just assign the PC VLANs in one VRF and vlanPrinter in an other VRF. The link from the core to the firewall is also tagged. The firewall is now the only way to get from the PC network to the printer network.
I hope that example makes the setup clear, if now just write a comment.
Securing your client network 1: Enforce DHCP usage
June 14, 2015
In my last blog post I talked about going the full Layer 3 way and not building complex Layer2 subnets throughout your network. As many have the argument of security for building their networks this way I thought I write down how I secure client networks. With client networks I mean the part of the network client systems like PCs, phones, printer, … are connected to. Some of the articles and setups can also be used for the data center networks but thats an other story … 😉
All setups I describe in this series I have implemented in productions networks over the years and are therefore not stuff that only works in theory but they work in real life and solve real world problems. So lets start with something easy but which has real benefits not only for security – enforcing DHCP usage by all client systems.
Motivation
Sure, everybody knows for what DHCP is used but lets talk a little bit about the benefits besides not needing to configure each clients manually.
- If clients get their IP address via DHCP its easier to move the client systems to other subnets. So the need to extend your subnet over multiple switches decreases.
Result: Helps you to a more routed network and so simpler and more stable network. Clients can move through out your network and it just works. - It is also easier to change the client subnet if needed it for an upgrade/change of the network architecture.
Result: Makes much more flexible to change your network. - If you enforce the use of DHCP you also get an log file which client had which IP address at a given time and also to which switch port the client was connected. If there are static IP addresses in your network which you don’t control your log file ins incomplete.
Result: Audit logs in case you need to do a forensic investigation on how and by what systems an attack was carried out. Most systems log the IP address and you need to map that to a specify systems/location. - Also if you enforce the usage of DHCP, you can use the DHCP requests/replies for protection against of ARP spoofing (or at least mitigation) in your network.
Result: An attacker can not sniffer the traffic from an other client system in the same subnet. - If enforced, no idiot configures an IP address static which is also used dynamically.
Result: Quieter life for you. 😉
Implementation
To enforce DHCP usage we need to make sure that not using DHCP does not work. How can we do that? Simple – disable ARP learning on the Layer 3 switch, which is the default gateway of a client subnet. ARP (Address Resolution Protocol) is used to resolve IP addresses to MAC addresses, so if the default gateway needs to send a packet to a client systems and it does not know the MAC address (in its ARP table) – its not able to send the packet. Of course the setup needs to work for systems that use DHCP. How is this done? Also simple, the default gateway is most likely already configured as DHCP relay for the central DHCP server so it gets every request and reply. The DHCP reply contains the IP address assigned by the server and the MAC address of the client. The layer 3 switch just needs to write that into its ARP table. From this time on the IP address resolves always to that MAC address until a new DHCP rely provides and not MAC address for a given IP address.
For Extreme Networks switches (XOS) it is as simple as typing that lines per client VLAN/subnet:
enable ip-security dhcp-snooping vlan <vlanClient> port <ClientPorts> violation-action drop-packet snmp-trap

configure trusted-ports <UpLinkPorts> trust-for dhcp-server  (only once needed)

enable ip-security arp learning learn-from-dhcp vlan <vlanClient> ports <ClientPorts>

enable ip-security arp gratuitous-protection vlan Default

disable ip-security arp learning learn-from-arp vlan <vlanClient> ports <ClientPorts>
If the clients are connected directly to the layer 3 switch (default gateway for the client subnet) I recommend changing the first command to
enable ip-security dhcp-snooping vlan <vlanClient> port <ClientPorts> violation-action drop-packet block-port permanently snmp-trap
So that guy who did start a DHCP server in your network needs to call you, before it works again – otherwise I recommend configuring that this way on the switch the client is connected to.
Optional
Following setups / configurations should be done to increase the security in this part still more:
- Save the DHCP log file for a longer time period as is default for Windows DHCP servers which rotate every week and make sure all information you need is in the log file.
- Enable ARP spoofing protection also on the clients systems where possible (most likely on on PCs possible). Most enterprise endpoint protection systems allow such a configuration.
- Integrate the configuration of DHCP reservations (e.g. for printers) into your network authentication solution. It already needs to know the MAC address of the client so adding the IP address there is simple. It keeps also the DHCP scopes clean, so if a client is removed from the network authentication, it automatically removes the reservation from the DHCP server. The side benefit is that your service desk employees could also use this to create DHCP reservations without needing DHCP administrator privileges – and its often easier to have an audit log of the changes than on the Windows DHCP server.
Ghostery – prevent browser tracking
May 14, 2015
Sorry for not posting for a long time, but today I’ve again something for you. Its a Firefox plugin which allows you to easily block tracking sites. First what are tracking sites?
Lets say you want to visit www.example-a.com and your browser goes to that page. It loads the HTML page and that includes 1×1 pixel pictures from other domains or it loads java script code from other domains. e.g. like shown here (Adition – which is an advertising company):
![]()
These have mostly no other purpuse but to track you and get as much information about your system and you as is possible. The big tracking sites are not only used by www.example-a.com but also by www.example-b.com. So by using cookies and more subtle techniques they are able to track you over multiple sites and generate a profile about you. Only after installing the plugin I’ll show you, you’ll see how manny different tracking sites big sites are using to get you.
The software is called Ghostery and can be downloaed directly from the Mozilla guys here. Just click on the green button, no restart of Firefox is required.

Click on the light blue ghost image on the right upper side of your browser. Click through the tuturial and than I recommend to set all sites to block and only unblock sites that you need. For this click on the Ghostery icon and than on the settings icon followed by options.
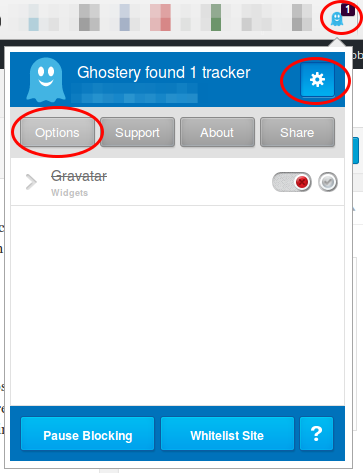
Now scroll down and click on select all and if asked if you want also new sites to be blocked and then click on save.

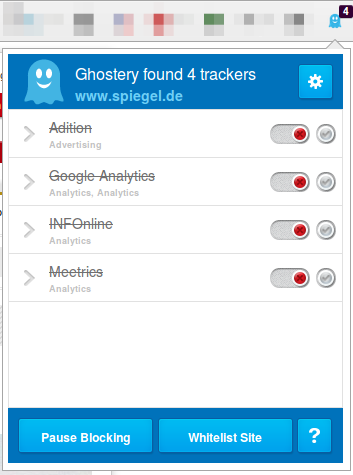
Now visit a big, prominent site and check the count. 4 sites like in this screen shot is low …. my personal record was 14 for one site – can you top it? Write in the comments.
Howto intercept the traffic of nearby smart phones or why you should disable WiFi in the public
December 8, 2014
This blog post will show you how easy it is to intercept the traffic of nearby smart phones, and there are no special tricks or know how needed. So lets start with a little background info:
Background
All major smart phone operating systems (e.g. Android, iOS) are keeping a list of WiFi networks you’ve be connected to and if WiFi is enabled on the phone and it sees the same SSID it will try to connect to it automatically. iOS also synchronizes the list of once connected SSIDs between your devices (iPhones, iPad and even a Mac) – so your list got a lot longer. For your encrypted home or company network this is an good idea, but this happens also for public hotspots which are unencrypted. It is possible (at least on Android) to configure the phone that it does not auto connect to a given SSID, but 95% of the user will not ever seen this option or use it.
For those that still think that hiding the SSID is a good idea, think again. It makes this attack even easier as following happens:
When you hide your wireless SSID on the router side of things, what actually happens behind the scenes is that your laptop or mobile device is going to start pinging over the air to try and find your router—no matter where you are. So you’re sitting there at the neighborhood coffee shop, and your laptop or iPhone is telling anybody with a network scanner that you’ve got a hidden network at your house or job.
SSIDs for the attack
After reading the background part, the attack vector should be obvious. We need to broadcast SSIDs the phones will automatically connect to. So what would be good SSIDs for this? There are some global ones like SSIDs from big hotel and fast food chains, than there are the ones that are big in a given nation like public transportation or telecommunication provider SSID. And at last there a big local players in the location the attack takes place. So how to get this SSIDs? Really simple, there are sites which help you finding them:
- e.g. following site which allows a search by chains and tells me e.g that the SSID for Starbucks is “WIFLY”
- or following site allows to search for airports and other bigger locations in a country. e.g. SSIDs for the Vienna airport is “Wireless Vienna Airport”
- and there are many more sites like this
but for some SSIDs you don’t need to look in the Internet, just check you’re phone and look around you.
- e.g. many who travelled with the RailJet train will have an “OEBB” SSID on their phones. And whats about the rail stations?
- Check the free WiFi SSID of your city e.g. in Innsbruck “Innsbruck Wireless“
So it should really easy to compile a list.
Hardware and Software for the attack
As we need multiple SSIDs broadcast-ed we need a hardware which allows us that and as we like it to be mobile a small embedded system like a Raspberry Pi would be nice. We also need a USB WiFi – one WiFi chip vendor which is often used for this is Atheros. And a USB UMTS/LTE stick for the up-link so we see some traffic going over our system. As software hostapd for the WiFi part and as a small DHCP/DNS server dnsmasq is commonly used. There are multiple programs to intercept the traffic which is routed over this system. I’ll not go into details on how to configure it all together so that it hopefully keeps script kiddies away.
Defence against the attack
There are several methods to minimize the attack surface, which I recommend all you use:
- The first and with the biggest benefit is to disable WiFi if not at home or work. Doing this manually won’t work (at least not for me) so I use llama on Android to enable WiFi if the GSM cell tells me I’m near my home. So I’m only vulnerable to if I’m near to my home or if I enable WiFi while travelling abroad and want to use a WiFi.
- Periodically remove SSIDs from your phone you don’t need any more. On Android this can be done on the phone. On iOS you can delete the SSIDs on your Mac which gets synchronized to your phone. Adding unencrypted SSIDs is a one click operation you I’ll recommend to remove all unencrypted ones.
- Make sure all traffic (like pop3, imap, smtp, xmpp, …) is encrypted and make sure it’s not “encrypt if possible” (why? take a look at that post) , you’ll never know when your phone roams into an insecure network. Even if the WiFi is not provided by the attacker, hotspots are normally not encrypted!
Outlook
With the same method it is also possible to attack the phone directly. Why is that important? Many providers assign only 10.x.x.x IP addresses to the phones and use “Carrier Grade NAT” (CGN) to translate that to “real” IP addresses. They mostly do this because of the amount of IPv4 addresses they would need otherwise, but it also does not allow connecting directly to the phones. And a targeted attack is much easier if you see the MAC address of the device and in this case you even don’t need an up-link. 🙂
Filter traffic from and to Tor IP addresses automatically with Mikrotik RouterOS
November 30, 2014
Some newer malware communicates with their command and control servers via the Tor network, in a typical enterprise network no system should connect the Tor network. A other scenario is that you’re providing services which don’t need to be accessed via the Tor network but your servers get attacked from Tor Exit Nodes. In both cases it may be a good defence to filter/log/redirect the traffic on your router. With Mikrotiks RouterOS this is possible. You need also a small Linux/Unix server to help. This server needs to be trustworthy one as the router executes a script this server generates. This is required as RouterOS is only able to parse text files up to 4096 by itself, and the Tor IP address list is longer.
Linux Part
So first we create the script /usr/local/sbin/generateAddTorIPsScript.sh on the Linux server with following content:
#!/bin/sh

# the full path of the file we create

filename=/var/www/html/addTorIPs.rsc
# remove the comment  if you want to use the List of All Current Tor Server IP Addresses

#url=http://torstatus.blutmagie.de/ip_list_all.php/Tor_ip_list_ALL.csv

# remove the comment  if you want to use the List of All Current Tor Server Exit Node IP Addresses

#url=http://torstatus.blutmagie.de/ip_list_exit.php/Tor_ip_list_EXIT.csv
echo "# This scrip adds Tor IP addresses to an address-list (list created: $(date))" > $filename

echo "/ip firewall address-list" >> $filename
/usr/bin/wget -q -O - $url | sort -u | /bin/awk --posix '/^[0-9]{1,3}\.[0-9]{1,3}\.[0-9]{1,3}\.[0-9]{1,3}/ { print "add list=addressListTor dynamic=yes address="$1" " ;}' >> $filename
The filename path works on CentOS, on Ubuntu you need to remove the html directory. Now make the file executable
chmod 755 /usr/local/sbin/generateAddTorIPsScript.sh
and execute it
/usr/local/sbin/generateAddTorIPsScript.sh
No output is good. Make sure that the file is reachable via HTTP (e.g. install httpd on CentOS) from the router. If everything works make sure that the script is called once a day to update the list. e.g. place a symlink in /etc/cron.daily:
ln -s /usr/local/sbin/generateAddTorIPsScript.sh /etc/cron.daily/generateAddTorIPsScript.sh
Mikrotik part
Copy and pasted following to get the script onto the router:
/system script

add name=scriptUpdateTorIPs policy=ftp,reboot,read,write,policy,test,password,sniff,sensitive source="# Script which will download a script which adds the Tor IP addresses to an address-list\

\n# Using a script to add this is required as RouterOS can only parse 4096 byte files, and the list is longer\

\n# Written by Robert Penz <[email protected]> \

\n# Released under GPL version 3\

\n\

\n# get the \"add script\"\

\n/tool fetch url=\"http://10.xxx.xxx.xxx/addTorIPs.rsc\" mode=http\

\n:log info \"Downloaded addTorIPs.rsc\"\

\n\

\n# remove the old entries\

\n/ip firewall address-list remove [/ip firewall address-list find list=addressListTor]\

\n\

\n# import the new entries\

\n/import file-name=addTorIPs.rsc\

\n:log info \"Removed old IP addresses and added new ones\"\

\n"
To make the first try run use following command
/system script run scriptUpdateTorIPs
if you didn’t get an error
/ip firewall address-list print
should show many entries. Now you only need to run the script once a day which following command does:
/system scheduler add interval=1d name=schedulerUpdateTorIPs on-event=scriptUpdateTorIPs start-date=nov/30/2014 start-time=00:05:00
You can use this address list now in various ways .. the simplest is following
/ip firewall filter

add chain=forward comment="just the answer packets --> pass" connection-state=established

add chain=forward comment="just the answer packets --> pass" connection-state=related

add action=reject chain=forward comment="no internal system is allowed to connect to Tor IP addresses" dst-address-list=addressListTor

add chain=forward comment="everything from internal is ok --> pass" in-interface=InternalInterface
Howto get an A+-Rating at Qualys SSL Labs with Apache 2.2
November 1, 2014
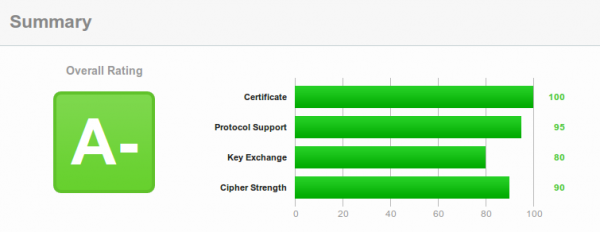
One of my HTTPS servers currently gets an A- on Qualys SSL Labs test, as I’m running Ubuntu 12.04 LTS with Apache 2.2 which does not support the ECHDE-Cipher suites, which is required for Perfect Forward Secrecy with the Internet Explorer.
Upgrading to Ubuntu 14.04 needs some major rework for which I currently don’t have the time for.But there is now a trick to get that A-Rating and it is called TLS Interposer. It uses LD_PRELOAD to intercept the OpenSSL API calls and adds some additional features and security settings.
Currently there is no deb package for Ubuntu 12.04, so we need to compile it for our-self:
wget https://github.com/Netfuture/tlsinterposer/archive/master.zip

unzip master.zip

cd tlsinterposer-master/

make
Possible errors:
make: cc: Command not found-> install the gcc (apt-get install gcc)tlsinterposer.c:29:25: error: openssl/ssl.h: No such file or directory–> Install the OpenSSL Development package (apt-get install libssl-dev)
Now we need only an make install and we’re ready to try it. For this we add
export LD_PRELOAD=/usr/local/lib/libtlsinterposer.so
at the end of
/etc/apache2/envvars
and restart Apache with
/etc/init.d/apache2 restart
And you get
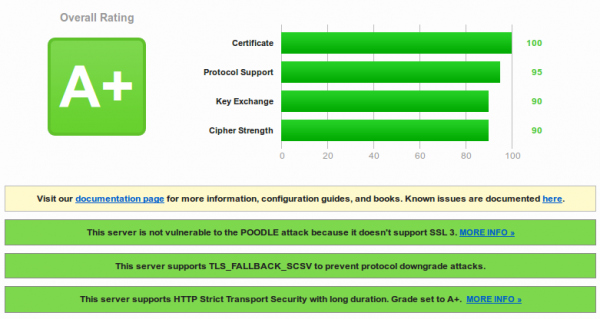
Success!!!
You need also following for an A+ Rating:
- Following needs to be still in the Apache config:
SSLProtocol ALL -SSLv2 -SSLv3

SSLHonorCipherOrder On

SSLCompression Off

# SSLCipherSuite settings will be ignored - You need to HSTS configured, check this link for how to enable it on Apache 2.2
So this is with Ubuntu 12.04 … I’ve tried the same with Centos 6 but I didn’t have success. Following problems did arise
1. Makefile
The Makefile does not support the names of the ssl libs on Centos 6 – when you compile, you get:
tlsinterposer.c:85: error: ‘DEFAULT_SSLLIB’ undeclared here (not in a function)
The Makefile has a regex that does not work with Centos 6. I changed following
# diff Makefile.orig Makefile

32c32

<       ldconfig -p | sed -n -e 's/^\t*\(libssl\.so\.[0-9]\.[0-9]\.[0-9]\).*/#define DEFAULT_SSLLIB "\1"/p' > $@

---

>       ldconfig -p | sed -n -e 's/^\t*\(libssl\.so\.[0-9][0-9]\).*/#define DEFAULT_SSLLIB "\1"/p' > $@
and deleted the file ssl-version.h and called make again and it compiled. I’ve reported that to author.
2. application’s cipher is not overwritten
Loading the TLS Interposer with putting it in /etc/sysconfig/httpd and than doing an /etc/init.d/httpd restart worked but the application’s cipher didn’t get changed. I could verify that with the test scripts which come with TLS Interposer:
# ./run_tests

gcc -O2 -Wall -Wextra simple_server.c -lcrypto -lssl -o simple_server

Test 1a pass

Test 1b FAIL!

Test 1c pass

Test 1d pass

Test 1e pass

Test 2a pass

Test 2b pass

Test 2c pass

Test 3a pass

Test 3b pass

Test 4a pass

Test 4b pass

Test 4c pass

Test 5a pass

Test 5b pass

Test 5c pass

Test 5d pass
I’ve reported that to the author. If I get an update on this I’ll report in my blog about this.
Check your hardening index of your Linux systems
October 6, 2014
I found a small program called Lynis, which does a system check of your Linux and Unix System. From the homepage:
Lynis is an open source security auditing tool. Primary goal is to help users with auditing and hardening of Unix and Linux based systems. The software is very flexible and runs on almost every Unix based system (including Mac). Even the installation of the software itself is optional!
To test a system is really easy, just download the tar.gz from here and extract the tar as root (otherwise it will complain) and change into its directory and call
./lynis -c
for the interactive mode (waits after each section) or
./lynis -q
for the quick mode which only logs the results to the log file. In both cases the log is written to /var/log/lynis.log.
For the following screenshots a I did setup a test system with some changes to show you some errors and warnings :-):
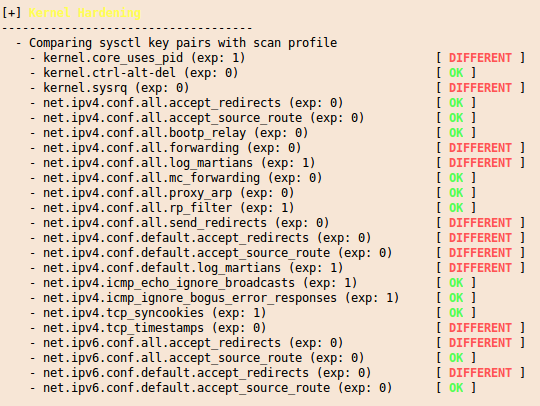
and at the end you get a summary with entries like this:
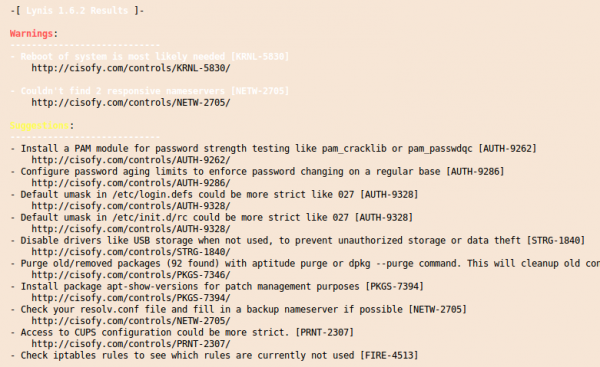
And you’ll get also a “Hardening index” which allows you to compare various systems against each other. 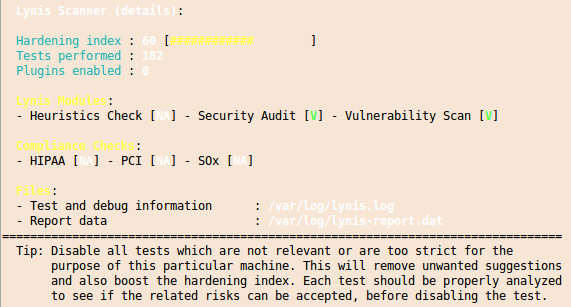

I you want to check multiple systems it it also possible to create an rpm file with the lynis.spec file from the Lynis homepage. You should run this software every time you setup a new system to make sure that you didn’t leave the big whole open.
Solution for high CPU load when using the flash player in the browser on Linux
September 17, 2014
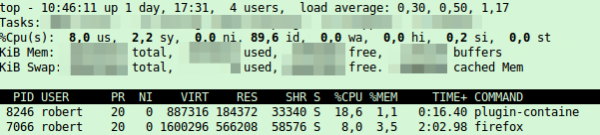
For some time now I wondered why I had such a high CPU load while watching e.g. YouTube videos, even if I’ve a Nvidia GeForce GTX 760 in my PC. Ok thats not the latest card, but normal HD video should be accelerated with it also. 20% CPU load on my modern CPU is too much for a simple YouTube video:
The solution is quite easy – the flash player has disabled the hardware acceleration by default. Following steps need to be done to enable it – as I only have an Nvidia card I was only able to test it for it, but looking around I found some tips for the other cards too.
- Check if you’ve
libvdpau1installed. On Ubuntu its done like this:
# dpkg -l | grep vdpau

ii libvdpau1:amd64 0.7-1 amd64 Video Decode and Presentation API for Unix (libraries) - You need a fitting graphics card driver:
- Nvidia: Nouveau and Closed Source driver should work
- AMD Radeon: You need the Mesa projects drivers (r300g, r600g or radeonsi)
- Intel: You need also following library/packaged installed:
libvdpau-va-gl1(as Intel supports only the libva interface for video acceleration)
- You need (most likely) to create following file
/etc/adobe/mms.cfgwith following content. It is possible that the directory and file exists in this case add the lines:
EnableLinuxHWVideoDecode=1

OverrideGPUValidation=1 - Now you need to make sure that the player is not running anymore:
# ps aux | grep plugin-containe

robert 8246 0.1 0.9 798312 153260 ? Sl Sep16 0:57 /usr/lib/firefox/plugin-container /usr/lib/flashplugin-installer/libflashplayer.so -greomni /usr/lib/firefox/omni.ja -appomni /usr/lib/firefox/browser/omni.ja -appdir /usr/lib/firefox/browser 7066 true plugin
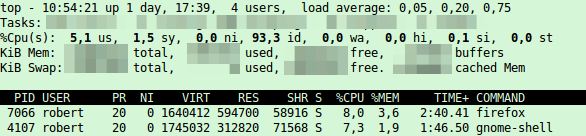
# kill 8246 - Now open the YouTube page again you tried before and top should show following – under 10% CPU Load, thats better.
Powered by WordPress
Entries and comments feeds.
Valid XHTML and CSS.
44 queries. 0.141 seconds.