
-

-

-

- Austria (27)
- General (16)
- HowTo (122)
- IT Security (129)
- Linux (127)
- Networking (65)
- Other (3)
-

- CDemu - a free, gpl cd/dvd-rom device emulator for linux
- heatpumpMonitor - Monitoring a Stiebel Eltron LWZ
- ignis backup tool - the heat-strengthened backup tool
-

- December 2021 (2)
- September 2019 (1)
- May 2019 (1)
- April 2019 (1)
- January 2019 (1)
- October 2018 (1)
- August 2018 (1)
- February 2018 (1)
- September 2017 (1)
- August 2017 (2)
- May 2017 (1)
- April 2017 (1)
- February 2017 (1)
- January 2017 (2)
- December 2016 (1)
- November 2016 (2)
- October 2016 (1)
- September 2016 (1)
- August 2016 (1)
- July 2016 (2)
- April 2016 (1)
- March 2016 (3)
- February 2016 (4)
- January 2016 (2)
- December 2015 (2)
- November 2015 (2)
- September 2015 (2)
- July 2015 (5)
- June 2015 (4)
- May 2015 (2)
- February 2015 (1)
- January 2015 (4)
- December 2014 (1)
- November 2014 (5)
- October 2014 (4)
- September 2014 (1)
- August 2014 (4)
- July 2014 (3)
- June 2014 (5)
- May 2014 (5)
- April 2014 (1)
- March 2014 (2)
- February 2014 (3)
- January 2014 (5)
- December 2013 (2)
- November 2013 (3)
- September 2013 (3)
- August 2013 (2)
- May 2013 (4)
- April 2013 (1)
- March 2013 (1)
- February 2013 (3)
- December 2012 (3)
- November 2012 (3)
- October 2012 (1)
- September 2012 (2)
- June 2012 (1)
- May 2012 (1)
- April 2012 (1)
- March 2012 (1)
- February 2012 (1)
- January 2012 (1)
- December 2011 (4)
- November 2011 (1)
- August 2011 (1)
- March 2011 (1)
- October 2010 (1)
- May 2010 (3)
- January 2010 (1)
- September 2009 (1)
- August 2009 (5)
- July 2009 (5)
- June 2009 (4)
- May 2009 (1)
- April 2009 (1)
- January 2009 (1)
- December 2008 (6)
- November 2008 (6)
- October 2008 (2)
- September 2008 (11)
- August 2008 (4)
- July 2008 (7)
- June 2008 (2)
- May 2008 (7)
- April 2008 (5)
- March 2008 (9)
- February 2008 (15)
- January 2008 (11)
- December 2007 (3)
Configure a Synology NAS as OpenVPN client with certificate authentication (and make it stable)
March 8, 2014
Normally I use standard Linux distributions as NAS systems, but in this case it had to be a real NAS (size and price was more important than performance) and it was not at my place –> so I chose a Synology DS214se. But I still needed to setup a certificate based OpenVPN where the NAS was the client and it needed to stay connected all the time. First I though that must be easily done in the GUI as OpenVPN is easy for stuff like this … but I was wrong. First it is not possible to configure a certificate based authentication for OpenVPN in the Synology GUI and secondly if the connection got disconnected it stayed that way. But with some magic it was easily fixed:
Configure Certificate based authentication
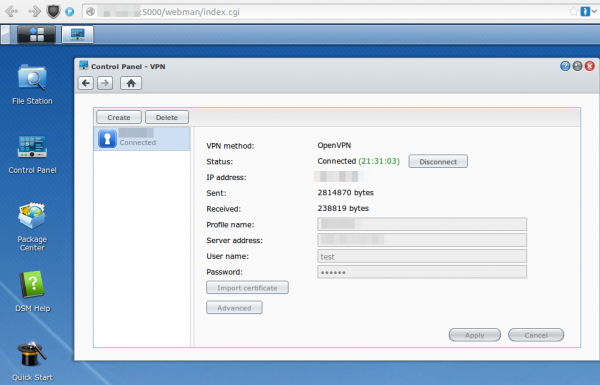
First go to the VPN window in Control Panel and configure what is possible via the GUI. e.g. the CA certificate or the server IP address or DNS name. Use anything as username/password:
After that save it .. but don’t connect as it won’t work. You need to log in via ssh (use username root and the admin user password) and change some files and upload some new.
cd /usr/syno/etc/synovpnclient/openvpn

ll
will give you something like this
drwxr-xr-x    3 root     root          4096 Feb 23 20:21 .

drwxr-xr-x    7 root     root          4096 Mar  7 21:15 ..

-rwxr-xr-x    1 root     root          1147 Feb 22 18:10 ca_234324321146.crt

-rw-r--r--    1 root     root           524 Mar  2 09:24 client_234324321146

-rw-------    1 root     root           425 Feb 22 18:10 ovpn_234324321146.conf
the file without extension is the configuration for OpenVPN, which gets created from the GUI. The GUI config is stored in the .conf file. So if we change the OpenVPN configuration file it gets overwritten if we change the GUI config, but we won’t do that anymore ;-). Now we create a sub directory and upload our client (=NAS) certificate files. The long and hopefully good documentation on creating the certificates and how to configure OpenVPN on a standard distribution can be found here.
mkdir keys

cat > keys/my_ds.crt    (paste the certificate content and press CRTL-D in an empty line)

cat > keys/my_ds.key  (paste the private key content and press CRTL-D in an empty line)

chmod 600 keys/my_ds.key
Now we change the file without extension so that it contains at leased following lines (other stuff is also required but depends on your setup)
ca ca_234324321146.crt

cert keys/my_ds.crt

key keys/my_ds.key

keepalive 10 120

tls-client
I recommend to make a copy of the file after very change so if someone changes something in the GUI you don’t need to start from the beginning.
cat client_234324321146 client_234324321146.backup
For simple testing start OpenVPN like this (stop it with CTRL-C):
/usr/sbin/openvpn --daemon --cd /usr/syno/etc/synovpnclient/openvpn --config client_234324321146 --writepid /var/run/ovpn_client.pid
And tune it until it works correctly. Now you can start it in the GUI and you’re finished with the first task.
Configure OpenVPN in a way that it keeps running
For this we write a script that gets called every five minutes to check if the OpenVPN is still working and if not restart its.
cat > /root/checkAndReconnectOpenVPN
if echo `ifconfig tun0` | grep -q "00-00-00-00-00-00-00-00-00-00-00-00-00-00-00-00"

then

echo "VPN up"

else

echo 1 > /usr/syno/etc/synovpnclient/vpnc_connecting

synovpnc reconnect --protocol=openvpn --name=XXXXXX

fi

exit 0
Replace XXXXXX with the name the VPN Connection has in the GUI (not sure if it is case sensitive or not, I kept the case anyway.) and make the script executable:
chmod +x /root/checkAndReconnectOpenVPN
Try it with (e.g. when the OpenVPN is running and not running)
/root/checkAndReconnectOpenVPN
Now we only need to add a line to the crontab file (Important it is >> and not >)
cat >> /etc/crontab
and paste and press CRTL-D in an empty line
*/5 * * * * root /root/checkAndReconnectOpenVPN
Now we only need to restart the cron daemon with following commands:
/usr/syno/etc/rc.d/S04crond.sh stop

/usr/syno/etc/rc.d/S04crond.sh start
and we’re finished … a certificate based OpenVPN which reconnects also if the process fails/stops.
9 Comments »
RSS feed for comments on this post. TrackBack URI
Leave a comment
Powered by WordPress
Entries and comments feeds.
Valid XHTML and CSS.
41 queries. 0.076 seconds.
Thanks 🙂 I am running DSM 5 and ran into a few problems.
1. open VPN would not start until i added:
echo conf_id=oXXXXXX > /usr/syno/etc/synovpnclient/vpnc_connecting
echo conf_name=iPredator >> /usr/syno/etc/synovpnclient/vpnc_connecting
echo proto=openvpn >> /usr/syno/etc/synovpnclient/vpnc_connecting
before the “synovpnc reconnect” line. oXXXXXX is the config id winth the p[ on the first line of:
cat /usr/syno/etc/synovpnclient/openvpn/openvpnclient.conf
2. S04crond.sh does not exist anymore. used instead:
/usr/syno/sbin/synoservicectl –restart crond
HTH someone else. working great now 😉
Comment by dave — June 26, 2014 #
Thanks Robert 🙂 I am running DSM 5 and ran into a few problems.
1. open VPN would not start until i added:
echo conf_id=oXXXXXX > /usr/syno/etc/synovpnclient/vpnc_connecting
echo conf_name=iPredator >> /usr/syno/etc/synovpnclient/vpnc_connecting
echo proto=openvpn >> /usr/syno/etc/synovpnclient/vpnc_connecting
before the “synovpnc reconnect” line. oXXXXXX is the config id winth the p[ on the first line of:
cat /usr/syno/etc/synovpnclient/openvpn/openvpnclient.conf
2. S04crond.sh does not exist anymore. used instead:
/usr/syno/sbin/synoservicectl –restart crond
HTH someone else. working great now 😉
Comment by dave — June 26, 2014 #
Hi,
It’s not working for me. I did this script :
#!/bin/sh
if echo `ifconfig tun0` | grep -q “00-00-00-00-00-00-00-00-00-00-00-00-00-00-00-00”
then
echo “VPN is running”
else
echo conf_id=CONFID > /usr/syno/etc/synovpnclient/vpnc_connecting
echo conf_name=DS409 >> /usr/syno/etc/synovpnclient/vpnc_connecting
echo proto=openvpn >> /usr/syno/etc/synovpnclient/vpnc_connecting
synovpnc reconnect –protocol=openvpn –name=DS409
fi
exit 0
When I connect via the DSM 5.0 gui, it connects. If I run the script via Putty, like this, it works but connection is not up :
DiskStation> sh openvpn_connect.sh
get arguemnt protocol: openvpn
get arguemnt name: DS409
Reconnect [DS409] … done
DiskStation>
Looking at connection status :
DiskStation> synovpnc get_conn –name=DS409
get arguemnt name: DS409
No connection!!
I gave full rights :
DiskStation> ls -lrt openvpn_connect.sh
-rwxrwxrwx 1 jose users 269 Dec 9 11:35 openvpn_connect.sh
DiskStation>
Help would be very welcome. Thanks
Comment by Jo — December 9, 2014 #
Hello
Could you make the same tutorial but for L2TP/IPSec when the Synology is the client?
Thanks
Comment by James — December 7, 2015 #
Hello!
I am very late to this but I wonder if you can tell me how to stop my ccd file from being overwritten with 255.255.255.0!
Many thanks,
James
Comment by Lester Lane — May 4, 2018 #
Any chance for updated directions on DSM >6.3 ?
And a guide for IKEv2 (until wireguard is non beta)
🙂
Comment by herbert — December 27, 2019 #
Hi there
Do you know how I can port foward with OPENVPN on Synology?
Reason why I’m doing this is I’m webhosting and would like to hide my IP address
Thanks
Comment by James — August 31, 2021 #
I just came across this as I was looking fro this solution. I am currently using DSM 7 and was wondering if you will be having an update that could be used for DSM 7.
There are some important changes to DSM 7 and am very interested in learning how to do this using DSM 7. I am good on CLI but this aspect of security is something I am learning.
Please advise at earliest opportunity.
Best
Carl
Comment by Carl Fitzsimmons — February 23, 2022 #
I don’t have a Synology anymore – sorry can’t help you.
Comment by robert — February 23, 2022 #