A howto for using a Canon PIXMA MG4250 under Ubuntu
December 7, 2012
We’ve bought a new multi functions printer at home, a Canon PIXMA MG4250 and as we’re a Linux shop (PCs and notebooks under Linux, mobiles and tablets under Android) I needed to make the printer work under Ubuntu, in our case Ubuntu 12.04, but the solution should work also under newer versions. We’ve connected the printer via WiFi and therefore need both printing and scanning to work via WiFi.
At least at the time of writing this blog post, searching for a driver or howto was not that easy, specially if you search on the US or European Canon Site …. you need to got the Asian site. You wont find the MG4250 listed there but the MG4270. Take it. I should lead you to a driver site where you can choose “Linux” and than 2 links are interesting for you
- MG4200 series ScanGear MP Ver. 2.00 for Linux (debian …
- MG4200 series IJ Printer Driver Ver. 3.80 for Linux (debian …
I provided direct links to the drivers above but the version may change or the URLs themselves – so maybe the links are broken at the time you’re reading it – in this case you need to click through the site to the new pages.
As you see the drivers are generic for the whole MG4200 series so we’re good. Download the tar.gz files and open a console (e.g. CTRL-ALT-T) and change to that directory.
Printing Part
Lets start with the printing part by extracting the tar.gz and changing into the newly created directory.
$ tar xzf cnijfilter-mg4200series-3.80-1-deb.tar.gz

$ cd cnijfilter-mg4200series-3.80-1-deb/
And let the installation process begin with (if prompted for a password use your user password )
$ ./install.sh
After installing the packages you will be asked some questions. The first one is to connect your printer and switch it on. This is followed by the connection method you’re using (USB vs network). In the case of network it will broadcast within the same subnet, so it only works if the PC and the printer are on the same subnet. After it detected the printer you need knowledge that and choose if it should be the default printer.
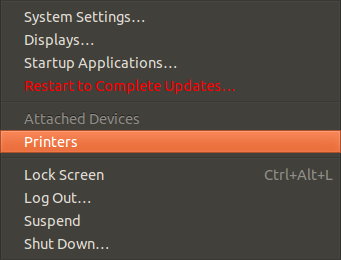
After all this just go to the most top right icon and click onto it to the following menu, choose printers …

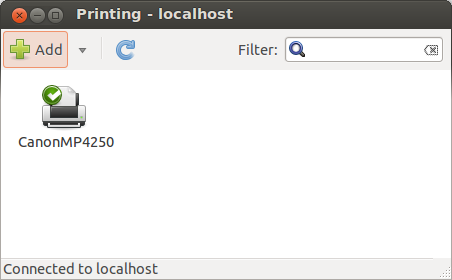
…. and it should show you following with your printer:

Ok, printing is working … lets go to scanning
Scanning Part
As with the printing part extract the tar.gz and change into the newly created directory.
$ tar xzf scangearmp-mg4200series-2.00-1-deb.tar.gz

$ cd scangearmp-mg4200series-2.00-1-deb/
And again we’re using the install script (if prompted for a password use your user password ).
$ ./install.sh
You’ll be asked no questions and after the installation just start the scanning program with following command
$ scangearmp
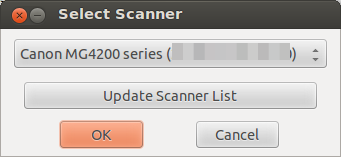
It will show you an error message that no configured scanner has been detected, click Ok. Now following window is shown:

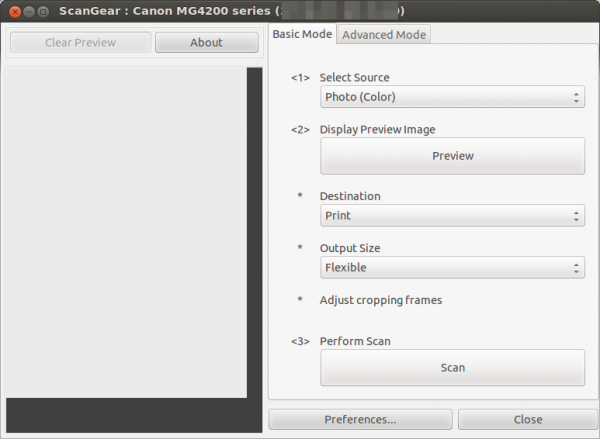
In the case of the first start the list is empty, you need to click onto “Update Scanner List”, after this you should see the same window with your printer. Click onto Ok and you get following:

And we’re done.
Update for Ubuntu 13.10 (and possible other versions) users:
If you get following error message:
Unpacking cnijfilter-mg4200series (from .../cnijfilter-mg4200series_3.80-1_amd64.deb) ...

dpkg: dependency problems prevent configuration of cnijfilter-mg4200series:

cnijfilter-mg4200series depends on libtiff4; however:

Package libtiff4 is not installed.
dpkg: error processing cnijfilter-mg4200series (--install):

dependency problems - leaving unconfigured

Errors were encountered while processing:

cnijfilter-mg4200series
Just install the library with
$ sudo apt-get install libtiff4
and the call the install.sh again and it will work.
62 Comments »
RSS feed for comments on this post. TrackBack URI
Leave a comment
Powered by WordPress
Entries and comments feeds.
Valid XHTML and CSS.
41 queries. 0.068 seconds.


Thanx, worked great, also for my MG6450! I used the MG6470 link and got the MG6400 series IJ Printer Driver Ver. 4.00 for Linux (debian Packagearchive)driver
Comment by SteBo1970 — April 18, 2016 #
Awesome ! Worked fine for me in May 2016 on Ubuntu 15.10 with my MG4250. One change – didn’t get asked any questions having run the printer driver installer, so there was no printer icon when I ran the “Printers” utility. However, I just clicked Add Printer and it appeared in the list. Thanks !!!
Comment by Drew — May 29, 2016 #
Thank you.
Nice Tuturial. Worked for me with Deepin 15.2 x64;
Comment by Daniel Costa — July 22, 2016 #
Worked great, thank you for the tutorial!
Comment by Nils M — October 3, 2016 #
Thank you for the tutorial! It is really easy to follow.
Comment by Chiara — November 9, 2016 #
Worked first time. I have installed this under Linux Mint 17.3
Comment by LoopZilla — January 25, 2017 #
It worked for installing MG4250 using a wireless network. Thanks so much for this tutorial :).
Comment by Alex — May 3, 2017 #
Thank you – worked fine on a unbuntu 17.10 desktop pc just this week.
Guess only part missing is you need to download to your downloads folder in firefox, not use archive manager, then
cd/ Downloads
to install the scanner after downloading the printer and installing it, if using the same terminal, will need to go back a directory, just use
cd..
many thanks
Comment by Simon Ball — April 6, 2018 #
Thank you for the guidance..
Comment by Kavn — July 11, 2019 #
This is really helpful information
Comment by Richard — July 30, 2019 #
I have been searching about this issue finally when I read this article I get to know the correct information about it and I found this information is relevant. Thanks for sharing this. Here we share easy tips to Canon Pixma MX490 setup.
Comment by Canon Pixma MX490 setup — October 11, 2019 #
Unable to locate libtiff4 (July 2020)
Comment by John Sampson — July 25, 2020 #